UH9000 UHF CB Transceiver For more exciting new products please visit our website: Australia: www.uniden.com.
Contents Introduction Controls & Connectors Indicators Included with your Transceiver Optional Accessories Connecting the Microphone Mounting the MIC Hanger Slide Mount Bracket Operation Turning on the Power LCD Flip Setting the Squelch Level Monitor Setting the Volume Selecting a Channel Smart-Key Function Voice Enhancer (EQL) Setting Programming the Instant Priority CH-1 Programming the Instant Priority CH-2 Recalling the Instant Channel Triple Watch Trans
Contents Manually Programme a RX channel Search Extra Channel Range and Programme a RX Channel CTCSS Codes Table DCS Codes Table Channel Bank List - Police (POL) Channel Bank List - Fire UHF CB Channel Guidelines UHF CB Channels & Frequencies Warranty UNIDEN UH9000 3 32 33 34 35 36 37 38 39 41 UHF CB Transceiver
Introduction The Uniden UH9000 is designed to provide you with years of trouble free service. Its rugged components and materials are capable of withstanding harsh environments. Please read this Operating Manual carefully to ensure you gain the optimum performance of the unit.
Introduction Preventive Maintenance The following system checks should be made every six to twelve months: • Check the Standing Wave Ratio (SWR). • Inspect the tightness of all electrical connections. • Inspect the antenna coaxial cable for wear or breaks on the shielding. • Inspect the tightness of all screws and other mounting hardware. Troubleshooting Should the unit malfunction or perform poorly, follow these procedures: If the transceiver is completely inoperative: Check the power cord and fuse.
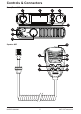
Controls & Connectors Base (Front & Rear) 1 2 3 4 5 6 7 8 16 Speaker MIC 9 15 14 UNIDEN UH9000 10 13 11 12 6 UHF CB Transceiver
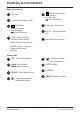
Controls & Connectors Base (Front & Rear) 1 MIC Jack 2 Liquid Crystal Display (LCD) 3 Menu Button /Monitor function (press & hold) - Move Selection 4 5 Channel Scan button /Scan Memory (press & hold) - Move Selection 6 Power Input Connection 7 EXT SP - External Speaker Jack PUSH control - Volume /Channel Select (press) /Power On/Off (press & hold) 8 UHF Antenna Connection ROTARY control - Volume /Channel /Menu Item Selector Speaker MIC 9 PTT - Push To Talk Button 10 SCAN - Scan Button /MEM -
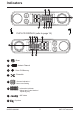
Indicators 8 7 6 5 4 3 2 1 FLIP LCD DISPLAY (refer to page 15) 5 1 2 3 4 6 7 1 2 3 4 5 8 - Scan - Instant Channel - Scan CH Memory - Scramble - Channel Indication / Menu Item Setting - Information Indicator 6 - (Menu Item/ Code Number / Alpha tag etc.
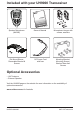
Included with your UH9000 Transceiver UHF 0 UH90ei0ver ansc CB Tr site: t our web se visi .au ucts plea new prod .uniden.
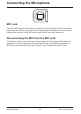
Connecting the Microphone MIC Jack Push the MIC plug at the end of the microphone into the MIC jack until the connection locks into place. Gently tug the MIC cord to test that the connection is locked. Use the rubber cover which is on the MIC cord to seal the MIC jack entry from dust. Disconnecting the MIC from the MIC Jack Pull back the rubber cover and move it down along the cord.
Mounting the MIC Hanger The Microphone Hanger comes in two parts. How and where you mount the MIC hanger will determine which parts to use. Conventional Mounting with Screws Use the front part of the MIC Hanger only. Locate a suitable mounting position and mark and drill two 3mm holes. Fix the MIC Hanger into place with screws. Conventional Mounting with Double Sided Tape (not supplied) High quality Double-Sided tape can be found at good retail stores.
Slide Mount Bracket How to attach Slide Mount Bracket? When you unpack the box, ensure that you have the slide mount bracket, guide rails and the screws. Align the guide rails along the side of the base and insert them into the slots provided. Then use the screws to lock them securely in position. BASE unit with secured guide rails.
Slide Mount Bracket Slide the bracket along the guide rails to attach the bracket to the unit.
Operation Turning on the Power Press and hold rotary knob. Low-Voltage/High-Voltage Alert The UH9000 can operate on 12VDC (13.8V) or 24VDC (27.6V) power supply, with the range between 10.8VDC to 28.8VDC. NOTE If the power supply voltage exceeds approx. 30VDC, an alert tone sounds and HI flashes for 5 seconds. The power source must not exceed 32VDC otherwise permanent damage may occur to your radio, which may not be covered by the manufacturer’s warranty. If the input voltage falls below approx.
LCD Flip 1. Press 20 times. The Flip setting flashes. 2. Turn the rotary knob or press orientation. 3. Press and hold / on the microphone to change the flip to save & exit from the menu mode. Setting the Squelch Level Press once, SQL shows and the current squelch level will flash. Turn the rotary knob or press to select the desired squelch level. NOTE If a button is not pressed within 10 seconds the UHF CB Radio will automatically exit the Menu Mode.
Operation 1 - max sensitivity (min squelch) 5 - med sensitivity (med squelch) 9 - min sensitivity (max/tight squelch) NOTE You must select a channel which is not in use before setting the SQUELCH control. (see page 17 for “Selecting a Channel”). Think of the squelch control as a gate. If you turn Squelch fully clockwise it raises the ‘Squelch gate’ so high that no signals get through. If you turn Squelch fully counter clockwise it lowers the ‘Squelch gate’ so low that noise gets through.
Operation Setting the Volume Turn the rotary knob to select desired volume. Selecting a Channel Press the rotary knob once and turn the rotary knob to select channel. NOTE For your reference a list of the available channels, corresponding frequencies and guidelines for their use is printed on page 34 - page 40. For Australia, Channels 05 and 35 are reserved for Emergency Calls.
Operation Voice Enhancer (EQL) Setting Choose from 4 different receive audio level settings to provide a natural Voice Enhancer for super clarity and performance.
Operation Triple Watch Triple watch will continuously monitor the two Instant Channel and the current channel for activity (see Programming the Instant Priority Channel-1/Channel-2, page 18). Press [TRIPLE] to switch Triple watch On/Off. • Every 1.5 seconds the Instant channel is monitored for 40msec. • Triple watch function stops temporarily when receiving a signal. NOTE • Triple watch function is invalid in Scan mode. Transmitting The UH9000 transmits only on UHF-CB Channels.
Operation CTCSS (Continuous Tone Coded Squelch System) & DCS (Digital Coded Squelch) Turn the rotary knob to desired channel to use CTCSS or DCS. 1. Press 3 times. Sub-code setting appears. / on the microphone to select desired 2. Turn the rotary knob or press CTCSS code 01 - 38 or DCS code 01 - 104. To turn off CTCSS/DCS select the oF code. 3. Press & hold to save & exit menu mode. Scramble On/Off Scramble enables private communications by scrambling the voice signal.
Operation Using Repeater Channels UHF CB repeaters are used to retransmit or relay your signal. Repeaters will extend the range of your radio and overcome the shielding effect caused by solid obstructions. In normal Simplex operation, your radio transmits on one particular frequency and receives on that same frequency. If there is a barrier that partially blocks your transmitted signal, the probability of another radio receiving the signal is very slim. Hills, tall buildings, metallic structures,...
Operation Operating the UHF CB Radio in Duplex Mode For this example we are adopting CH01 as the channel being used in your area for repeater use. 1. Press 5 times. The duplex setting flashes. / on the microphone to change the 2. Turn the rotary knob or press setting between simplex and duplex (“ r ” for repeater channels 01 - 08 or “ n “ for repeater channels 41 - 48). 3. Press to store the setting. to save & exit the menu mode. Only channels 01 - 08 and 41 4.
Operation Scanning The Scan feature allows you to search for active channels automatically. There are 3 scanning modes; Open Scan (OS), Group Scan (GS) and Master Scan (MS) During SCAN the UH9000 only checks channels or frequencies that are in the SCAN Memory, which are indicated by the M (memory) icon (●). The UH9000 maintains two SCAN Memories; one for Open Scan (OS) mode and the other for Group Scan (GS mode, to give you flexibility and allow you to use the radio more effectively.
Operation MASTER SCAN Mode MASTER SCAN is the default scan mode and is enabled to allow continual communication across congested channels. Master Scan scans channels stored into GS Memory and only opens the squelch for signals with the correct subcode (CTCSS or DCS tone). To achieve this, all radios in your group must have the same channels in GS memory (group channels) and use the same Subcode (CTCSS or DCS tone).
Operation 4. Turn the rotary knob or press DCS code 01 - 104 / CTCSS: 5. Press to select desired CTCSS code 01 - 38 or DCS: to store the setting. 6. Press and hold to save & exit the menu mode. Open Scan (OS) Mode All UHF-CB, user-programmed extra RX channels, Police and Fire & Ambulance frequencies have been added to the OS SCAN Memory for convenience. To add/remove channels from OS SCAN Memory, refer to page 23. Allows continuous scanning of all selected channels.
Operation Group Scan (GS) Mode GS Mode has CH09 to CH20 in the SCAN Memory by default. Channels must be stored to the GS SCAN Memory before group scan can start. To add/remove channels from GS SCAN Memory, refer to page 23. Includes the accessory feature Priority Watch which allows you to only monitor Instant Priority Channel-1 while scanning (see page 18 for setting Instant Priority Channel and page 27 to turn on Priority Watch).
Operation Priority Watch To switch Priority Watch On/Off; 1. Press 6 times. The Priority Watch setting flashes. 2. Turn the rotary knob or press between ON or OFF. 3. Press and hold / on the microphone to change the setting to save & exit from the menu mode. NOTE If SCAN is deactivated while it is tuned to an active channel, the UH9000 will stay on that active channel. If none of the channels are active, the UH9000 will reinstate the scan start channel.
Operation Call Tone The radio is equipped with 10 selectable call tones that will be transmitted when [S] is press when Smart key is set to Call Tone function. 1. Press 13 times. The CTONE setting flashes. 2. Turn the rotary knob or press / on the microphone to change the selection. The 10 call tones are CTONE 1 to CTONE 10. 3. Press and hold to save & exit from the menu mode. Roger Beep 1. Press 14 times. The ROGER setting flashes. 2. Turn the rotary knob or press setting between ON or OFF. 3.
Operation Internal Speaker The internal speaker can be switch ON or OFF. 1. Press 16 times. The INTSP setting flashes. 2. Turn the rotary knob or press setting between ON or OFF. 3. Press and hold / on the microphone to change the to save & exit from the menu mode. Mic Gain Control To control the gain (sensitivity) of microphone. 1. Press 17 times. The MIC-G setting flashes. 2. Turn the rotary knob or press / on the microphone to change the Mic Gain setting between (Low) -6, -5, -4....
Operation Backlight Brightness 1. Press 19 times. The BRIGHT setting flashes. 2. Turn the rotary knob or press / on the microphone to change the setting between Off (oF), 1(Lo), 2(mid) and 3(Hi). 3. Press and hold UNIDEN UH9000 to save & exit from the menu mode.
Operation - Special Features Channel Banks The UH9000 has three banks (groups) of channels to select from; CB POL (Police) FIRE UHF CB + User programmable RX channels¹ Pre-programmed Police frequencies² Pre-programmed Fire & Ambulance frequencies² When the POL is showing then pre-programmed police channels will be available. When the FI is showing then pre-programmed fire & ambulance channels will be available. The police, fire & ambulance frequencies have channel numbers.
Operation - Special Features 100 User Programmable RX Channels The UH9000 has 100 receive only channels (CH81 to CH180) which can be programmed with frequencies ranging from 400-520MHz (in 12.5kHz steps). The extra RX channels only appear, as part of the CB channel bank, when a frequency has been programmed to a channel. There are two ways to programme RX channels; 1. If you know the frequency you may manually programme it to a channel. 2. Search extra channel range and programme it to a channel.
Operation - Special Features Search Extra Channel Range and Programme a RX Channel UH9000 can search extra channel range (400MHz-520MHz) per 12.5KHz step. Then you can store the stay frequency to extra channel. Turn power off Press and hold while turning power on (pressing rotary knob). The channel indicator flashes the lowest available empty channel. You may use the rotary channel selector to select another channel from CH81 - CH180. to start scanning.
CTCSS Codes Table Code No. Frequency (Hz) Code No. Frequency (Hz) “oFF’ OFF 20 131.8 1 67.0 21 136.5 2 71.9 22 141.3 3 74.4 23 146.2 4 77.0 24 151.4 5 79.7 25 156.7 6 82.5 26 162.2 7 85.4 27 167.9 8 88.5 28 173.8 9 91.5 29 179.9 10 94.8 30 186.2 11 97.4 31 192.8 12 100.0 32 203.5 13 103.5 33 210.7 14 107.2 34 218.1 15 110.9 35 225.7 16 114.8 36 233.6 17 118.8 37 241.8 18 123.0 38 250.3 19 127.
DCS Codes Table 1 DCS Code (Octal) 023 36 DCS Code (Octal) 223 71 DCS Code (Octal) 445 2 025 37 225 72 446 3 026 38 226 73 452 4 031 39 243 74 454 5 032 40 244 75 455 6 036 41 245 76 462 7 043 42 246 77 464 8 047 43 251 78 465 Code No. Code No. Code No.
Channel Bank List - Police (POL) Code No. 1 Frequency (MHz) 419.95000 Frequency (MHz) 468.27500 Code No. 26 Code No. 51 Frequency (MHz) 468.85000 2 465.50000 27 468.30000 52 468.87500 3 465.97500 28 468.32500 53 468.90000 4 466.25000 29 468.35000 54 468.92500 5 466.77500 30 468.37500 55 468.95000 6 466.85000 31 468.40000 56 468.97500 7 467.12500 32 468.42500 57 469.00000 8 467.65000 33 468.45000 58 469.02500 9 467.85000 34 468.47500 59 469.05000 10 467.
Channel Bank List - Fire 1 Frequency (MHz) 410.60000 36 Frequency (MHz) 413.27500 2 410.80000 37 413.30000 72 463.05000 3 411.01250 38 413.32500 73 463.12500 Code No. Code No. Code No. 71 Frequency (MHz) 462.86250 4 411.03750 39 413.35000 74 463.27500 5 411.06250 40 413.36250 75 463.32500 6 411.08750 41 413.37500 76 463.65000 7 412.32500 42 413.38750 77 463.70000 8 412.45000 43 413.40000 78 463.87500 9 412.47500 44 413.42500 79 465.02500 10 412.
UHF-CB Channel Guidelines Always listen on a channel (or observe the receive signal level meter) to ensure it is not already being used before transmitting. Channels 5 and 35 are used for emergency channels. CTCSS and DCS will not operate on these channels. NOTE Please follow these guidelines for channel use in Australia: • Channels 05 and 35 are Emergency Channels. • Channel 11 is a Calling Channel.
UHF-CB Channels and Frequencies CH No. Simplex Mode Transmit / Receive Frequency (MHz) Duplex Mode Transmit Frequency (MHz) CH No. Simplex Mode Transmit / Receive Frequency (MHz) 1 476.425 477.175 (CH31) 21 476.925 2 476.450 477.200 (CH32) 22 476.950 (RX only) 3 476.475 477.225 (CH33) 23 476.975 (RX only) 4 476.500 477.250 (CH34) 24 477.000 5 476.525 477.275 (CH35) 25 477.025 6 476.550 477.300 (CH36) 26 477.050 7 476.575 477.325 (CH37) 27 477.075 8 476.600 477.
UHF-CB Channels and Frequencies CH No. Simplex Mode Transmit / Receive Frequency (MHz) Duplex Mode Transmit Frequency (MHz) CH No. 41 476.4375 477.1875 (CH 71) 61 42 476.4625 477.2125 (CH 72) 62 43 476.4875 477.2375 (CH 73) 63 44 476.5125 477.2625 (CH 74) 64 477.0125 45 476.5375 477.2875 (CH 75) 65 477.0375 46 476.5625 477.3125 (CH 76) 66 477.0625 47 476.5875 477.3375 (CH 77) 67 477.0875 48 476.6125 477.3625 (CH 78) 68 477.1125 49 476.6375 69 477.1375 50 476.
Warranty UNIDEN UH9000 UHF CB Transceiver IMPORTANT: Satisfactory evidence of the original purchase is required for warranty service Please refer to our Uniden website for any details or warranty durations offered in addition to those contained below. Warrantor: The warrantor is Uniden Australia Pty Limited ABN 58 001 865 498 (“Uniden Aust”).
Warranty Our goods come with guarantees that cannot be excluded under the Australian Consumer Law. You are entitled to a replacement or refund for a major failure and for compensation for any other reasonably foreseeable loss or damage. You are also entitled to have the goods repaired or replaced if the goods fail to be of acceptable quality and the failure does not amount to a major failure.
UNIDEN UH9000 43 UHF CB Transceiver
© 2016 Uniden Australia Pty Limited. Printed in Vietnam.