XDECT R055
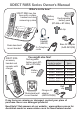
XDECT R055 Series Owner's Manual What's in the box? XDECT R055 two-line base with cordless handset and dual answering system Battery cover Rechargeable battery pack (BT-694 or BT-694s) Belt clip Desk stand/wall mount bracket XDECT R005 accessory handset and repeater with charger Headset (HS910) 2 x Telephone cords Base AC adapter (AAD-041S(M)) You might also find: Rechargeable battery pack (BT694 or BT-694s) Battery cover Desk stand/wall mount bracket If you purchased model number: XDECT R055 XDEC
What's in the manual? Installing Your Phone.................................1 Setup the Base..........................................1 Setup the Repeater/Charger(s) (if included)................................................4 Setup the Handset(s).................................5 Using the Belt Clip ....................................6 Test the Connection...................................7 Using the Repeater....................................8 Getting to Know Your Phone...................
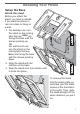
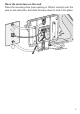
Installing Your Phone Setup the Base W A L L Attach the stand Before you attach the stand, you have to decide if you want the phone to rest on a desk or hang on a wall. 111 For desktop use, turn the stand so the locking tabs that say Desk are facing the base with the arrows pointing up. OR For wall mount use, turn the stand so the locking tabs that say wall are facing the base with the arrows pointing down. 222 Align the stand with the notches on the base.
Connect the power and telephone cord(s) 111 Connect the base AC adapter to the DC IN 9V jack and route the cord as shown: For desktop use DC IN 9V PRIMAR For wall mount use Y LIN E TE L LI NE 2 DC IN 9V PRIM AR Y LIN E TE L LINE 2 222 Connect one of the included telephone cords to the PRIMARY LINE jack. If you wish to connect a second telephone line then remove the label cover to access the TEL LINE 2 jack. Connect the second telephone cord to the TEL LINE 2 jack. Route the cords as shown above.
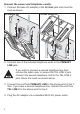
Place the main base on the wall Place the mounting slots (hole spacing is 100mm vertical) over the pins on the wall plate, and slide the base down to lock it into place.
Setup the Repeater/Charger(s) (if included) Connect the repeater/charger power cord 111 If your phone came with any accessory handsets and chargers, connect a charger AC adapter to each charger's DC IN 9V jack and set the plug into the notch as shown. (These adapters might already be connected.) 222 Plug the other end of the adapter into a standard 240V AC power outlet. Attach the stand 333 To attach the stand, you have to decide if you want the repeater to rest on a desk or hang on a wall.
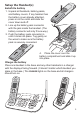
Setup the Handset(s) Install the battery 111 Unpack all handsets, battery packs, and battery covers. If any handset has the battery cover already attached, press in on the notch and slide the cover down and off. 222 Line up the battery pack connector with the jack inside the handset. (The battery connector will only fit one way.) 333 Push the battery pack connector in until it clicks into place. Tug gently on the wires to make sure the battery pack is securely connected.
If... Try... a charge light doesn't turn on --reseating the handset. --checking the AC adapter connection. Charge all handsets completely (about 15 hours) before using them. When fully charged the battery will provide up to 8hrs talk time and 7 days standby time. Using the Belt Clip To attach the belt clip Line up the holes on each side of the handset. Insert the belt clip into the holes on each side of the handset. Press down until it clicks.
Test the Connection Pick up the handset from the base and press TALK/FLASH.. The phone should pick up line 1 automatically and change the display to show Talk , and you should hear a dial tone. When you get a dial tone, make a test call; press End to hang up. If... Try... the base display says Check or you don't hear a dial tone checking the connection between the base and the phone jack: make sure the cord is connected to PRIMARY LINE.
Using the Repeater How it works An XDECT R005 repeater can extend the range of your base in all directions, including up and down. The XDECT R005 repeater unit is also a charger for the accessory handset. Each handset will automatically connect to the repeater or the base, depending on which signal is stronger, and the handset operates exactly the same way whether it's connected to the base or to the repeater. The repeaters must be registered to the base before you can use them.
Repeaters can be up to 3 chain-links (maximum) from the base Example of coverage area with 6 repeaters (maximum total) You can roam anywhere within range of the base or the repeater(s) and make and receive calls as usual from your handsets. If you want to use the repeater with a new base, simply register the repeater to the new base (see page 50). The repeater overwrites its own link to the base.
Picking the best spot The best spot for the repeater is as far from the base as possible while still maintaining a good signal, or near the edge of the base’s coverage area. To find the edge of the coverage area: 111 Stand near the base and make a call on the handset. 222 While on the call, carry the handset away from the base towards the general area where you want to put the repeater. 333 Watch the signal strength icon on the handset. Make a note where the icon drops from 4 bars to 3 bars.
Getting to Know Your Phone Parts of the Base If the key name is spelled out on the key itself, it's not labeled in the drawing below. PLAY/STOP PHONEBOOK/ LEFT Display Charging contacts Soft keys UP DOWN CALLER ID/ RIGHT INTERCOM/ DO NOT 12-key DELETE HOLD DISTURB SPEAKER dial pad Base keys and how they work Key name (and icon) What it does Phonebook/ left ( / ) --In standby or during a call: open the phonebook. --During text entry: move the cursor to the left.
Key name (and icon) What it does Up ( --In standby: increase the ringer volume for line 1 or line 2. --During a speakerphone call or while a message is playing: increase the speaker volume. --In the menu or any list: move the cursor up one line. ) Caller ID/ right ( / ) --In standby or during a call: open the Caller ID list. --During text entry: move the cursor to the right. --While a message is playing: skip to the next message. Down ( --In standby: decrease the ringer volume for line 1 or line 2.
Parts of the Handset Message waiting LED, visual Earpiece Display Soft keys TALK/FLASH PHONEBOOK/ LEFT DOWN UP END CALLER ID/ RIGHT 12-key dial pad REDIAL/ PAUSE INTERCOM/ HOLD REDIAL Charging contacts SPEAKER Microphone Handset keys and how they work Key name (and icon) What it does Up ( --In standby: increase the ringer volume for line 1 or line 2. --During a call: increase the call volume. --In the menu or any list: move the cursor up one line. End ) --During a call: hang up.
Key name (and icon) What it does Caller ID/ right ( ) --In standby or during a call: open the Caller ID list. --During text entry: move the cursor to the right. Speaker ( ) --Switch a normal call to the speakerphone (and back). intercom/ hold --In standby: page another station using the intercom. --During a call: put the call on hold and start a call transfer. Redial/ pause --In standby: open the redial list. --While entering a phone number: insert a 2-second pause.
Reading the Displays On the base Status icon areas Day & time SUN 12:00A 31/12/08 New CID: 4 1 2 Date Caller ID count Current LINE 1 functions for: Soft key 1 Answering system status for: Line 1 MENU LINE 2 Soft key 2 Soft key 3 Line 2 On the handset Status icons Handset banner SUN 12:00A Handset #1 New CID: 2 Day and time Caller ID count Current LINE1 MENU LINE2 functions for: Soft key 1 Soft key 2 Soft key 3 The table below shows the possible icons and what they mean.
Base Icon Handset Icon What it means The ringer is turned off for 1) line 1 only, 2) line 2 only, or 3) both. This station will not ring when a call comes in on the indicated lines. You have a voice message waiting (see "Using Voice Message Notification" on page 39). Privacy Mode is on: no other station can join your call. The speakerphone is on. The microphone is muted, and the caller can't hear you. NA The alarm is set. (See "Using the Alarm Feature" on page 38.) NA T-coil mode is on.
Using the Soft Keys Soft keys are controlled by the software: they will automatically change their function depending on what you're currently doing: Soft keys with the phone in standby On the base On the handset SUN 12:00A 31/12/08 New CID: 4 1 2 LINE 1 MENU LINE 2 Soft key 1 Soft key 2 Soft key 3 SUN 12:00A Handset #1 New CID: 2 LINE1 MENU LINE2 Soft key Soft key 2 Soft key 1 3 Soft keys in the main menu On the base Base Setup Ans.
If the description for a soft key is blank, that key doesn't currently have a function. Sometimes, the current function of a soft key can duplicate the function of a regular key. If this happens, you can press either key. When this manual refers to a soft key, it uses the soft key's description printed on a black background. Common soft key descriptions The table below lists some soft key descriptions that the phone uses across several menus or operations.
Entering Text on Your Phone When you want to enter text into your phone (for example, a name in the phonebook), use the twelve-key dial pad to enter the letters printed on the number keys. Here's how it works: The phone enters the letters in the order they appear on the key. For example, if you press the number key 2 once, the phone enters the letter A. Press 2 twice for B, and three times for C.
Using the Menus The menus are designed to be as easy as possible. Some users don't even need the manual once they know how to perform these actions: To open the menu, press MENU Use UP and to move the cursor. DOWN Go back one screen. Retrieve Msg Handset Setup Ans. Setup Clock Setup Global Setup BACK OK To close the menu: on the handset, press END; on the base, press MUTE/EXIT. Select the current item. If you don't press any keys for thirty seconds, the phone times out and exits the menu.
On the handset, press End; on the base, press mute/ Close the menu exit. (If you open the menu during a call, press Back to back out of the menu without hanging up.) The next several pages list all the available menu options and how to use them. Most of the menus are the same for the base and cordless handsets; any option that is available only for the base or handset is noted in the description. The Handset and Base Setup Menu When you open the menu on a handset, this menu is called Handset Setup.
Menu option: Use it to: Autotalk (Handset only) Turn on Auto Talk so you can answer the phone just by picking up the handset from the cradle (without having to press any buttons). Any Key Answer (Handset only) Turn on Any Key Answer so you can answer the phone by pressing a key on the twelve-key dial pad. Banner (Handset only) Change the name used on the handset's display. Enter any name up to 10 characters. LCD Contrast Change the contrast of the display.
When you select the Global Setup menu, the phone prompts you to select Line 1 or Line 2. Then, you can choose one of the following options to change the global settings for that line: Menu option: Use it to: Set Line Mode Do not change this setting unless instructed to by customer service. VMWI Reset (Base only) Reset the voice message waiting indicator to bring it back into sync with your voice mail service (see "Using Voice Message Notification" on page 34).
Using Your Phone Working with Two Lines When performing common tasks, you can let the station use the primary line, or you can manually choose a particular line for each task. Using the primary line makes common tasks much simpler, but you will need to assign a primary line to each station (see below). If you want to... From a handset From a handset From the base speakerphone speakerphone make a call: Dial the number, then --with the primary line Press Talk/flash. Press speaker.
primary line assignment by manually choosing line for your current task. To assign a primary line, open the menu and select Handset Setup or Base Setup. Select Primary Line, then choose the line you want this station to connect to when it goes off hook: Line 1 Always connect to line 1, regardless of either line's status. Line 2 Always connect to line 2, regardless of either line's status.
Changing the Volume You can set the volume of the ringer and speaker separately for the base and each handset; you can also set the earpiece volume on each handset. The available volume levels and how to change them are listed below; for each item, press Up to make it louder or Down to make it softer.
Using the lists Open the CID list Press Caller ID/right. Open the redial list Press Redial/pause. Scroll through the CID or redial list Press Down to scroll through the list from newest to oldest. Press Up to scroll from oldest to newest. Close the CID or redial list Press End on a handset or Mute/exit on the base. (If you open the CID list during a call, press Back to back out of the list without hanging up.) Dialing from the CID or redial list 111 Find the entry you want to dial.
Delete All Erase all entries from this station's CID or redial list. (This doesn't affect the CID or redial lists on any other stations.) Add Call Block (CID list only) Add the number to the call block list (see page 36). Using Call Waiting A Call Waiting call refers to a call received on a line while that line is already in use. Call Waiting and Caller ID on Call Waiting are services provided by your telephone company. You must subscribe to these services to use these features.
press Intercom/hold again or press Talk/flash followed by End on the handset. Using the Headset You can use a standard 2.5 mm telephone headset with your cordless handsets. To purchase additional headsets (HS910), visit our website; www.uniden.com.au for Australian model or www.uniden.co.nz for New Zealand model. (Belt clip To install a headset, remove the headset hole) jack cover and insert the headset plug into the jack.
Using the Phonebook Each station can store up to 100 entries in its phonebook, and each entry can have two different phone numbers. Open the phonebook Press Phonebook/left. Scroll through the entries Press Down to scroll through the phonebook from A to Z or Up to scroll from Z to A. Jump to entries that start with a certain letter Press the number key corresponding to the letter you want to jump to. Quick dial the primary number for an entry 111 Find the entry you want to dial.
Edit Number1 Enter the primary number (up to 32 digits) for this entry exactly the way you would dial it. --If you need the phone to wait before sending the next set of digits, press Redial/pause to enter a two-second pause. --If two seconds isn't long enough, you can enter as many pauses as you want. --Each pause counts as one digit (you'll see a P in the number). Edit Number2 Enter the secondary number for this entry just like you did the primary number.
Phonebook Menu Options Open the phonebook with the phone in standby, and press Options to open the phonebook menu. From the main phonebook screen, you have three options: Create New Add an entry to your phonebook. (See "Creating a new entry" on page 30.) Copy All Copy the whole phonebook to another station. (You must have at least one cordless handset to use this multi-station feature.) Delete All Erase all the entries in this station's phonebook.
Using Multi-station Features The expandable base works together with the accessory handsets to give you some useful multi-station features. (A station can be any cordless handset or the base.) You must have at least one accessory handset to use the features in this section. Expanding Your Phone Your base supports a total of six XDECT R005 accessory handsets, including any that were supplied with your phone.
To leave a conference call, hang up normally; all other stations remains connected to the call. If you conference line 1 and line 2 together (see page 23), the base and four cordless handsets can hold a seven-way call with both outside callers at the same time. You can also use the speakerphone for a conference call, just like you can with a normal call. Using Privacy Mode You can prevent other stations from joining a call. Start your call as usual, then press Menu and select Call Privacy.
Using the Intercom Here are some things you need to know about using the intercom: Whenever the phone is in standby, you can make an intercom call between stations without using the phone line. You can make an intercom call from any station, but only two stations can be in an intercom call at any time. If an outside call comes in during an intercom call, the phone shows the CID information.
Using Special Features Using Do Not Disturb The Do Not Disturb or DND feature turns off the ringers of the base and all handsets at the same time. With the phone in standby, press and hold Do not disturb on the base. The phone automatically turns on the answering system and shows Do Not Disturb in the display on all stations. To cancel, press Do not disturb again. If you turn the answering system off while DND is on, the phone turns off DND along with the answering system.
Call Blocking menu options With the phone in standby, open the menu and select Call Blocking. Choose one of these options: View Number See the numbers on your call block list. Create New Add an entry to your call block list. The phone will prompt you to enter a name (optional) and phone number. Private Number Block all calls from numbers reported by CID as "Private." (This does not count as one of the 20 entries.) Unknown Number Block all calls from numbers reported by CID as "Unknown".
Using the Alarm Feature You can set 3 different alarms on each cordless handset so your phone can remind you of important events. When an alarm is set, the alarm icon ( ) appears on the top of the screen. Setting an alarm 111 Open the menu and select Handset Setup. 222 Select Alarm Setting, then select the alarm (Alarm1, Alarm2, or Alarm3) you want to set. Alarm 1 333 To turn on the alarm, Time setting select On. The phone 00:00AM goes to the alarm Repeat setting 1 time edit screen.
When an alarm rings When the day and time on the phone matches the day and time of an alarm setting, the handset sounds the selected tone and displays the alarm screen. Alarm SNOOZE The alarm will ring for three minutes. To turn off the alarm, press End. When the phone prompts you to confirm, press YES . To temporarily turn off the alarm, press Snooze (or just let the alarm ring for the three minutes). The alarm will ring again in five minutes.
Using the Answering System Each line has a separate answering system. Whenever you access the answering system, the phone prompts you to choose a line. After that, any settings or operations will affect only the answering system for that line. For example, deleting all the messages from the answering system from line 1 does not affect any messages on the answering system for line 2.
Delete your greeting 111 Open the menu and select Ans. Setup. 222 Select Line 1 or Line 2, then select Greeting Options. 333 While the system plays back the current greeting, press Delete to erase the personal greeting for this line. (You can't erase the pre-recorded greeting.) Ans. Setup menu options You can change the answering system options separately for each line. When you select the Ans. Setup menu, the phone prompts you to select Line 1 or Line 2.
Getting Your Messages Accessing your system from a handset (remote operation) You can access your system from a handset whenever the phone is in standby. Only one handset at a time can access the system through remote operation, and you can't use remote operation if the base is using the answering system. To start remote operation, open the menu and select Retrieve Msg. When the phone prompts you to select a line, press Line1 or Line2 .
To... From the base From a handset (during remote operation) Press Phonebook/left repeatedly Press 1 repeatedly until replay previous until you hear the message you you hear the message messages want to replay. you want to replay. skip a message Press Caller ID/Right. Press 3. delete a message While the message is playing, press Delete. While the message is playing, press 4. With the phone in standby, press delete all of your Delete. When the system prompts Not available.
Using the System While You're Away from Home You can also operate your answering system from any touch-tone phone. Before you can use this feature, you have to program a security code. Programming a security code 111 With the phone in standby, open the menu and select Ans. Setup. 222 When the phone prompts you to select a line, select Line 1 or Line 2, then select Security Code. 333 Use the number keypad to enter a two-digit security code (00 to 99). Press Ok when you’re finished.
Solving Problems If you have any trouble with your phone, try these simple steps first. If you still have a question, call our Customer Care Line listed on the front cover. If… Try… No stations can make or receive calls. --Checking the telephone cord connection. --Disconnecting the base AC adapter. Wait a few minutes, then reconnect it. One cordless handset can’t make or receive calls. --Moving the handset closer to the base. --Resetting the handset. A station can make calls, but it won’t ring.
If… Try… No stations will display any Caller ID information. --Letting calls ring at least twice before answering. --Seeing if the call was placed through a switchboard. --Checking with your telephone service provider to make sure your Caller ID service is active. Caller ID displays briefly and then clears. --You may have to change the line mode. Contact customer service for more information. I can’t transfer calls. --Resetting all the handsets (see page 49).
If… Try… Messages are incomplete. --The incoming messages may be too long. Remind callers to leave a brief message. --Deleting messages (the memory may be full). The system keeps recording if I answer on an extension. --You may have to change the line mode. Contact customer service for more information. I can't register a handset. --Seeing if there are 10 handsets registered to this base. --Resetting the handset. My alarm rings at the wrong time.
radio-based wireless devices, such as room monitors, wireless controllers, or wireless Do you use a T-Coil hearing aid? headphones or If you have a hearing aid equipped with speakers a telecoil (T-coil) feature, the interaction large fluorescent light between the hearing aid and digital cordless fixtures (especially if phones can cause noise in the handset. If they give off a buzzing you have a T-coil hearing aid and you have noise) problems with noise on the line, try turning on T-coil mode.
Resetting and Registering Handsets If you are having trouble with a cordless handset or if you want to replace one, you need to clear the registration information from the base and the handset: Do you have the base the handset is registered to? Yes No 111 Press and hold End and 111 Press and hold End and # until the # until the System Reset System Reset menu appears (about 5 seconds). menu appears (about 5 seconds). 222 Select Deregister HS. The display 222 Select Base Unavailable.
your phone. Usually, you can't tell when a handset switches between Usually, you can't tell when the base and the charger in the middle of a call, but the in base you might notice a brief pause yourand the charger i Registeringsometimes, Repeaters sometimes, youone, might noti conversation. If you are having trouble with a repeater or if you want to replace conversation. you need toRegistering register the repeater to the base.
Handling Liquid Damage Moisture and liquid can damage your cordless phone. If the handset or base is exposed to moisture or liquid, but only the exterior plastic housing is affected, wipe off the liquid, and use as normal. If moisture or liquid has entered the plastic housing (i.e.
Important Information Terms Used In This Manual Accessory Handset An extra handset that can register to and be used with an expandable phone base. All accessory handsets must be registered to a base. The main part of the phone. It connects to your phone line and lets you make and receive Base calls. Most bases also have a cradle to store a handset. CIDCW (CID on Call Waiting.) A service that shows CID for calls that come in during another call.
Battery Information Fully charged, the battery should provide about 8 hours of talk time and about 7 days of standby time. For best results, return the handset to the cradle after each call to keep it fully charged. Keep an eye on the battery status icon. When the battery gets too low, the handset shows a low battery alert. If you hear a strange beep during a call, check the display: if you see the low battery alert, finish your conversation as quickly as possible and return the handset to the cradle.
Index A B C D E F H I K L Alarm Feature........................................ 38 Answering a Call.................................... 24 Answering System................................. 40 Any Key Answer ................................... 22 AutoTalk................................................. 22 Base Unavailable................................... 49 Battery Install........................................... 5 Battery Specifications............................ 52 Battery Information ........
One-year Limited Warranty UNIDEN XDECT R055 IMPORTANT Evidence of the original purchase is required for warranty service. Warrantor: Uniden Australia Pty Limited ABN 58 001 865 498 Uniden New Zealand Limited Elements of Warranty: Uniden warrants to the original retail owner for the duration of this warranty its XDECT R055 (hereinafter referred to as the Product), to be free from defects in materials and craftsmanship with only the limitations or exclusions set out below.
© 2009 Uniden Australia Pty Ltd/Uniden New Zealand Limited Printed in Vietnam UNZZ01096BB(0)