XDECT 7015
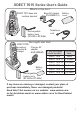
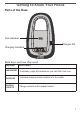
XDECT 7015 Series User's Guide What's in the box? XDECT 7015 base and cordless handset Base AC adapter (PS-S0635YL3) Rechargeable battery pack (BT-694 or BT-694s) XDECT 7005 accessory handset & charger Battery cover Telephone cord You might also find: Charger AC adapter AAD-600S(M) Battery cover Rechargeable battery pack (BT-694 or BT-694s) If you purchased You should model number: have: XDECT 7015 None XDECT 7015+1 1 of each XDECT 7015+2 2 of each XDECT 7015+3 3 of each XDECT 7015+4 4 of each XDECT
What's in the manual? Installing Your Phone....................... 3 Charge the Battery.......................... 3 Connect the Telephone Cord......... 4 Getting to Know Your Phone.......... 5 Parts of the Base............................. 5 Parts of the Handset........................ 6 Reading the Handset Display ........ 7 Using the Handset Menus................ 8 Entering Text on Your Phone....... 10 Using Your Phone........................... 11 Changing the Volume...................
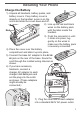
Installing Your Phone Charge the Battery 111 Unpack all handsets, battery packs, and battery covers. If any battery cover is already on the handset, press in on the notch and slide the cover down and off. 222 Line up the red and black wires on the battery pack Black with the label inside the Red handset. 333 Push the connector in until it clicks into place; tug gently on the wires to make sure the battery pack is securely connected.
888 Place a handset in the base and any accessory handset(s) in the charger(s) with the display(s) facing forward. The charge light on the base and each charger should all turn on. If... Try... the charge --reseating the handset. light does --checking the AC adapter connection. not turn on --seeing if the outlet is controlled by a wall switch. Charge all handsets completely (about 15 hours) before using them.
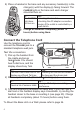
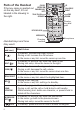
Getting to Know Your Phone Parts of the Base Find Handset Charge LED Charging Contacts Base keys and how they work Key name What it does Find Handset --In standby: page all handsets so you can find a lost one. Charge LED Charging Contacts --Indicates charging when handset is in the cradle. --Charge contacts with handset locator.
Parts of the Handset CLEAR/ INTERCOM If the key name is spelled out PHONEBOOK/ on the key itself, it's not LEFT labeled in the drawing to TALK/FLASH the right. SPEAKER UP CALLER ID/ RIGHT END DOWN Twelvekey dial pad KEYPAD LOCK MESSAGES Handset keys and how they work Key name (and icon) Charging contacts Microphone What it does --In standby: increase the ringer volume. --During a call: increase the call volume. --In the menu or any list: move the cursor up one line.
Key name (and icon) What it does --In standby: start a telephone call (get a dial tone). --During a call: switch to a waiting call. Speaker ( ) --Switch a normal call to the speakerphone (& back). --In standby: open the redial list. Redial/pause --While entering a phone number: insert a 2-second pause. --During a call: mute the microphone. MUTE --While the phone is ringing: mute the ringer for this call only. message ( ) --In standby: access your voice mail (see page 15).
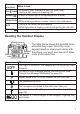
Using the Handset Menus The menus are designed to be as easy as possible. Some users don't even need the manual once they know how to perform these actions: Open the menu Press Menu/select. The arrow cursor on the left side of the line shows which Move the cursor menu item is currently highlighted. Use Up to move the cursor up & Down to move it down. Move the cursor to highlight the option, then press Menu/ Select an option select . Go up one screen Press Phonebook/left. Close the menu Press End ( ).
Handset Setup You can change these settings separately for each handset. T-coil Edit Voice Mail Ringer Tones Personal Ring Autotalk Any Key Answer Banner Key Touch Tone Turn on T-coil mode to reduce noise on some hearing aids (see "Do you use a T-coil hearing aid?" on page 19). If you subscribe to a Voice Mail service you can set the Voice Mail number . Choose one of four melodies or four tones for the handset's main ring tone. As you highlight each ring tone, the phone plays a sample of the tone.
Set Line Mode Insert 0 Do not change this setting unless instructed to by customer service. This feature adds “0” or “00” at the beginning of the number received from Caller ID. The default setting for New Zealand is ON. The default setting for Australia is OFF. Entering Text on Your Phone When you want to enter text into your phone (for example, a name in the phonebook), use the twelve-key dial pad to enter the letters printed on the number keys.
Using Your Phone To... From a handset make a call: Dial the Press Talk ( )/flash. number, then From a handset speakerphone answer a call Press Talk ( )/flash. Press Speaker. hang up Press End ( ) or put the handset in the cradle. Press Speaker. switch between the speaker & Press Speaker. Press Speaker. earpiece mute the microPress mute. phone during a call Press again to turn the microphone back on. Press Clear/intercom.
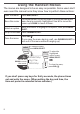
Using the Redial List The phone saves the last 5 numbers you dial on each handset. To open the redial list, press Redial/pause; use Up and Down to scroll through the list. To close the list, press Phonebook/left. With the phone in standby, open the list and find the number you want. Then: to redial the selected number Press Talk ( )/flash or speaker. to delete the number Press Menu/select & select Delete Entry. to save it to the phonebook Press Menu/select & select Store Into Pb.
Delete Entry Store Into Pb Delete All Erase this Caller ID number. Add this number to this handset's phonebook. The phone prompts you to enter the name, edit the phone number, and choose a personal ring. Erase this handset's CID list. (This does not affect the CID lists saved on any other handsets.) Using Call Waiting If you get a Call Waiting call, the phone sounds a tone and displays any CID information received for the waiting call.
Phonebook menu options Open the phonebook with the phone in standby, then press Menu/ select to open the phonebook menu. Choose one of these options: Create New Add an entry to your phonebook. The phone prompts you to enter the name and phone number, and choose a personal ring. Copy the whole phonebook to another handset. (You must have at Copy All least two handsets to use this feature.) Delete Erase all the entries in this handset's phonebook.
Using Special Features Using Voice Message Notification This feature supports Frequency-Shift Keying (FSK) message notification. Contact your voice mail provider for more details. If you subscribe to a voice mail service, your phone can notify you when you have a new message waiting. When you have new messages, the voice message icon ( ) appears in the display, and the new message light (at the top of the handset) blinks.
Using Multi-Handset Features The expandable base works together with the accessory handsets to give you some useful multi-handset features. You must have at least two handsets to use the features in this section. Expanding Your Phone Your base supports a total of six cordless handsets: the one that came with the base and up to five XDECT 7005 accessory handsets. Your base might be compatible with other Uniden accessory handsets: please visit our website for a list of compatible handsets.
As long you have privacy mode on, no other handsets can interrupt your call. To allow another handset to join the call, just turn privacy mode off by repeating the process above (press Menu/select twice). Using Call Transfer To... transfer a call From a handset 111 Press Clear/intercom to put the call on hold. 222 Select the handset you want to transfer the call to, or select All to page all the handsets at the same time.
Solving Problems If you have any trouble with your phone, try these simple steps first. If you still have a question, visit the website listed on the front cover. If… Try… --Checking the telephone cord connection. No handsets can make --Disconnecting the base AC adapter. Wait a few or receive calls. minutes, then reconnect it. --Moving the handset closer to the base. One handset can’t make or receive calls. --Resetting the handset. A handset can make --Making sure the ringer is turned on.
Weak or Hard To Hear Audio If a caller’s voice sounds weak or soft, the signal might be blocked by large metal objects or walls; you might also be too far from the base, or the handset’s battery may be weak. Try moving around while you’re on a call or moving closer to the base to see if the sound gets louder. Make sure the handset’s battery is fully charged. Try adjusting the earpiece volume or the audio tone (see below). Adjust the audio tone During a call, open the menu and select Audio Tone.
Here are some hints for when the static is... on 1 handset or in 1 location: --Check nearby for one of the common interference sources. --Try moving the handset away from a suspected source, or try moving the suspected source so it’s not between the handset & the base. --Try moving closer to the base. There is always more noise at the edges of the base's range. If the handset displays an Out of Range message, you need to move closer to the base.
When you reset a handset (or if you buy a new one), that handset displays a Handset Not Registered message. If you see this message on a handset, you need to register it to a base before you can use it. Registering a handset 111 Place the unregistered handset into the main base for charging to start the registration process. If... Try... --you don't hear a dial tone Making sure the handset is fully --the display says Registration Failed charged, then start over at step 1.
Important Information Terms Used In This Guide Accessory handset An extra handset that can register to and be used with an expandable phone base. All accessory handsets must be registered to a base before you can use them. The main part of the phone. It connects to your phone line and lets you make and receive calls. Base Most bases also have a cradle to store a handset. CIDCW (CID on Call Waiting.) A service that shows CID for calls that come in during another call.
Battery Information Fully charged, the battery should provide about 10 hours of talk time and about 7 days of standby time. For best results, return the handset to the cradle after each call to keep it fully charged. Keep an eye on the battery status icon. When the battery gets too low, the handset shows a low battery alert.
Mounting the base unit on a wall You can mount your base directly to the wall. Before doing this, consider the following: • Avoid electrical cables, pipes, or other items behind the mounting location that could cause a hazard when inserting screws into the wall. Mount your phone within distance of a working phone jack. Make sure the wall material is capable of supporting the weight of the base and handset. Use screws with anchoring devices suitable for the wall material where the base unit will be placed.
One Year Limited Warranty UNIDEN XDECT 7015 IMPORTANT Evidence of the original purchase is required for warranty service. Warrantor: Uniden Australia Pty Limited ABN 58 001 865 498 Uniden New Zealand Limited Elements of Warranty: Uniden warrants to the original retail owner for the duration of this warranty its XDECT 7015 (hereinafter referred to as the Product), to be free from defects in materials and craftsmanship with only the limitations or exclusions set out below.
© 2009 Uniden Australia Pty/Uniden New Zealand Limited Printed in Vietnam UNZZ01072BZ(0)