U (Power Source) IM I S S ER R WELDE 85 L MIG180 D G SUPPORT 1985 UNI-FLAME N 2 YEARS Warranty td Welding G AUSTR IN E SINC IAN AL 19 us Of A tralia P t yL UNI-FLAME AUTOLIFT s un G WE Manual Lift Arc DC/TIG 240 Volt Standard MIG / MAG
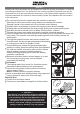
SAFETY 1. SAFETY Welding and cutting equipment can be dangerous to both the operator andispeople in or nearand the may c Welding dangerous, surrounding working area, if the equipment is not correctly operated. only be please r whenEquipment welding. must For details, used under the strict and comprehensive observance of all relevant safety regulations.
INTRODUCTION Thank you for purchasing this UNI-MIG Welder. Before operating the machine, it is essential that you read this manual thoroughly and carefully follow all instructions given. GUARANTEE This UNIMIG product is guaranteed against faulty manufacture for a period of 2 Years from the date of purchase. Please keep your receipt as proof of purchase. This guarantee is invalid if the product is found to have been abused or tampered with in any way, or not used for the purpose for which it was intended.
MOUNTING THE WELDING WIRE SPOOL WARNING: Ensure that the welder is not connected to the mains supply. 1. Open the side panel, by pushing the latch down and allowing the side panel to drop down. 2. Remove the locking knob and retaining disc. 3. Place the spool of welding wire over the spindle so that it sits against the spring. · Do not release the tension on the wire as it will unravel causing feeding problems later. · The wire will feed off the spool anticlockwise from the bottom of the reel.
4. Pass the wire through the guide, over the drive roller and into the torch liner. · Push about 10-15 cm into the torch liner. 5. Lower the arm and replace the tensioning knob. · Tighten the tensioning knob sufficiently to hold firmly, but do not fully tighten. NOTE: Correct tension will allow the wire to feed into the torch liner smoothly, but will allow the drive roller to slip in the event of a blockage. 6. Close the side panel of the welder. 7.
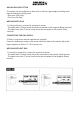
GAS/NO-GAS SELECTION The welder can be configured to weld, with or without a gas supply according to the type of welding wire being used. · Solid core (With Gas), · Flux Core (No Gas) WELDING WITH GAS 1. If using solid wire, connect the terminal as shown. · The earth cable (Thicker Lead) should be connected to the negative (Black) terminal. · The cable from torch (Thinner Lead) should be connected to the positive (Red) terminal. CONNECTING THE GAS SUPPLY UNI-PLAS 2.
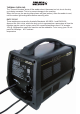
OPERATING THE WELDER PREPARING THE WORKPIECE The area being welded should be perfectly clean. Any coating, plating or corrosion must be removed, otherwise a good weld will be impossible to achieve. Attach the earth clamp to the workpiece as close to the point of weld as possible, without it being intrusive. OPERATION 1. Select appropriate welding voltage for material to be welded, settings adjustable from 1 to 6 positions. Never move voltage selection switch whilst welding as this will damage the switch.
THERMAL OVERLOAD The ‘Thermal Overload’ shuts off the welder when it becomes too hot, due to the duty cycle being exceeded. This is to prevent damage to the machine. When this occurs, the warning lamp shown will glow (amber). Allow the welder to cool, until the amber light extinguishes before resuming work.
CAUTION 1. Working Environment. 1.1 1.2 1.3 1.4 The environment in which this welding equipment is installed must be free of grinding dust, corrosive chemicals, flammable gas or materials etc, and at no more than maximum of 80% humidity. When using the machine outdoors protect the machine from direct sun light, rain water and snow etc; the temperature of working environment should be maintained within -10°C to +40°C. Keep this equipment 30cm distant from the wall for ventilation.
MAINTENANCE WARNING: Exposure to extremely dusty, damp, or corrosive air is damaging to the welding machine. In order to prevent any possible failure or fault of this welding equipment, clean the dust at regular intervals with clean and dry compressed air of required pressure.