
Instruction manual

OPERATINGTHEWELDER
PREPARINGTHEWORKPIECE
The area being welded should be perfectly clean. Any coating, plating or corrosion must
be removed, otherwise a good weld will be impossible to achieve.
Attach the earth clamp to the workpiece as close to the point of weld as possible,
without it being intrusive.
OPERATION
1. Select appropriate welding voltage for material to be welded, settings adjustable from
1 to 6 positions. Never move voltage selection switch whilst welding as this will damage
the switch. Adjust wire speed setting to match selected voltage.
2. Plug the 15 Amp primary input lead into the mains supply (240V Single Phase) and
switch ON the machine.
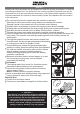
3. Cover your face with an Australian Standards approved welding mask or welding
helmet.
This is essential.
Arc rays are harmful to people’s eyes and skin. Always wear a welding helmet and
suitable protective clothing including welding gloves whilst the welding operation is
performed.
4. Lower the torch to the workpiece with one hand and approach the work with the torch
tip at an angle of about 35 Degrees and pull the torch trigger fully.
· As the wire touches the workpiece, an arc will be struck.
5. In order to produce a satisfactory weld, the controls may be ne tuned as required.
NOTE:MIGweldingisanacquiredskill,itisstronglyadvisedthat,ifyouarenot
fullyfamiliarwiththistypeofwelding,youpracticeonapieceofmaterialwiththe
samecharacteristicsasyourworkpiece,untilyouaresatisedwiththeresult,
andyouhavenetunedyourweldertoproduceasatisfactoryweld.
NOTE:Oneoftheproblemsexperiencedwithnovicewelders,istheweldingwire
stickingtothecontacttip.Thisisasaresultofthewirefeedspeedbeingtoo
slow.Itisalwaysbetterthereforetostartwithtoohighaspeed,andbackoff
slightly,toavoidthepossibilityofthewireweldingitselftothetip.Thisisthe
reasonposition6isrecommendedforstartup.
NOTE:Listentothesoundmade.Anirregularcracklingsounddenotestoo
highawirespeed.Decreasethespeeduntilaregular,strongbuzzing
soundisheard.
UNI-PLAS UNI-PLAS