
OpenScape S6- User Guide


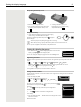
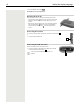
Table Of Contents
- Contents
- Safety precautions
- Getting started
- Using the telephone
- Additional functions
- Setting the handset
- Appendix
- Accessing system functions
- Making calls to multiple parties
- Caller list
- Central directories (group directory)
- Call forwarding
- Mailbox
- More features
- Making calls using project assignment (cost billing)
- Callback
- Using a different telephone in the same way as your own
- Caller ID suppression
- Activating/deactivating do not disturb
- Tracing a call
- Entering commands via tone dialing (DTMF suffix dialing)
- Parking/activating calls
- System-wide speaker call
- System appointment function
- Locking the telephone line to prevent misuse
- Index

8 Getting started
Getting started
Contents of the package
• One handset
• One battery cover (rear cover for the handset)
• One battery
• One belt clip
• One user guide
Connecting the charging cradle
¤ Connect the flat plug of the power adapter .
¤ Plug the mains unit into your power socket .
To remove the plug from the charging cradle again:
¤ Disconnect the power adapter from the mains power
supply.
¤ Press the release button .
¤ Pull out the plug .
Setting up the handset for use
The display is protected by a plastic film. Please remove the protective film!
Inserting the battery
The charging cradle is designed for use in closed, dry rooms within a temperature
range of +5°C to +45°C.
Never expose the telephone to heat sources, direct sunlight or other electrical
devices.
Protect your telephone from moisture, dust, corrosive liquids and vapours.
The device's feet do not usually leave any marks on surfaces. However, due to the
multitude of different varnishes and polishes used on furniture, contact marks on the
surfaces cannot be completely ruled out.
This device is only suitable for a maximum installation height of 2 m.
Only use a rechargeable battery, as this could otherwise result in significant health
risks and personal injury. For example, the outer casing of the battery could be
destroyed or the battery could explode. The device could also malfunction or be
damaged as a result of using batteries that are not of the recommended type.
¤ Insert battery with the contact side pointing
down .
¤ Press the battery down until it clicks into
place .
¤ Orientate the battery cover with the
side tabs fitting into the slots on the
inside of the casing .
¤ Press the cover until it clicks into place.
2
1
3
4
1
2
3
4
2
1
3
1
2
3