
Specifications

TD 92930EN
13 December 2013 /Ver B
Configuration Manual
WL3 and WL3 Plus WLAN Handset
101
Appendix C: Easy Deployment
Microsoft uses a method, that allows the administrator to set up the sub-options (that
will be part of the vendor options, as a complete set of sub-options, which then are
concatenated to the 43 option string by the server. Each sub-option (called "code") is
defined with the sub-option numbers, as described by the vendor. In the case of the
VoWiFi handset, the sub-options are 01 and 02.
NOTE: The DHCP server automatically calculates the length of each sub-option, and
the total length of the whole string, and attaches the option ID of “43” at the beginning
of the string.
NOTE: If option 43 is configured, using “code 43”, the “code 43” option is added to the
concatenated string. Then double headers are added (one created by you, and one
created by the system), and the string is not functioning as intended.
Instead, fill in the created sub-options with correct values. The sub-options are then
automatically concatenated to the string, and creates an option 42 on the fly.
Define new vendor class to support multiple types of clients
To include the needed information for a handset, an administrator has to define a new
vendor class as follows:
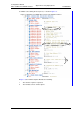
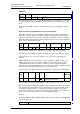
1 Right click on the DHCP server object, and select “Define Vendor Classes”.
Then click “Add”.
2 In the New Class dialog box, enter a descriptive name for the Vendor class. For
example enter, in the Display name: field: “SiemensWL3 handset”, and in the
Description: field: “Option 43 for Easy Deployment”. These fields are only used
for displaying information for the administrator. In the ID: field, enter the VCI
string seen in the table in
Appendix C.5.2 (OpenStageWL3). Then click “OK”.
TIP: Click on the right side of the filed to be able to write in ASCII.
NOTE: The VCI string has to exactly match with the vendor specification, since it
is used in the mapping of the information sent from the handset in option 60
(case sensitive)
Configure Sub-options for a vendor class in an MS Windows 2003 DHCP Server
The current sup-options string for the handset contains two codes (which in some
documentation from vendors, are referred to as "tags".) In order to build these two
codes, they have to be defined as follows: one with the value of Siemens, and one with
the IP-address of the WSG (Device Manager application).
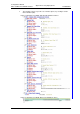
1 Right click on the DHCP server and select "Set Predefined Options".
2 Select the vendor class created earlier (in section Define new vendor class to
support multiple types of clients) under “Option class” and click “Add”. The
Option type window opens.
3 Enter a descriptive name for the first sub-option, for example enter, in the Name:
field: “VoWiFi Vendor”, and in the Description: field: “Vendor Magic ID”
4 In the Data type: field, select “Binary”, to allow the entering of more than one
byte.
5 In the Code: field, enter “001”. Then click “OK”.
NOTE: A predefined value (by selecting Edit Array) isn’t needed to be entered
here. It can be preferred to be set per scope instead (explained below).
6 For the second sub-option, repeat the steps 1- 2 above.
7 Enter a descriptive name for the second sub-option, for example enter, in the
Name: field: “WSG IP address”, and also copy it into the Description: field.