
User's Manual


Pick to Light Tag
1- -
LT213CIII User Manual
• •• •• •• •Technical Parameter
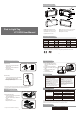
Product Summary
LED Indicator
Screen
Tag Cover
Tag Cover
SN Barcode
Buckles
Buckles
Battery Cover
Battery Lock
SN Barcode: Serial Number Barcode
Screen: Display information using E-ink
LED Indicator: LED Light with flashing
Tag Cover: Protector of Screen
Buckles: Attach Tags to the rails or other accessories
Battery Lock: Enable to open the Battery Cover
Battery Cover: Protect battery
Size
77x38x14.5±1mm
Display Size
48x23mm
CR2450*2 Battery
* Battery life ≥ 2 years (Estimation: Refresh screen content 4 times per day without flashing light)
* Battery life ≥ 1-year (Estimation: Refresh screen content 4 times per day with 50 times LED
flashing with 2Hz per day for 30 seconds each)
Remarks: Flashing duration (30 seconds) is configurable by software with unit “second”.
Battery
LT213CIII
Model
Frequency
2.402~2.482GHz
Screen Type Dot-matrix display
Display Color
1~2 Years
Battery Life Coverage
15~50m(Open Area)
43±2g
Weight
Resolution 250x122
LED Color
Red/Green/Yellow/Blue
Operation
Temperature
10℃~35℃Black/White/Red
Storage
Temperature
10℃~35℃
FCC ID 0000-00000
• •• •• •• •Installation & Removal
• •
• •• •
Cover Replacement
2- -
Installation Step:
1. Place the tag’s upper buckle inside
the upper rail
2. Place the tag’s lower buckle inside
the lower rail
3. Complete installation
Replace Battery
Packing Details
Remarks: If the tag failure cannot be solved, please contact the after-sales service team for support. The
content may not be consistent with the actual products due to product enhancement or components change.
Updates will not be further announced. Please refer to the actual product as final.
3- -
Battery replacing method:
Tags User Manual
200 1
1. Insert the needle into the battery
lock, then push the battery cover
outward
2. Unplug and remove the battery
3. Replace a new battery and plug the
cable
4. Replace a new battery in the
compartment
5.
Close the battery cover
Battery
Plug
Compartment
Removal Step:
1. Insert the lockpick tip into the gap between
the rail and the tag at the bottom
2. Flick the lockpick along the direction of arrow
3. The tag could be removed
Cover Replacement Step:
1. Insert the lockpick into the gap between
the cover and the tag
2. Flick the lockpick along the direction of
arrow
3. Take off the cover
4. Replace with the new cover
Needle
Lockpick
* Please note the lockpick is an optional product. Image showns is for illustration purposes
only, actual product may have variation. Please refer to the actual product as final.
* The tag cover was installed before the shipping.
Precautions
Troubleshooting
Failure Possible Reason Solution
Fail to refresh screen
Display LOW POWER
Screen display confusion
Screen display turns grey
or LED turns dim
Base station offline
Software abnormal
Tag undetectable
Low battery
Screen damage
Low battery
Check the base station power supply
and network connection
Restart the software
Add base station or move the
tag within the range
Replace with new batteries
Contact after-sales service
Replace with new batteries
Warnings
· Do not disassemble or modify this product.
· Avoid prolonged sun exposure.
· Avoid external impacts such as drops and
collisions.
· It is forbidden to use the tag in harsh
environments, such as high temperature,
high humidity, strong magnetism, strong
radiation or chemical corrosion etc.
· The tag must be used and stored within the
specified temperature range, otherwise the
screen may be damaged or battery of life
would be shortened.
· The product should be installed more than
two meters away from the anti-theft door
system to avoid electromagnetic
interference.
· Keep the tag clean and prevent from water,
dust, corrosive liquids, and similar pollutant
entering the tag.
· Storage time should be controlled within 6
months. Other redness or distortion would
be found on the screen.
· Avoid placing the screen downward.
· Avoid any metal, shielding materials or liquid
place between tags and base stations.
Notice
Lockpick