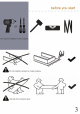
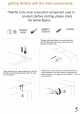
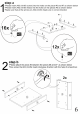
getting familiar with the main components *Mini fix is the main connection component used in products.Before starting, please check the below figures ea + MINI FIX DOWEL cw MINNIE 5 4 #2 Heap & SCREW *Please notice that there is an small arrow on AQ2 {minim head). This arrow should show the direction of upper hole. | “After attaching two pieces please tum the A02 | “Please do not over screw the mini fix head since it {mini fix head) clockwise direction with the help of a screwdriver.
step a “Please insert ADS (infix screw) Into the holes on the piece #6 and #7 as shown below "Please insert AOZ (mini fix head) into the holes on the pieces #5 as shown below *Make sure that all the arrows on ADZ (mini fix head} are in correct direction step b *Please attach the piece #5 between the pieces #6 and #7 as shown below *Now screw the A0Z (mini fix head) clockwise direction with the help of screwdriver.
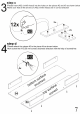
step c *Please insert A02 (mini fix head) into the holes on the pieces #2 and #3 as shown below "Make sure that all the arrows on AD2 {mini fix head) are in correct direction "Please attach the pieces #2 to the piece #4 as shown below *Now screw the A13 (50 mm screw) clockwise direction with the help of screwdriver.
step e "Please put all the C04 {pivot ) the way that they will Bt the per-diilled holes on the piece #0 *M Now take ACS (3.5x18 screw ) and put them on per-drilled holes then turn them all with screwdriver *Please attach the piece #10 to the pieces #9 as shown below *Now screw the ATS (50 mim screw] clockwise direction with the help of screwdriver. step f *Please attach the pieces #8 onto the piece #9 as shown below *Now screw the A13 (50 mm screw) clockwise direction with the help of screwdriver.
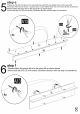
step g "Please attach the parts we installed in step b to the piece #9 as shown below *Now screw the A13 (50 mm screw) clockwise direction with the help of screwdriver.
step *Please attach the part we installed in step d onto the pieces #8 as shown below "Please insert AQ3 {mini fix screw) into the holes on the piece #4 as shown below *Now screw the A13 (80 mm screw) clockwise direction with the help of screwdriver. step i "Please attach the pieces #3 onto the pieces #4 as shown below *Now screw the AD2 (mini fix screw) clockwise direction with the help of screwdriver.
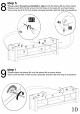
step j Please insert ADS (mini fix screw) into the holes on the spice #1 as shown below *Please insert ADS (dowel) into the holes on the piece #1 as shown below step k “Please attach the piece #1 onto the pieces shown below *Now screw the AD2 {mini fix head) clockwise direction with the help of screwdriver.
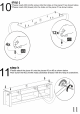
step | “Please pul al COZ (bracelets) into the big holes on piece #11 and 12 the way they will fit the per-drilied holes “Now take ADS (3.
step n *Please connect CO4{pivol} and COZ (bracelet) as shown in figure “Turn the screw A *You can make some adjustment with screw B for beater opening and closing of door
step o Please take the panel and nail down with the help of a hammer “For the best result use all nails given in the hardware pack Please do not neglect installing the back pane! of the tv stand. Installing the back panel will both make your iv stand sturdier and look better.
step p *For the best appearance of your furniture please place ali AQT{18 mm sticker) onto the A13 (50 mm screw) and Minifloppies head).