
Installation Guide


Determining Your Build Out Area (continued)Determining your build out area
1
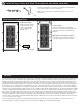
Additional sloped trim may be added in the reverse
direction to create at surface
OR
Sloped trim may be removed or replaced with at
trim to properly mount your new security door
StudStud
Entry Door
Sloped Trim (Top View)
Entry Door Jamb
Sloped Trim
1" minimum
mounting
surface
1" minimum
mounting
surface
Ready for installation
Brick Moulding (Top View)
Brick
moulding trim
StudStud
Entry Door Jamb
Entry Door
1" minimum
mounting
surface
1" minimum
mounting
surface
Ready for installation
Flat Trim (Top View)
Entry Door
StudStud
Entry Door Jamb
1" minimum
mounting
surface
1" minimum
mounting
surface
Flat Trim
Minimum 2-3/8"
Minimum 2-3/8"
Ready for installation
Stucco 1 (Top View)
Entry Door
StudStud
Entry Door Jamb
1" minimum
mounting
surface
1" minimum
mounting
surface
Stucco
Pop-out
Minimum 2-3/8"
CAUTION: Check closely for possible hardware interference!
mounted between stucco pop-outs
Stucco 2 (Top View)
Entry Door
StudStud
Entry Door Jamb
1" minimum
mounting
surface
Stucco
Pop-out
Minimum 2-3/8"
mounted to front surface
of stucco pop-outs
1" minimum
mounting
surface
This application will require 6" screws (sold separately)
Minimum 2-3/8"
Inspect Your Entryway for Obstructions
Check for any obstructions above and around
your entryway that may prevent the outward
swing of your new security door, and/or its
installation, such as:
• Light xtures
• Door bell
• Low overhang
• Trees, bushes, or hanging plants
Determine Type and Readiness of Mounting
Surface
Your security door will require a minimum
mounting surface of 1" on the trim above, and
on both sides of your entry door. Mounting
screws must be secured to a stud in the wall.
Review diagrams at right and determine which
one most resembles the trim around the entry
door to which you will mount your security door.
Hinge-side
jamb
Entry Door
Security Screen Door
Lock-side
jamb
Check for Hardware Interference
Measure the depth from the corner of
your mounting surface to your existing
entry door hardware. If this measurement
is 2-3/8" or greater there is no potential
for hardware interference. If the
measurement is less than 2-3/8", measure
from the edge of the mounting surface
on top of the door to the top and bottom
edge of the part of your existing hardware
that intrudes into the 2-3/8" clearance.
If either of these two measurements falls
between 39-1/4" and 43-1/4", the security
door and existing door hardware will
interfere with each other. You can either
build your mounting surface out to create
the clearance required or mount your
security door with an opposite swing to
your main entry door. If there is less than
2-3/8" clearance between the surface of
the main entry door and the security door
mounting surface, a build out is required.
Minimum 2-3/8"