
Installation Guide


E
F
G
H
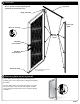
B.
the mounting process.
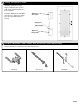
7
Push jamb up
into corner tight
against the top jamb.
Attach the sweep
8
#8 x 5/8" self-tapping screws
Bottom
of door
Push the sweep in place on the
bottom edge of the security door
sweep on the bottom lightly touches
the sweep in place using a wood
on a low speed so that the threads
do not strip.
Page 6
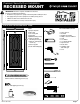
A. Mark for latch and deadbolt clearance BEFORE
permanently installing the latch-side jamb.
latch-side
Check with a level as
you mark each hole to
drill and again as you
install each screw