
Installation Guide
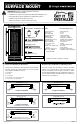


Premium Security Door Installation
SURFACE MOUNT
IMPORTANT: Read the complete installation instructions
before proceeding with installation.
• Installation may require two people when lifting and installing the door
• Use appropriate protective equipment, including safety glasses
• Children should not be allowed in work area
• Failure to install door correctly could result in injury
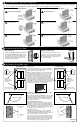
Parts and Recommended Tools
Recommended Tool List:
• Measuring tape
• Pencil
• Level
• Drill and drill bits*
(1/8", 5/32", 3/16")
• Flat-blade screwdriver
• Phillips head screwdriver
• One-way screw driver
and remover
• Square
• Tin snips/aviation snips
• Box knife
• Safety glasses
• Wood blocks and shims
• Paintable caulk and caulk gun
4" One-Way Screws
Touch-up Paint
One-Way Driver Tool
Self-tapping screws
#10 3-1/2" Dry wall screws (2 pcs.)
#8 Black screws (8 pcs.)
6" x 36" Cardboard Threshold Template
Parts:
A) Hinge-side jamb
B) Door slab
C) Lock-side jamb
D) Top header jamb
E) Bottom bar
F) Threshold plate
G) Multi-blade bug sweep
H) Touch-up paint
I) One-way driver tool
J) 4" one-way screws
(12 pcs.)
K) #10 3-1/2" drywall screws
(2 pcs.)
L) #8 black screws (8 pcs.)
M) 6" x 36" cardboard
threshold template
*Drill bits should be a minimum 4" in length
4" one-way screws (12 pcs.)
CA
E
D
F
G
B
M
H
L
I
K
J
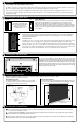
Determining Your Build Out Area
1
Determine Type and Readiness of Mounting Surface
Your new security door will require a minimum mounting
surface of 1" on the trim above, and on both sides of your
entry door. Mounting screws must be secured to a stud in
the wall. Review diagrams below, and determine which one
most resembles the trim around the entry door to which you
will mount your security door.
Inspect Your Entryway for Obstructions
Check for any obstructions above and around your entryway
that may prevent the outward swing of your new security
door, and/or its installation, such as:
Light xtures
Door bell
Low overhang
Door handle of your existing entry door
Trees, bushes, or hanging plants
Page 1
or or
or
Ready for installation
Ready for installation
Ready for installation
Entry Door Jamb
Entry Door
Stucco 2 (Top View)
Stucco
Pop-Out
1" minimum
mounting
surface
1" minimum
mounting
surface
This application will require 6" screws (Sold separately)
StudStud
Entry Door Jamb
Entry Door
Sloped Trim (Top View)
Sloped Trim*
Stud
Stud
Entry Door Jamb
1" minimum
mounting
surface
1" minimum
mounting
surface
Entry Door
Flat Trim (Top View)
Flat Trim
StudStud
Entry Door Jamb
Entry Door
Stucco 1 (Top View)
Stucco
Pop-Out
1" minimum
mounting
surface
1" minimum
mounting
surface
StudStud
Entry Door Jamb
Brick molding trim
Entry Door
Brick Molding (Top View)
StudStud
1" minimum
mounting
surface
1" minimum
mounting
surface
mounted between stucco pop-outs
mounted to front surface of stucco pop-outs
MK615 09212012
Ask an Associate for details or visit the Millwork Desk.