
Installation Guide
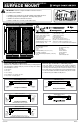

Determining Your Threshold Conguration
2
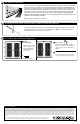
Look at your existing entry door threshold and use the diagrams below to determine which threshold conguration best applies to
your entryway. This will determine whether a bottom bar is or is not required for your double security doors.
The concrete is set back
and lacks space to mount
to the threshold plate.
The concrete extends at
least 7/8" further than
your trim.
The existing threshold sticks out
beyond the trim by 3/16" or less.
The existing threshold extends
past the trim between 3/16" and
7/8".
The concrete and thresh-
old sets back behind the
trim.
The existing threshold
extends beyond the trim by
7/8" or more.
Bottom Bar Required Bottom Bar NOT Required
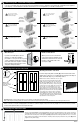
Preparing Your Security Door
3
Glass Removal
If your doors include glass, remove
it before you start the installation
procedure. Loosen (do not remove) each
screw. Carefully hold the glass panel in
place and rotate each clip 90°. Carefully
remove the glass panel and store it in a
safe place during installation.
Handleset Attachment
Attach your choice of locksets with
2-3/8" backset (Sold separately.) Fully
extend the lock bolts into the "locked"
position on the handle side of the
security door (D).
Rotate
clips 90°
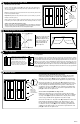
4
Installing the Inactive-side Jamb
Mounting the Inactive-side Jamb
Position hinge-side jamb assembly (A) on the inactive-side of the
double doors. Allow for a 1/8" gap between the hinge-side edge of
jamb and inside-edge of your mounting surface.
Support inactive jamb with temporary screws:
Drive two of the #10 3-1/2" drywall screws (N) supplied into the middle holes (1 & 2 in the diagram on left) for the inactive-side jamb (A). These screws are inserted only to hold the
security door frame plumb and will be removed and replaced in step 9.
Important: All jambs must be positioned to allow secure mounting to your trim framing around the opening.
Make certain the jamb assembly is plumb, and mark the location of the mounting holes with a pencil. Set the jamb aside and, where marked, pre-drill 3/16" holes.
Note: There should be a minimum of 2-3/4" space
below the hinge side jamb and below the entire
width of the door to allow space for the bottom
bar (attached in Step 10). It is okay to move the
doors up within the doorway to ensure this space,
as long as the top of the jambs do not go beyond
the top edge of your trim framing. If a 2- 3/4"
space exists across the entire doorway, skip to
step 5. Otherwise, position bottom bar assembly
(J) on the ground in front of the doorway with the
legs pointing up. Position the hinge-side jamb
assembly (A) on the inactive side of the double
doors sliding the jamb over the bottom bar leg to
correctly position the jamb. This alignment will be
repeated for the active side jamb.
J
Insert bottom bar into jamb
Note: verify
that direction of
hinge pins match
illustration
This side up
A
1
3
2
4
MK616
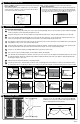
5
Installing the Top/Head Jamb
Place the top head jamb (E) above the side jamb (A). Take care to make sure that a minimum of 1/8" reveal is consistent on
side jamb (A) as well as on the top head jamb (E). Spacing should be equal, from left to right, and above the door. Mark
the location of the mounting holes. Set the top head jamb (E) aside and, where marked, pre-drill 3/16" holes 1-1/4" inches
deep. Return top head jamb to position and fasten to mounting surface using the provided one-way screws (M) and the
supplied one-way driver tool (L).
E
A