
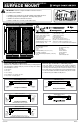
Installation Guide

6
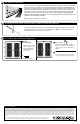
Installing the Active-side Jamb
Mounting the Active-side Jamb
Position active-side jamb assembly (B) on the active side of the double doors.
Allow for a 1/8" gap between the hinge-side edge of jamb and inside-edge of
your mounting surface.
Note: If the bottom bar has been placed under the door, slide the jamb over the
bottom bar leg refer to step 4.
Important: All jambs must be positioned to allow secure mounting to your trim
framing around the opening.
Make certain the jamb assembly is plumb, and mark the location of the mounting
holes with a pencil. Set the jamb aside and, where marked, pre-drill 3/16" holes.
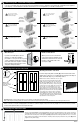
Support active jamb with temporary screws:
Drive two of the #10 3-1/2" dry wall screws (N) supplied into the middle holes (1 & 2 in the
diagram on right) for the active-side jamb (B). These screws are inserted only to hold the
security door frame plumb and will be removed and replaced in step 9.
A
E
B
This side up
1
3
4
2
Note: verify
that direction
of hinge pins
match illustration
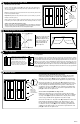
7
Hang the security doors (C
& D) on the jamb hinges
(A & B), holding the doors
open at more than a 90°
angle (see diagram at
right), starting with the
bottom pin rst.
Hang the Doors to Test Fit
More than 90°More than 90°
Top View
A
B
A
B
C
D
E
Jamb-side (B) hinge
Door-side (D) hinge
C
D
8
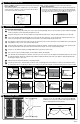
Lock Alignment
Lock Alignment
Test the alignment of the lock bolts with the lock holes by closing both door panels
and extending the bolts. Note: the bolt should slide easily in and out of the hole and
be somewhat centered. If the bolts do not align properly with the holes, measure the
distance, up or down, of the misalignment. Retract the bolts and remove the lock
side door panel from the hinges. Set aside. Remove temporary screws (N) from the
active side jamb, adjust the height as measured, and reinstall jamb with temporary
screws. Hang the door back on the hinges and retest lock t. If necessary, repeat until
properly aligned.
Gap between doors (C & D) and
both side jambs (A & B) should
appear equal on each side with a
minimal reveal of 1/8", up to 1/4".
NOTE: Rubber shims are pre-
attached to inactive-side door and
at the tops of doors to ensure proper
reveal. Use these as reference.
Hinge side
Lock side
Secure Jambs
9
Secure Inactive-side Jamb with One-way Screws:
Drill two 5/32" diameter holes 3" deep into the entryway trim mounting
surface through holes 3 & 4 in the inactive-side jamb (A). Drive the ¼"
diameter one-way screws (M) through holes 3 & 4 into the entryway trim
mounting surface using your drill and the supplied one-way driver tool (L).
Remove the two #10 3-1/2" dry wall screws (N) installed in the in-active
side jamb (1 & 2 in the diagram) and drill two 3/16" diameter holes 3" deep
into the entryway trim mounting surface through holes 1 & 2. Drive two
¼" diameter one-way screws (M) into holes 1 & 2 using your drill and the
supplied one-way driver tool (L). Use a level at the top and bottom of the
jamb (A) to make sure the jamb is level.
Secure active-side jamb with one-way screws:
Drill two 5/32" diameter holes 3" deep into the entryway trim mounting
surface through holes 3 & 4 in the active-side jamb. Drive the ¼" diameter
one-way screws (M) through holes 3 & 4 into the entryway trim mounting
surface using your drill and the supplied one-way driver tool (L).
Remove the two #10 3-1/2" dry wall screws (N) installed in the active-side
jamb (1 & 2 in the diagram) and drill two 3/16" diameter holes 3" deep
into the entryway trim mounting surface through holes 1 & 2. Drive two
¼" diameter one-way screws (M) into holes 1 & 2 using your drill and the
supplied one-way driver tool (L). Use a level at the top and bottom of the
jamb (B) to make sure the jamb is level.
MK616
Leveling
washers
A
E
B
This side up
1
3
4
2
Note: verify
that direction
of hinge pins
match illustration