
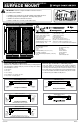
Installation Guide

10
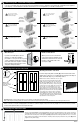
Installing the Bottom Bar
Note: If you will NOT be installing the bottom bar, discard the bottom bar and skip to step 11. This step is easier if both door panels are removed from the hinges.
Bottom Bar Placement
The bottom bar (J) will need to be installed 1/8" to 1/4" lower than the
existing doorway so that there is slope to the threshold. This allows
any moisture to drain away from the door.
Bottom Bar Installation
Insert bottom bar into the left and right door jambs. Adjust the bottom bar (J) to the
correct height. Using the predrilled holes in the center of each jamb (approximately
5/16" up from the bottom), install the bottom bar (J) using four #8 self-tapping
screws (O). Keep the drill on a low speed so the threads do not strip out.
J
11
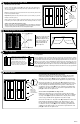
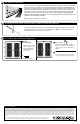
Threshold Plate Installation
Threshold Template Fitting
The contour of door framing varies, making it necessary to cut the threshold plate (H) to t. We recommend using the provided cardboard template (P)
to t the opening rst, to avoid cutting the threshold plate incorrectly.
Measure the widest portion of the doorway (usually the front edge). Divide this number by two. Cut both cardboard template pieces to this length.
Lay one of the provided cardboard templates (P) on top of the bottom bar, slide completely to one side, and push into existing threshold, as far as it
will go. Using a straight edge, mark the template at the various widths of your existing molding and trim, at both ends.
Move template so that front edge is ush to the front edge of bottom bar (it is okay to bend to allow to t the shortest width between your molding and
trim). Mark at the various corners of your existing molding and trim.
Using a box knife, cut template to shape of molding and trim revealed by the markings. Test t the template. (It should lay across the bottom bar, with
the front edge ush with the front edge of the bottom bar and t in and around the corners of the existing molding and trim).
Using the second cardboard template, repeat Steps 3 thru 5 for the opposite side of the doorway.
Once you have created a good tting template, use the template to mark the threshold plate.
Note: Each half of the threshold plate has a half circle cut into the center of one end. These are the midpoint and should butt against each other to form
the entire threshold plate. Overlay the cardboard temples with their straight ends butted together in the center. Align the cardboard template and the
threshold plates along the center seams.
Mark each end of the threshold to match the corresponding template.
Using tin-snips/aviator snips, cut threshold plate to match the shape of template (6). Position threshold plate to extend across the bottom bar and into
the existing threshold. Use 1/8" drill bit to pre-drill holes for mounting screws. Attach threshold plate to existing threshold using the provided screws (O).
1
2
3
4
5
6
7
8
9
10
1 2 3 4 5
7
6
8
9
10
12
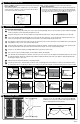
Installing the Doors
Hang the security doors (C & D) on the jamb hinges (A & B),
holding the door open at more than a 90° angle (see diagram
below), starting with the bottom pin rst.
A B
C
D
H
GF
I
E
Jamb side (B) hinge
Door side (D) hinge
More than 90°More than 90°
Top View
A
C
B
D
MK616
Existing door contour
Make cardboard templates
Fit template to contour Template ush with bottom bar Cut template to contour
Place template on threshold Mark threshold plateButt threshold plates togetherRepeat Steps 3-5 Cut threshold plate to t
Leveling washers