
Installation Guide
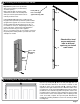
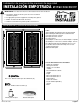

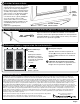

Installing the Door Closer and Wind Chain (optional, purchased separately)
10
Follow the manufacturer’s instructions included with the windchain
and door closer to install the windchain and door closer on your
new security door. Note: It is not required to use a windchain and
door closer for your security door.
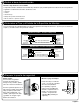
Final Touch Up and Upkeep Suggestions
11
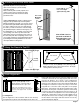
Caulk
(not included)
Caulk around the outside
of the security door jamb
frame using paintable
caulk and paint to the
desired color.
1
Paintable caulk & gun
Touch-Up Paint
Shake the supplied touch-up paint (K)
vigorously for 2 minutes and paint the heads of
the mounting screws and bug sweep.
White Grease Lubricant (not included)
Use white grease to lubricate the hinges of
your new security door every six months.
2
3
Warranty Information
Your Unique Home Designs Premium Security Screen door is warranted for residential installations against manufacturer defects under normal use for as long
as you own your UHD product, and terminates if you sell or otherwise transfer the product or the property upon which it was installed. The Powder Coat Finish
is warranted for ve years from date of purchase. All other components of the product, including sunscreen material, bug sweeps, weather-stripping, and
composite materials are covered for one year from date of purchase. If the door breaks or structural defects occur, Unique Home Designs will, at our discretion,
repair or replace the door. If your home is burglarized and entry was accomplished through a UHD security door, locked with a double dead bolt, UHD will pay
your insurance deductible up to $1000 or replace as applicable the damaged UHD security door at no charge (the "Home Protection Warranty"). Replacement
items may vary in style due to changes in suppliers and product. Not all colors can be reproduced if colors have been discontinued. UHD is not responsible for
any labor expense required to repair or replace the door. UHD is not responsible for securing the property while warranted items are being repaired or replaced.
Cutting parts not specied by the installation guide or parts drilled incorrectly are not included in this warranty. Any problem caused by abuse, misuse, failure to
maintain warranted item properly, adjustments due to settling of the structure that the product is mounted on, or acts of God, are not covered.
To make a claim under this Warranty, send a brief written description of the problem, a picture of the
claim, proof of purchase, and your contact information to: Unique Home Designs, 973 N. Colorado
Street, Gilbert AZ. 85233 Attn: Warranty Claims
VIEW INSTALLATION VIDEOS
AND LATEST INFORMATION AT
Page 5
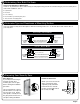
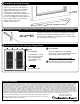
Installing the Bug Sweeps
9
#8 x 5/8" self-tapping screws
Bottom
of door
Push the sweep in place on the bottom
edge of the security door and adjust it so
that the rubber bug sweep on the bottom
lightly touches the threshold. You may
need to tap the sweep in place using a
wood block. Pre-drill with 1/8" drill bit and
secure the sweep in place using 2 of the
#8 x 5/8" self-tapping screws provided. Be
sure to keep your drill on a low speed so
that the threads do not strip.
Repeat on second door.