
Installation Guide


E
A
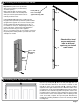
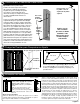
Installing the Top/Head Jamb
5
Place the top head jamb (E) above the side jamb (A). Take care
to make sure that a minimum of 1/8" reveal is consistent on side
jamb (A) as well as on the top head jamb (E). Spacing should be
equal, from left to right, and above the door. Mark the location of the
mounting holes. Set the top head jamb (E) aside and, where marked,
pre-drill 1/8" holes. Return the top jamb to the position, fasten to the
mounting surface in only the two end mounting holes and a mounting
hole that is in the center of the head jamb. After completing section
seven successfully complete the top head jamb attachment by
installing the remaining installation screws in the unused pre-drilled
mounting holes.
Page 3
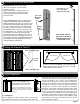
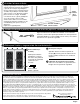
Hinge
pins
face up
Push jamb up
into corner tight
against the top jamb.
Check with a level
as you mark each
hole to drill and
again as you install
each screw
A
B
C
D
#8 x 1-1/4"
Mounting
screws
Installing the Inactive-side Jamb
4
Important: The jamb must be positioned to
allow secure mounting to your trim framing
around the opening.
Make certain the jamb assembly is plumb,
and mark the location of the mounting holes
with a pencil. Set the jamb aside and, where
marked, pre-drill 1/8" holes.
Hold the hinge-side jamb in place, making sure the
hinge pins face up and the top end of the jamb is butted
up against the top jamb. Use a level to ensure the jamb
remains plumb and mark through the holes A, B, C &
D. Drill four 1/8" holes 3/4" deep through the marks you
made on the frame. Put the hinge-side jamb back in
place and mount it using four of the supplied
#8 x 1-1/4" mounting screws (F). Use a level to ensure the
hinge-side jamb remains plumb as you install each screw
and adjust as needed.