
Installation Guide


Determining Your Build Out Area (continued)
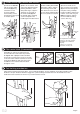
1
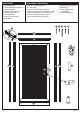
Install frame and prepare latch holes
5
Place the assembled 3-piece frame inside the opening. Install two temporary
mounting screws (
#6x2" drywall screws
(J)
)
on each side-jamb (B & D). One at
the top and one at the bottom.
These screws are inserted to temporarily hold the jambs in place. Do NOT
install permanent screws until the door is completely up and working
properly.
B D
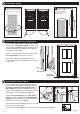
Remove temporary screws from lock-side jamb (D) ONLY and slide jamb away
from opening to expose marks made on the mounting surface. Use a block to
prop up the bottom of the latch-side jamb while preparing the latch holes.
Prepare latch holes in mounting surface:
Determining Your Build Out Area (continued)
1
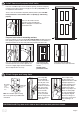
Attach hinges and hang door
6
Place hinge (F)
over pre-drilled
holes on the door.
The at part of the
hinge attaches to
the door. The barrel
side of the hinge
should always be
on the outside
of the door. Use
screws provided
with the hinges and
attach all 3 hinges
to the door.
Have a helper hold
the door in place. It is
important the door is held
in proper alignment so
the rst mounting screw
in each hinge is driven
straight into the door
panel. It may help to use
blocks or similar props
to assist in keeping the
door properly aligned.
Attach all 3 hinges to
door using screws that
attached hinges to
jamb.
Jamb Side:
Anti-bow
point
Door Side:
Anti-bow
point
receiving
hole
Note: The Anti-bow point receiving
hole lines up with the pre-drilled hole
on the door.
CAUTION: Do NOT lay door on it's side so that it rests on the 3-point lock throws.
Trace all 3 latch holes onto the
mounting surface including top,
bottom, and upper most of the two
center latch holes.
Re-install latch-side
jamb using temporary
screws.
Do NOT install
permanent screws.
Use a 1/2" wood chisel or spade drill bit (1/2") to
clean the latch hole area out to a depth of 3/4".
Chisel out a slightly larger area than marked to
allow for adjustment if necessary.
Install latch plate plug (P) into
unused lower most center latch hole.
D
Page 5
G2