
Installation Guide
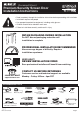


Page 6
Determining Your Build Out Area (continued)
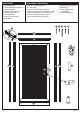
1
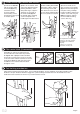
Install active door handle and lockset
7
1) Start on the interior
side of the door. With
the handle (N) facing
toward the screen,
insert the spindle
and mounting screws
through the mortise gear
in the door panel.
2) Move to the exterior of the
active door. With the handle
pointing toward the active
door panel hinges, align the
openings on the inside of
the other handle (N) with
the spindle and 2 mounting
screws and position the
handle against the door frame.
3) While holding both handle
trim plates in place, tighten
the mounting screws and
then back off 2 turns. These
screws will be tightened after
the lock cylinder is installed.
4) From the inside of the
door, insert the lock cylinder
(O) into the door through the
trim plate. Using a Phillips-
head screw driver, tighten the
retainer screw until snug. Do
NOT over-tighten. Tighten
the two handle mounting
screws until snug.
Spindle
Trim plate
screw
Trim plate
screw
Spindle
For duplication and rekeying
purposes, the lock cylinder
provided uses a Kwikset
®
keyway.
“Kwikset” is a registered
trademark of Newfry LLC.
Lock cylinder
Flat-head
bolt
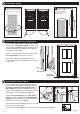
Determining Your Build Out Area (continued)
1
Flip center latch (if necessary)
8
Depending on right or left side placement
of active door the center latch may need to
be ipped. With a phillips-head screwdriver
loosen (do not remove) the screw just enough
to raise the latch and turn clockwise to reverse
the position. Note: the high side of the latch
should be on the exterior side of the door.
Re-tighten screw.
Door
exterior
Door
exterior
High side
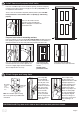
Determining Your Build Out Area (continued)Test locking mechanism
9
Verify that the locking mechanism opens, closes and locks properly. To test, pull down on the door handle to open
the door. Pull up on the door handle to engage the 3-point locking mechanism then turn the thumb-turn on the
inside of the door clockwise or turn the key counterclockwise to lock.
G2