
Installation Guide
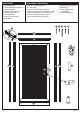


Determining Your Build Out Area (continued)
1
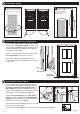
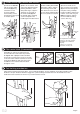
Install permanent mounting screws
10
Hinge-side jamb (B):
Pre-drill through mounting holes with
3/32"drill bit. Install permanent INSIDE
screws (#8x1" at-head screws (H)) into the
INSIDE mounting holes (Fig. 5) checking
that reveal stays even and 3-point locking
trigger will engage as you install each
screw. You may need to shim between the
frame and mounting surface if tightening
or loosening screws does not maintain the
reveal and 3-point lock does not engage
(Fig. 7).
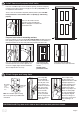
Lock-side jamb (D):
Close the door. There should be a 1/8"
reveal on the latch side. If necessary, place
shim(s) between the door and frame to
create the 1/8" reveal (Fig. 8). Pre-drill with
3/32"drill bit. Install OUTSIDE permanent
screws (#8x1" pan-head screws (L))into all
OUTSIDE mounting holes (Fig. 6). You
may need to shim between the frame and
mounting surface if tightening or loosening
screws does not maintain the reveal and
3-point lock does not engage (Fig. 8).
Install ALL remaining permanent screws
INSIDE and OUTSIDE of hinge-side jamb,
latch-side jamb and top-header jamb
adjusting and/or shimming as described
above.
Fig. 5 Fig. 6
Fig. 7
Security
Door
Top View
(cutaway)
Mounting
Screw
If necessary, add shims
here to make plumb
and adjust reveal
Hinge-side
Page 7
G2
Determining Your Build Out Area (continued)
1
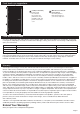
Install latch guard
11
1. Remove top and
bottom screws
from the one-piece
gear.
2. Attach the latch guard
provided in the hardware
box using two #8x1"
painted at-head screws
(H) in the pre-drilled
holes.
Fig. 8
Security
Door
Top View
(cutaway)
Mounting
Screw
If necessary, add shims
here to make plumb
and adjust reveal
Lock-side