
Installation Guide

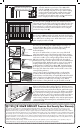


Parts and Recommended Tools
A) Door/Hinge-side
Jamb Assembly
B) Lock-side Jamb
C) Top Header Jamb
D) Bottom Bar
E) Threshold Plate
F) Multi-blade Bug Sweep
Recommended Tool List:
•Measuring tape
•Pencil
•Level
•Drill and drill bits
(1/8", 5/32", 3/16")
•Flat-blade screwdriver
•Phillips-head screwdriver
•One-way driver
•Square
•Tin-snips (or hacksaw)
•Box knife
•Safety glasses
•2x4 Wood blocks
•1x3 Wood blocks
•Wood shims
•Touch-up paint
It is also recommended
to have a helper.
1
Installation
Instructions
A
C
B
F
D
E
3
Self-tapping Screws
4" One-way Screws
#10 (2)
Painted
#8 (6)
Painted
H J
G
Attach your choice of locksets with 2-3/8" backset. (Sold separately)
Fully extend the lock bolts into the “locked” position.
For Guardian, Pima
and Sylvan models
#8 (6)
Black
I
#8 (30)
Painted
*Self-tapping screws provided with screens
For questions regarding installation, missing parts, or warranty
service please contact Unique Home Designs at (877) 340-3667
from 7am to 5pm MST, send an email to 247info@uhdco.com,
or write to Unique Home Designs Customer Service at:
973 N. Colorado Street, Gilbert, AZ 85233.
STOP
Screens or glass inserts should be installed
prior to installing the door to your house.
Lay the door/hinge-side assembly flat with outside
of the door face down on the door’s cardboard
packaging to avoid damaging the paint.
Fit screens into the door, so that the flatter side of
the screens are face up (See illustrations).
Hold screens in place and mark position of a
hole at the top and bottom of each screen. Set
the screens aside and use 1/8" drill bit to pre-
drill holes at each mark. Using 2 of the provided
screws* for each screen, attach the 3 screens to
the door, fastening at the pre-drilled holes. Once
secured, finish pre-drilling remaining holes and
install the rest of the screws.
2
Position door/hinge-side jamb assembly (A) in front of opening.
Allow for a 1/8" gap between the lock-side edge of door
and inside-edge of your mounting surface, as well as a 1/8"
gap between the top-edge of door and bottom-edge of your
mounting surface (see illustration).
Note: There should be a minimum of 1-3/8" space below
hinge-side jamb to allow space for the bottom bar (attached
in Step 6). If this space is not there after positioning the door
as directed above, it is okay to move the door up, so long
as the top of the jamb does not go beyond the top-edge of
your framing.
Important: All jambs must be positioned to allow secure
mounting to your framing around the opening.
Make certain door/hinge-side jamb assembly is plumb, and
mark the location of the mounting holes for hinge-side jamb.
Set door aside and, where marked, pre-drill 3/16" holes.
Return door to position and fasten to house using the
provided one-way screws (G).
Wood blocks and shims
placed underneath door,
will help to hold position
1/8" gap
1/8"
gap
PLEASE READ ALL INSTRUCTIONS
BEFORE YOU BEGIN INSTALLATION
CONTACT US BEFORE RETURNING TO STORE