
Full Product Manual


MAINTENANCE AND SERVICE
The LP gas pressure should be checked and the main regulator readjusted if pressure is incorrect. The correct
operating pressure is 11” W.C. (water column).
Inspect the fl ue ba e, it should be clean and free of soot. Any soot formation indicates improper functioning
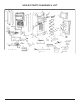
of the burner. The fl ue and burner both require cleaning in the following manner:
• Remove cover from the burner housing.
• Remove the burner by removing the burner mounting screw
• Remove the wire and fl ue ba e from the top of fl ue tube. Clean the fl ue from the top using a fl ue brush
and be sure to cover the burner if remaining intact to eliminate dirt falling into the burner. Blowing
compressed air into the fl ue should clean out soot and scale. Replace the fl ue ba e.
• Clean burner tube with compressed air, check for fl u or spider webs.
• Before removing burner orifi ce, clean burner area of any soot, scale or dirt. Remove the orifi ce/burner jet
and soak it in alcohol (isopropyl alcohol or thinners) and blow it out with compressed air. Re-install and
tighten burner orifi ce.
• Replace burner
WARNING - DO NOT use a pin or wire when cleaning the burner orifi ce as damage can occur to
the precision opening. This can cause damage to the refrigerator or create a fi re hazard. It will also
create extremely dangerous levels of carbon monoxide.
• The inlet and outlet gas fi ttings on the refrigerator need to be checked for leaks. Apply a non-corrosive bubble
solution to the fi ttings and observe for leaks. The safety valve will not allow gas pressure to any connections
between it and the burner orifi ce. These fi ttings must be checked while burner is in operation (gas fl ow will be
present between safety valve and burner head).
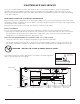
WARNING – The gas button D (Fig. #5) must be manually depressed to allow gas pressure to
fl ow to the burner orifi ce. Be sure to apply the leak check solution before depressing the safety
shut–o . DO NOT allow any open fl ame, sparks, smoking, etc. in the area of the test. DO NOT
depress safety shut-o for over 30 seconds.
• If a leak occurs, then allow ten minutes to dissipate from the burner area. Fix leak then light the burner
according to the instructions under GENERAL OPERATING INSTRUCTIONS – GAS OPERATION.
13