
Full Product Manual


7
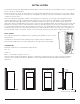
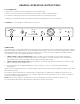
• Fig. #1 - This is ideal as both top and sides are open
• Fig. #2 – During hot/humid weather this confined area will become very warm. To reduce heat build-up,
we recommend providing an area for two air vents to circulate the air. One placed 6” o the floor and the
other at or above the appliance top. Cold air return vents with adjustable louvres/dampers, works very
well. This will allow hot air to evacuate the area and assist in air flow across the fins (similar to air passing
across a radiator) – See Fig. #4
• Fig. #3 – If this is your opening you only need to stay the diagrammed distance from the wall and ceiling.
There is no need for additional venting.
INSTALLATION
GAS CONNECTION
Hook-up to the gas supply line: 3/8” SAE (UNF 5/8” - 18) male flare connection. A backup wrench must be
used when tightening gas supply fitting. All completed connections should be checked for leaks with a non-
corrosive leak detector and/or soap and water for a bubble check.
WARNING – DO NOT USE FLAME TO CHECK FOR GAS LEAKS
The gas supply system must incorporate a pressure regulator to maintain a supply pressure of not more
than 12” water column and no less than 11” water column (max setting).
Make sure the refrigerator and any other high BTU appliances on your line are turned on when checking
the gas pressure. The appliance and its individual shut-o valve must be disconnected from the gas supply
piping system during any pressure testing of that system at pressures in excess of ½” psig.
In case detailed instructions on the installation and connection of the gas supply are required, contact your
dealer or distributor.
LEVELLING
Ensure the fridge is level by using a 2’ level. Level the fridge front to back and left to right using the top of
the appliance. There are no levelling legs at the back of the appliance just at the front; if the back if your
floor is uneven you will have to use shims of some sort to ensure the appliance is level. See the importance
of levelling explained on next page.