
Installation Guide
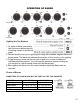
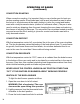


the electronic ignition. Note that you will hear a “clicking” noise. Hold the knob
pressed inward until the oven burner is lit. Once the oven burner is lit, release
the knob. In case of power outage, you can manually light the burner by press-
ing the knob inward and immediately approach a lighted match to the area
noted in the diagram above.Never continue this operation for more than 15 sec-
onds. If the burner has still not ignited, wait for about 1 minute prior to repeating
the ignition.
4. Whenusingtherangeforthersttimeorafterlongperiodofnon-usage,keep
pressing the knob inward for approximately 10 – 15 seconds after the burner
has lit to ensure the gas valve has been accurately primed.
5. Slowlyclosetheovendoor.Iftheameextinguishesforanyreason,thesafety
valve will automatically shut off the gas supply to the burner.
Tore-lighttheburner,rstturntheovencontrolknobtotheposition,waitforat
least 1 minute and then repeat the lighting procedure.
Always broil with oven door closed. Attention: the oven door becomes
very hot during operation. Keep children away.
BROILING
Very important: the broil burner must always be used with the oven door
closed.
Position the oven rack on the second level from the top
1. Turn on the broil burner, as explained in the preceding paragraphs and let the
broil burner preheat for about 5 minutes with the door closed.
2. Place the food to be cooked below the broiler.
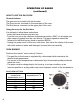
OVEN LIGHT
The range is equipped with a light that illuminates
the oven to enable visually controlling the food
that is cooking. This light is controlled by a button
on the right hand side of the control panel. Sim-
ply push the switch to activate the light.
CHANGING OVEN LIGHT BULB
Remove light bulb cover and unscrew light bulb
counter clockwise. Replace with an E14 120V
25W 300°C bulb.
ALIGNMENTS AND ADJUSTMENTS
37