
Installation Guide


44
CARE AND MAINTENANCE
(continued)
REPLACING THE OVEN LIGHT
•Lettheovencavityandbroilburnercooldown.
•Switchofftheelectricsupply.
•Removetheprotectivecover.
•Unscrewandreplacethebulbwithanewonesuitableforhightemperature
(200°~500°F)havingthesamespecications:E14120V25W300°C.
•Replacetheprotectivecover.
NOTE: Oven bulb replacement is not covered by your guarantee.
LEVELING THE RANGE
The range must be level to obtain proper operating. The four screws type lev-
eling legs located on the corners at the bottom of range should be adjusted by
turning them clockwise to make the range higher or counter-clockwise to lower
the range until the range is level. Use a level on surface units to check the
leveling of the range.
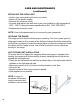
ANTI-TIP BRACKET INSTALLATION
To reduce the risk of tipping the range by abnormal usage or improper door
loading, the range must be secured by properly installing the anti-tip device
packed with the appliance.
•Placetheanti-tipbracketontheoorasshowngure.Anti-tipbracketcanbe
installed on the right and left side.
•Makethelocationsof2(x2)holesofant-tipbracketontheoor.
•Useadrillbit
•Securebrackettooorusingscrewssupplied.
•Slideapplianceintoposition.
NOTE: If range is
relocated, the bracket
must be removed and
installed in new location.