96 L / 3.
UNIQUE UGP-3 PORTABLE CAMPING REFRIGERATOR Installation and Owner’s Manual WARNING: Improper installation, adjustment, alteration, service or maintenance can cause injury or property damage. Refer to this manual. For assistance or additional information consult a qualified installer, service agency or the gas supplier. !SAVE THESE INSTRUCTIONS! FOR YOUR SAFETY IF YOU SMELL GAS Open windows. Do not touch electrical switches.
MANUFACTURED AND CERTIFIED BY Unique Gas Products Ltd 2245 Wyecroft Road Oakville, Ontario Canada L6L 5L7 Ph: 905-827-6154 Toll Free: 1-877-427-2266 Fax: 905-827-2027 www.UniqueOffGrid.com E-mail: info@UniqueOffGrid.
Table of Contents Chapters Welcome 1 Safety and Warnings 1 Appliances Installation/ Operating Instructions 2 Maintenance & Service 3 Troubleshooting & Suggested Spares 4 Door Removal and Reversal and Heating Element Replacement 5 Temperature Controls & Food Storage and Cleaning 6 Wiring Diagram 7 Parts & Warranty 8
U N I Q U E U G P 1 Chapter 3 Welcome & Congratulations C ongratulations on your purchase of a UNIQUE refrigerator!. We are very proud of our product and we are completely committed to providing you with the best service possible. Your satisfaction is our #1 priority. Please read this manual very carefully. It contains valuable information on how to properly maintain your new gas refrigerator. We know you will enjoy your new refrigerator and thank you for choosing one of our Unique Gas Products.
U N I Q U E U G P 3 Safety and Warnings If you smell gas Open windows Don’t touch electrical switches Extinguish any open flame Immediately call your gas supplier For you Safety Do not store or use gasoline or other flammable vapors and liquids in the vicinity of this unit or any other appliance. Warning Improper installation, adjustment, alteration, service or maintenance can cause injury or property damage. Refer to this manual.
U N I Q U E U G P 2 Chapter 3 Installation and Operating Instructions Installation For best performance at high ambient temperatures, there must be free air circulation over the cooling unit at the rear of the refrigerator. Ensure that there is a free air space above the refrigerator and that the flue (chimney) on top of the cabinet is not covered in any way. Do not place the refrigerator in a space where air circulation is restricted. Follow “clearance” instructions.
U N I Q U E U G P 3 Note: DO NOT install the appliance directly on carpeting. Carpeting must be removed or protected by a metal or wood panel beneath the appliance, which extends at least the full width and depth of the appliance. Keep appliance area clear and free from combustible materials, gasoline and other liquids with flammable vapors.
U N I Q U E U G P 3 Connecting of Gas Supply B. Option - Outdoor use only A. – Indoor and Outdoor use A. Indoor and Outdoor use only 1. Use supplied #600 connector, regulator and hose to connect your appliance to the gas supply #3. 2. Tighten #3 to #600 regulator assembly 3. and #4 using a backup wrench to the appliance. 4. After connecting, all gas connections must be checked for leaks.
U N I Q U E U G P 3 General Operating Instructions Importance of Leveling a Refrigerator The refrigerator must be adjusted to a vertical position in both directions. In an absorption refrigeration system, ammonia is liquefied in the finned condenser coil at the top rear of the refrigerator. The liquid ammonia then flows into the Evaporator (inside the freezer section) and is exposed to circulating flow of hydrogen gas, which causes the ammonia to evaporate, creating a cold condition in the freezer.
U N I Q U E U G P 3 5. Release the safety device control (D) and again check to see that the flame is alight, making sure the needle is in the green area of the flame indicator. 6. Adjust the thermostat knob (E) to desired temperature setting and allow for 6 to 8 hours of operation to achieve desired temperature. Shut Down Procedure – LP Gas 1. To terminate gas operation, turn selector switch (A) to either OFF or AC (110V) position. 2.
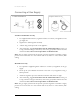
U N I Q U E U G P 3 4. To terminate any power mode, gas, AC or DC, turn the knob (A) to either of two OFF positions Battery replacement for electronic spark ignition When the battery ignition fails to spark, you need to replace the battery, replacement step as follows 1. Hold and pull down the “A” as illustrated in pic, take out the battery box. 2. Replace the old AAA battery “B” with new one. Note: 7#1.5V battery need to be used and the red wire must connect to the “+” side of the battery.
U N I Q U E U G P 3 1. “DEF” Defrost setting on the Gas/Electric Thermostat: In gas operation, the thermostat closes its main valve and the burner runs continuously at the bypass rate or pilot flame. (turn fully counter clockwise), and in 110V operation the element will cycle off, until cooling is again required. 2. “MAX” Setting of the Thermostat: In gas operation, the thermostat allows the burner to remain on high flame continuously.
U N I Q U E U G P 3 performance. Check the formation of frost every week and when it exceeds ½” thick, defrost the refrigerator. Shut off and empty the refrigerator, leaving the fridge and the freezer doors open. Defrosting time can be reduced by filling the ice tray with hot water and placing it in the freezer compartment. DO NOT USE A HOT AIR BLOWER, PERMANENT DAMAGE COULD RESULT. DO NOT USE A KNIFE, ICE PICK, OR ANY OTHER SHARP TOOLS TO REMOVE FROST FROM THE FREEZER COMPARTMENT.
U N I Q U E U G P 3 Chapter 3 Maintenance & Service The user should be aware of service that must be done on a regular schedule to keep the refrigerator operating properly. Installation must be by a licensed gas fitter in accordance with local codes or must comply with Propane Installation Code CAN/CGA-B149.2 (latest edition) Keep appliance area clear and free from combustible materials, gasoline and other liquids with flammable vapors.
U N I Q U E U G P 3 Check all connectors in the complete refrigerator LP gas system for gas leaks. The LP gas supply must be turned on. Apply a non-corrosive bubble solution to all LP connections. The appearance of bubbles indicates a leak and should be repaired immediately by a qualified serviceman. WARNING – DO NOT USE FLAME TO CHECK FOR GAS LEAKS PROCEDURE FOR CLEANING THE COOLING SYSTEM FLUE WARNING: Carbon Monoxide can be hazardous to your health.
U N I Q U E U G P 3 blow it out with compressed air. Do not use thin objects to either clean or unblock the injector. Re-install and tighten burner orifice. 5. Replace burner Warning - DO NOT use a pin or wire when cleaning the burner orifice as damage can occur to the precision opening. This can cause damage to the refrigerator or create a fire hazard. It will also create extremely dangerous levels of carbon monoxide.
U N I Q U E U G P 3 WARNING – Button (D) Fig. #1, page 8, must be manually depressed to allow gas pressure to flow to the burner orifice. Be sure to apply the leak check solution before depressing this button. DO NOT allow any open flame, sparks, smoking, etc. in the area of the test. DO NOT depress (D) for over 30 seconds.
U N I Q U E U G P 4 Chapter 3 TROUBLESHOOTING INSTRUCTIONS & SUGGESTED SPARE PARTS TO KEEP ON HAND REFRIGERATOR DOES NOT COOL, CHECK LIKELY CAUSES: 1. Burner orifice clogged. Clean. See section MAINTENANCE & SERVICE, CHAPTER 3 2. Check to ensure refrigerator is level – (left to right and front to back). 3. Restriction on air flow across cooling unit. 4. Heavy frost build up on evaporator fins. Defrost. 5. Flue baffle not inserted properly in flue tube. 6. Improperly set thermostat.
U N I Q U E U G P 3 Suggested Spare Parts The following is a list of commonly used parts which are available: Burner orifice Burner Electrode Thermocouple Baffle Contact your dealer or an authorized service center for parts and repairs as needed. Quote Model & Serial # - See CSA rating/serial plate on back of appliance.
U N I Q U E U G P 5 Chapter 3 Door Removal & Reversal Instructions This appliance has the capability of either opening the door from the left or right side. The unit is delivered to you with the door opening from the left side, to the right. Should you desire to reverse the opening direction, please follow instructions below.
U N I Q U E U G P 3 How to reverse the door: 1. Lay the fridge on one side exposing the bottom of the fridge, suggested hinge side up. 2. Remove the lower hinge (D) by loosening and removing all the screws with screwdriver. 3. Carefully pull away the door from top pin (E) and set aside. 4. Remove the top hinge pin (F) with a slotted screwdriver and move it to the opposite side (G).
U N I Q U E U G P 3 5. Turn fridge upside down and proceed to slide the top of the freezer door onto the top hinge pin. 6. Insert the lower hinge into the bottom hole of the fridge door, also including any round spacers that may have been present on the hinge pin when you removed the hinge. Line up the side of the fridge door with the cabinet before tightening hinge to bottom of cabinet. Start to fasten the lower hinge to the bottom of the appliance.
U N I Q U E U G P 3 3. Remove some insulation wool so that the heater (A) is accessible. 4. Open the terminal block cover and disconnect the heater leads. 5. Turn and lift the heater out of its pocket. 6. Fit the new heater into the pocket. 7. Connect the leads and close the terminal Block cover. 8. Carefully put the insulation wool back into position and close the cover of the boiler casing.
U N I Q U E U G P 6 Chapter 3 Looking Inside SHELF ADJUSTMENT Refrigerator shelves are easily adjusted to suit individual needs. Before adjusting the shelves, remove all food. Food Storage Ideas FRESH FOOD STORAGE The fresh food compartment should be kept between 38° F and 40° F (3.3° C and 4.4° C) with an optimum temperature of 38° F (3.3°C). Avoid overcrowding the refrigerator shelves. This reduces the circulation of air around the food and results in uneven cooling.
U N I Q U E U G P 3 Force as much air out of the packages as possible and seal them tightly. Trapped air can cause food to dry out, change color, and develop an off-flavor (freezer burn). Wrap fresh meats and poultry with suitable freezer wrap prior to freezing. Do not refreeze meat that has thawed. LOADING THE FREEZER Avoid adding too much warm food into the freezer at one time. This overloads the freezer, slows the rate of freezing, and will raise the temperature of frozen foods.
U N I Q U E U G P 7 Chapter 3 Wiring Diagram 23
U N I Q U E U G P 8 Chapter 3 Parts Diagram and List UNIQUE UGP 3 ‐ EXPLODED DIAGRAM 24
U N I Q U E U G P 3 UNIQUE UGP 3 – Parts List No. 1 2 3 4 5 7 11 12 13 14 15 16 17 18 19 20 21 22 24 25 26 27 28 Item Cabinet Front panel bracket Bottom hinge Washer Crisper Fridge door ‐ White Fridge door ‐ Black Bottom shelf Battery box Battery box holder ‐ White Battery box holder ‐ Black Battery Top shelf Middle Shelf Balcony Balcony spacer Screw Door handle Ice cube Tray Egg tray Freezer door hinge assy. Spring Top hinge Bottom hinge Axle Screws Freezer Door Assy.
U N I Q U E No.
U N I Q U E No.
U N I Q U E U G P 3 Warranty UNIQUE UGP-3 PROPANE REFRIGERATOR - 3 YEAR LIMITED WARRANTY Unique Gas Products Ltd. warrants that this UNIQUE UGP 3 refrigerator is free from defects in material and workmanship under normal usage and service under the following terms: 1. This Warranty is made only to the first purchaser (”original purchaser”) who acquires this refrigerator for his/her own use and will be honored by Unique Gas Products Ltd. and by the Seller. 2.