
Owners Manual


24
8. Remove all NG orifices, place in the bag and store in a safe place.
9. Take the LPG orifices provided and install them as shown below.
See below for rating of orifice for this model
Liquid Propane Gas Orifices
BTU 14,000 9,000 3,200 9,000 9,000 12,800
BURNER Auxiliary
Burner
Semi-Rapid
Burner
Triple Burner Rapid Burner Broil Burner Oven Burner
POSITION Front Right Rear Left Rear Right Front Left
ORIFICE 0.53
0.77
x2
0.93 0.57 0.93 0.93 1.07
10. Once all the orifices are installed, replace all burners and burner caps, then fire up
the burners to check the minimum flame height.
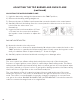
To replace the oven burner orifice
1. Open oven door.
2. Remove all racks, then the bottom pan by lifting up the
back first to release the front then pull pan out.
3. Locate the burner tube and locate the retaining screw
at the front of the tube. Once this screw has been
removed, lift up the burner and pull away slightly to
expose the oven orifice.
4. With a 7 mm wrench remove the orifice and replace with LPG orifices.
5. Replace the burner tube, then start up the oven to check oven flame, making sure
it’s tight and blue. Adjust the air shutter at the back of the burner tube to achieve
this. Once you have the bottom pan and oven door closed, you will be able to see
how the flame should look by viewing the flame through the door.
To replace the broiler burner orifice
1. Open oven door.
2. Locate the burner tube on the top of the oven cavity and locate the retaining screw
at the front of the tube. Once this screw has been removed, lift up the burner and
pull away slightly to expose the broiler orifice.
3. With a 7 mm wrench remove the orifice and replace with LPG orifices.
4. Replace the burner tube, then start up the broiler to check oven flame, making sure
it’s tight and blue. Adjust the air shutter at the back of the burner tube to achieve this.
GAS RANGE CONVERSION (continued)
OVEN ORIFICE
ORIFICE
WRENCH