
Owners Manual


34
OPERATION OF RANGE (continued)
CONVECTION ROASTING
When convection roasting, it is important that you use a broiler pan for best convection
roasting results. A broil/roast pan (with a rack) elevates the roast to allow the hot air
to circulate around the meat, sealing in juices for a moist and tender roast with a richly
browned exterior (similar to a rotisserie eect.) The pan is also used to catch any
drippings from the roast, keeping the oven clean and reducing the chance of smoking
or flare-ups. The convection fan circulates heated air evenly over and around the food,
sealing in juices for a moist and tender roast with a richly browned exterior.
CONVECTION DEFROST
With the temperature control o, a motorized fan in the rear of the oven circulates
air. The fan accelerates natural defrosting of the food without heat. To avoid bacteria
growth, food-borne illness and food waste, do not allow defrosted food to remain in the
oven for more than 2 hours without being cooked.
CONVECTION DEHYDRATE
With the temperature control at 175˚F, warm air is radiated from the bake burners in the
bottom of the oven cavity and is circulated by a motorized fan in the rear of the oven.
Over time, this constant circulating heat evaporates moisture from food, which inhibits
bacteria growth and halts enzyme activity
NEVER LEAVE THE CONTROL KNOBS IN ANY POSITION OTHER THAN “OFF” IF THE
IGNITORS OR BURNERS AREN’T WORKING PROPERLY.
IGNITION OF THE BROIL BURNER
To light the broil burner operate as follow:
1. Open the oven door to its full extent.
WARNING: Risk of explosion! The oven door must be open during this operation.
2. Lightly press and turn the thermostat knob clockwise to the broil position.
3. Press the knob inward and hold to activate the electronic ignition. Note that you
will hear a “clicking” noise. Hold the knob pressed inward until the oven burner is
lit. Once the oven burner is lit, release the knob. In case of power outage, you can
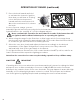
manually light the burner by pressing the knob
inward and immediately approach a lighted
match to the area noted in the diagram above.
Never continue this operation for more than 15
seconds. If the burner has still not ignited, wait for
about 1 minute prior to repeating the ignition.