UDS 1491 Printer Setup Guide UNISYS © 2005 Unisys Corporation. All rights reserved.
NO WARRANTIES OF ANY NATURE ARE EXTENDED BY THIS DOCUMENT. Any product or related information described herein is only furnished pursuant and subject to the terms and conditions of a duly executed agreement to purchase or lease equipment or to license software. The only warranties made by Unisys, if any, with respect to the products described in this document are set forth in such agreement.
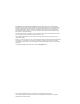
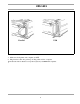
UDS 1491 Check the contents: 1. Printer 2. Ribbon cartridge 3. Power Cable 2 4. CD with online User and Setup Guide 5.
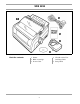
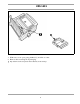
UDS 1491 2. 1. 1. Grasp tabs (1) and open access cover (2). 2. Remove printhead shipping retainer.
UDS 1491 2. 1. 3. 1. Grasp tabs (1) and remove the paper separator. 2. Remove protective material. Replace the paper separator. 3. Remove protective material from the pull-up roller assembly (2).
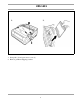
UDS 1491 1. With access cover open, grasp printhead (1) and slide to center. 2. Remove ribbon cartridge from packaging. ! Important! Leave the clear plastic ribbon shield (2) on the cartridge.
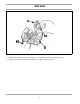
UDS 1491 1. Hold ribbon cartridge as shown with knob (1) up and ribbon shield (2) facing platen (3). 2. Fit grooves on sides at back end of cartridge over pins on ribbon plate (4).
UDS 1491 1. Lower front of cartridge over printhead (1) until it snaps into place. 2. Turn knob (2) clockwise to take up ribbon slack.
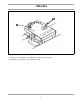
UDS 1491 Set the headgap lever (1) for the number of sheets in the forms you are using from 1-4. Use setting 5 for envelopes or extra-thick paper. Adjust setting for the best print quality.
UDS 1491 USB Parallel 1. Make sure both printer and computer are OFF. 2. Plug interface cable into printer port. Plug other end into computer. ! Parallel cable must be shielded, no longer than 6 ft (1.8m), and IEEE 1284-compatible.
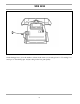
UDS 1491 2. 1. 1. Plug power cord into printer. Plug other end into a grounded outlet. 2. Turn the printer on. POWER light (1) comes on and ALARM light (2) comes on because paper is not loaded.
UDS 1491 1. 3. 2. 1. Move the paper lever (1) to “REAR” position. 2. Grasp the paper separator (2). Lift slightly then slide back. 3. Pivot forward and rest gently against the roller assembly.
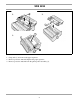
UDS 1491 1. Above view is from rear. Locate tractors. Pull up on tractor lock levers (1) to release tractors. 2. Position right-hand tractor for width of paper. See paper size reference marks on printer. 3. Open the tractor covers (2). This action raises the paper separator.
UDS 1491 Pull paper and place first two holes on each side over tractor pins (1). ! Equal number of paper holes must be engaged on each tractor to ensure proper paper feed.
UDS 1491 1. Close right tractor cover (1). 2. Push down on lock lever (2) to lock tractor.
UDS 1491 1. Position left tractor so that paper holes are centered on pins and paper is not stretched or too loose which could cause jams. Close tractor cover (1). 2. Push down on lock lever (2) to lock tractor.
UDS 1491 1. Replace the paper separator. Make sure the marks (1) are aligned. 2. Swing over the wire paper feed guide (2) to rest on roller assembly.
UDS 1491 Push FF/LOAD button. Paper feeds into printer and ALARM light goes out. ! For instructions on loading single sheet paper, see the User’s Guide on the CD.
UDS 1491 Setting the Top of Form (TOF) Position The factory default setting for the Top of Form (TOF) (where the printing should begin) is one inch down from the top of the page. The first line prints at the red line on the plastic paper shield (1). Your software may print the first line of print above or below where TOF is set. You may need to adjust the TOF to meet your software’s needs. Determine the Forms Tear-Off Setting How you set TOF is determined by the Forms Tear-Off setting.
UDS 1491 Using a Compatible Driver Note: See your software documentation for information on how to select a printer driver. The drivers below are listed by decreasing compatibility with your printer. Use one as close to the top of the list as possible.
UDS 1491 See the On-Line User’s Guide The complete on-line User’s Guide is provided on the CD. You need Adobe Acrobat Reader to view the guide. Consult the User's Guide for information on • operating your printer • menu selections • problem solving • maintenance and service.
UDS 1491 Service and Support If you need further assistance or have questions, see our web site: http://www.unisys.com In the U.S.
.
*68959691-000* 68959691-000