
Installation Instructions


10
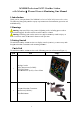
If it does not update, please reference the troubleshooting guide in Section 18.
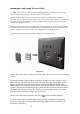
Note: The power adapter is intended to be correctly oriented in a vertical or floor
mounted position. The prongs are not designed to hold the plug in place if it is plugged into
a ceiling, under-the-table or cabinet outlet.
Figure 12
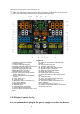
Note: If the power adapter is plugged in, BL ON will display in the time area for three
seconds when powered up. Conversely, if the power adapter is not plugged in, AC OFF
will be displayed, the icon will display .
3.4.2Sensor Operation Verification
The following steps verify proper operation of the sensors prior to installing the sensor
array.
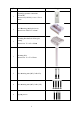
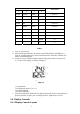
1. Verify proper operation of the rain gauge. Tip the sensor array back and forth several
times. You should hear a “clicking”sound within the rain gauge. Verify the rain reading on
the display console is not reading 0.00. Each “click”represents 0.3mm of rainfall.
2. Verify proper operating of the wind speed. Rotate the wind cups manually or with a
constant speed fan. Verify the wind speed is not reading 0.0.
3. Verify proper operation of the indoor and outdoor temperature. Verify the indoor and
outdoor temperature match closely with the console and sensor array in the same location
(about 3m apart). The sensors should be within2°C (the accuracy is ±1°C). Allow about 30
minutes for both sensors to stabilize.
4. Verify proper operation of the indoor and outdoor humidity. Verify the indoor and
outdoor humidity match closely with the console and sensor array in the same location
(about 3m apart). The sensors should be within 10% (the accuracy is ± 5%). Allow about
30 minutes for both sensors to stabilize
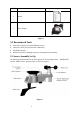
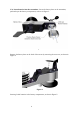
4.Weather Station Installation
4.1
Pre Installation Checkout Before installing your weather station in the
permanent location, we recommend operating the weather station for one week in a
temporary location with easy access. This will allow you to check out all of the