
Installation Manual Owner manual


PORTAL TI
Portal Installation Manual Rev C 9
Document #: PTL1001
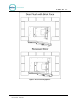
When installing the frame in pre-existing concrete, set the frame in the desired
location and mark the location of each leg of the frame. Drill 2 ½ in. diameter by 8 in.
deep (minimum) holes in the concrete for the frame legs. Fill the holes with concrete
anchoring cement (such as Quickrete #1245-20) and insert the base legs. Ensure
the frame is level and place the plastic base cover over the frame after the anchoring
cement has set.
Note:
For added security, the base can be filled with concrete. Before doing so however, the
electrical conduits should be extended to the top of the frame. A rope (or similar
material) should be tied around the plastic cover to prevent it from expanding as
concrete is poured.
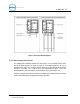
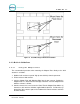
Before setting the Portal in place, ensure the field-installed wires are routed to a point
where they can be accessed and pulled through the wiring holes on the bottom of the
Portal. Carefully set the Portal on top of the base so the (3) studs of the base pass
through the mounting holes on the bottom of the Portal. Secure the Portal to the
studs with the flat washer, lock washer and hex nut (in that order) supplied with the
base. Pull the wires up through the cable entrance ports on the bottom of the Portal
enclosure.
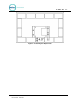
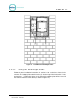
2.4 Brick-In Installation
2.4.1 Brick-in Mounting Options
There are (2) options for bricked-in mounting:
• Build the brick enclosure, fill it with concrete, sink the Adaptor Plate with
Mounting Bolts into the wet concrete, let the concrete cure, mount the
Portal TI unit, and then finish bricking in the unit.
• Install the Curb-Height Steel Frame, attach the Adaptor Plate, build the
brick enclosure around the frame, mount the Portal TI unit, and finish
bricking in the unit. For added security, you can fill the brick enclosure
with concrete prior to mounting the Portal TI unit.