
User guide


WASHPAY
Document Number: WP1007
Receipt Printer Installation Instructions
The WashPay Receipt Printer should be centrally located and visible from all wash bays. Since the printer is
operator-accessible from the rear, the ideal location would be in the vicinity of the bill changer. The Receipt Printer
will be recess-mounted into a pre-cut hole using L-brackets.
Receipt Printer Specifications
Dimensions, Enclosure 7” W x 16” H x 12.1” D
Dimensions, Front Panel 10” W x 19” H
Weight 29 lbs
Enclosure Stainless Steel
Power 110-220VAC, 50-60Hz
Wiring CAT5E Cable
Important:
The WashPay Receipt Printer enclosures must be connected to earth ground.
Follow the steps below to install the Receipt Printer:
1. Disconnect all power routing to existing equipment.
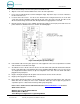
2. Using the Receipt Printer dimensions shown in the following figure, determine where to mount the Receipt
Printer. Make sure the mounting location is a solid surface.
3. Cut a hole for the Receipt Printer in the wall using the dimensions in the following figure.
4. Slide the Receipt Printer into the space you have created in the wall of the building. The back access door
will be inside of the building while the printer faces outside.
Figure 1. WashPay Receipt Printer Dimensions
Document Title: WashPay Receipt Printer Installation Instructions