Sierra Site Controller Installation Manual Unitec www.StartwithUnitec.
W A S H P A Y SIERRA SITE CONTROLLER INSTALLATION MANUAL Revision D This manual provides comprehensive installation procedures for the WashPay system. It includes the process of site planning, site preparation, the mechanical installation of the WashPay system and the electrical wiring of the unit. If further assistance is needed, please contact the distributor from which the WashPay system was purchased.
W A S H P A Y Table of Contents 1 Introduction.....................................................................................................................................1 2 Site Planning ...................................................................................................................................2 2.1 3 Conduit Run Considerations..................................................................................................2 Installation...............................
W A S H P A Y Index of Figures Figure 1. WashPay System Overview ....................................................................................................................................1 Figure 2. WashPay Site Controller Computer.........................................................................................................................3 Figure 3. NEMA Enclosure Dimensions................................................................................................................
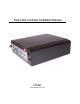
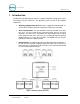
W A S H P A Y 1 Introduction The WashPay Site Management System is a highly configurable management system for multi-bay self-serve carwashes. The WashPay system consists of the following components: • WashPay-equipped meter box: Meter boxes equipped for Washpay will use a Unitec timer module and include a waterproof, swipe-style card reader. • Sierra Site Controller: The Site Controller should be installed in an office type area. The area should be dry and located away from the car wash chemicals.
W A S H P A Y 2 Site Planning Sierra Site Controller – The Site Controller will require a minimum of two 115VAC outlets to power the computer and router. Additional outlets will be required if the optional Network Kit and LCD monitor are purchased. A CAT5E cable will be needed to connect the Site Controller to the router. Receipt Printer – The Receipt Printer will require a 115VAC outlet. A CAT5E cable will need to run between the Receipt Printer and the 16-port switch (optional).
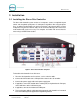
W A S H P A Y 3 Installation 3.1 Installing the Sierra Site Controller The Sierra Site Controller system consists of a computer, a router, an optional 16-port switch, and an optional report printer. If credit processing will be done using telephone lines, an optional credit modem can also be purchased. If the Internet will be used for credit processing, then the Internet cable can be connected directly to the router and a credit modem will not be necessary.
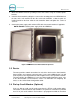
W A S H P A Y 3.2 Installing the NEMA Enclosure If an office area is not available, the Site Controller can be located in the equipment room. If this is the case, it is recommended that the optional NEMA enclosure be used in this type of location. The NEMA enclosure may be bolted to the wall in the equipment room. The NEMA enclosure is shipped with a mounting plate for the Site Controller Figure 3. NEMA Enclosure Dimensions Table 1.
W A S H P A Y 3. Mount the NEMA enclosure by bolting it to the wall surface using the included plastic brackets. 4. Install the Site Controller by fitting the screws on the mounting plate in the NEMA box into the slots on the rails mounted on the sides of the Site Controller, so that the ports are installed parallel to the floor. Slide the Site Controller down and tighten the screws to secure it. 5. Connect the power supply cable and the CAT5 cable. Connect the modem, if applicable.
W A S H P A Y account information before it is shipped. You must have your merchant account set up in advance for this to be done.
W A S H P A Y Appendix A. Installing the Print Controller The print controller option allows you to print reports from the WashPay to a printer connected to the local area network (LAN). The print controller is pre-configured at Unitec. 3.4.1.1 Note: You must purchase the USB print cable separately. Note: Unitec has tested these printers with the print controller and can verify that they will work without any additional setup procedures.