
User's Manual

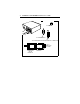
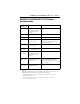

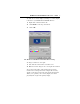
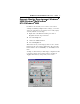
Table Of Contents
- RADEON™ 8500/ RADEON 7500™ User’s Guide
- Documentation Updates
- Multiple Monitors
- Connecting your RADEON 8500/RADEON 7500 to your monitors
- RADEON 8500/RADEON 7500 Display Configurations
- Multiple Monitor Controls
- Dynamic Monitor Reassignment Windows® 98SE/Windows®Me/Windows® NT4.0/Windows®2000
- Desktop Management Controls
- Hot Keys Controls
- MultiDesk
- Desktop Management Controls
- Hot Keys Controls
- MultiDesk
- OpenGL Display Properties
- Direct 3D Display Properties
- Color Properties
- Using TV Out
- View your PC’s display on a TV!
- Connecting your RADEON 8500/RADEON 7500 to a TV or a VCR
- Using and Adjusting TV Out
- Enabling and Disabling the Television Display
- 1 Click Start.
- 2 Point to Settings, then click Control Panel.
- 3 Double-click Display.
- 4 Click on the Settings tab and then the Advanced... button.
- 5 Click on the ATI Displays tab.
- 6 Click on the green enable/disable button next to the word “TV” to enable/disable television dis...
- 7 Click Apply to save the changes you have made.
- Starting Windows® with Television Display Enabled
- Using a Monitor vs. Using the Television Display
- Adjusting Monitor Display
- Viewing Text on Television
- To Use Larger Display Fonts
- 1 Click Start.
- 2 Point to Settings, then click Control Panel.
- 3 Double-click Display.
- 4 Click on the Settings tab and then the Advanced... button.
- 5 Make sure you’re on the General tab.
- 6 In the Font Size box, select the size you want your displayed fonts to be.
- 7 Click Apply, then follow the onscreen instructions to save your new settings.
- To Use Larger Display Fonts
- Reducing Edge Distortion
- To Increase the Horizontal Size
- 1 Click Start.
- 2 Point to Settings, then click Control Panel.
- 3 Double-click Display.
- 4 Click on the Settings tab and then the Advanced... button.
- 5 Click on the ATI Displays tab.
- 6 Click on the TV button.
- 7 Make sure you’re on the Adjustments tab.
- 8 Click on the plus (+) button under Horizontal Screen to increase the horizontal size of the tel...
- 9 Click Apply to save the changes you have made.
- To Change the Brightness
- 1 Click Start.
- 2 Point to Settings, then click Control Panel.
- 3 Double-click Display.
- 4 Click on the Settings tab and then the Advanced... button.
- 5 Click on the ATI Displays tab.
- 6 Click on the TV button.
- 7 Drag the Brightness slider to the left to decrease the brightness.
- 8 Click Apply to save the changes you have made.
- To Increase the Horizontal Size
- Changing Display Configurations
- Using Games and Applications
- Enabling and Disabling the Television Display

RADEON™ 8500/ RADEON 7500™ User’s Guide 5
RADEON 8500/RADEON 7500 Display
Configurations
Legend:
CRT-(cathode ray tube) analog monitor utilizing the standard 15-pin VGA connector
DFP-digital flat panel monitor utilizing the 24-pin DVI-I connector
- The DVI-I connector can support a monitor using a 15-pin VGA connector via
DVI-I-to-VGA adapter
- The s-video connector on the board can support a composite connector via
s-video-to-composite adapter
Display
Configuration
Connector(s) Used Comments
CRT monitor - 15-pin VGA connector
- 24-pin DVI-I connector
(with DVI-I-to-VGA
adapter)
DFP monitor - 24-pin DVI-I connector
TV - s-video connector
CRT monitor +
TV
- 15-pin VGA connector +
s-video connector
Unsupported configuration if the CRT
monitor is attached to DVI-I connector
via DVI-I-to-VGA adapter
DFP monitor +
TV
- 24-pin DVI-I connector +
s-video connector
CRT monitor +
DFP connector
- 15-pin VGA connector +
24-pin DVI-I connector
CRT monitor +
CRT monitor
- 15-pin VGA connector +
24-pin DVI-I connector
(with DVI-I-to-VGA
adapter)
CRT monitor +
DFP monitor +
TV
- 15-pin VGA connector +
24-pin DVI-I connector +
s-video connector
Please note that this will result in two
independent displays with the third
display “cloning” the image of one of the
other two displays.
CRT monitor +
CRT monitor +
TV
UNSUPPORTED
CONFIGURATION