uTV™ guide
Table of contents Your uTV™ ......................................................................1 Overview of your uTV™..................................................2 Package contents ...........................................................3 uTV™ description...........................................................4 Installation ......................................................................6 Daily usage of the Unitron uTV™ .................................15 Warnings.......................
Your uTV™ Hearing healthcare professional: _____________________ _________________________________________________ Telephone: _______________________________________ Serial number of uTV: ______________________________ Warranty: ________________________________________ Date of purchase: __________________________________ 1
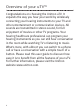
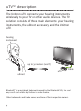
Overview of your uTV™ Congratulations on choosing the Unitron uTV. It expands the way you hear your world by wirelessly connecting your hearing instruments to your TV and other entertainment or communication devices. All sounds are transmitted in stereo sound, for full enjoyment of movies or other TV programs. Your hearing healthcare professional can program your hearing instruments so you can still hear conversation in the room while watching TV or listening to music.
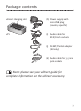
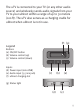
Package contents uDirect charging slot (h) Power supply with mini-USB plug (country specific) uTV (i) Audio cable for RCA/Cinch sockets (j) SCART/Peritel adapter (EU only) (k) Audio cable for 3.5 mm jack sockets Note: please see your uDirect guide for complete information on the uDirect accessory.
uTV™ description The Unitron uTV connects your hearing instruments wirelessly to your TV or other audio devices. The TV solution consists of three main elements: your hearing instruments, the uDirect accessory and the Unitron uTV. hearing instrument up to 30 meters (100 ft) cable uTV uDirect Bluetooth® is a registered trademark owned by the Bluetooth SIG, Inc. and any use of such marks by Unitron is under license. Other trademarks and trade names are those of their respective owners.
The uTV is connected to your TV (or any other audio source) and wirelessly sends audio signals from your TV to your uDirect within a range of up to 30 meters (100 ft). The uTV also serves as a charging cradle for uDirect when uDirect is not in use. (f) (g) Legend Buttons (a) ON/OFF button (b) Volume control (up) (c) Volume control (down) Inputs (d) Power input (mini-USB) (e) Audio input (3.
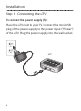
Installation Step 1: Connecting the uTV To connect the power supply (h): Place the uTV next to your TV. Connect the mini-USB plug of the power supply to the power input (“Power”) of the uTV. Plug the power supply into the wall socket.
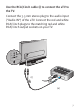
Use the RCA/Cinch cable (i) to connect the uTV to the TV: Connect the 3.5 mm stereo plug to the audio input (“Audio IN”) of the uTV. Connect the red and white RCA/Cinch plugs to the matching red and white RCA/Cinch output sockets on your TV.
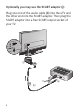
Optionally you may use the SCART adaptor (j): Plug one end of the audio cable (k) into the uTV and the other end into the SCART adaptor. Then plug the SCART adaptor into a free SCART output socket of your TV.
You can also connect your uTV to the 3.5 mm headset socket of your TV, using the 3.5 mm audio cable (k): Connect the 3.5 mm stereo plug to the audio input of the uTV (“Audio IN”). Plug the other end into the headset output socket of your TV.
When connecting the uTV to the 3.5 mm headset socket of your TV you are able to adjust the volume via your TV remote control. Many TVs will switch off their loudspeakers when plugging the 3.5 mm jack into the headset socket – the TV will not be audible for other people. In such a case use the Cinch/RCA or SCART socket as described above. For further information on volume adjustment please refer to step 6 below.
Step 2: Switching on all devices Battery indicator ON/OFF fig. 1 To use the uTV, all devices must to be switched on. 1. Switch on your TV or other audio source. 2. Make sure your hearing instruments are switched on and properly in place. 3. To turn ON your uDirect, press and hold the ON/OFF button as shown in fig. 1 for one second until you see the battery indicator illuminate.
4. Switch on the uTV by a short press of the ON/OFF button (a) as shown in fig. 2. The status light (g) will illuminate green initially and may switch to blue later. (g) (a) fig. 2 If the uDirect battery indicator is red or not illuminated at all, the uDirect battery level may be low. In this case please first charge the uDirect as described in step 9. For a more detailed explanation of the colors displayed by the uDirect battery indicator please refer to the uDirect guide.
Step 3: Pairing uDirect and uTV Before starting to use the uTV, it must be paired with your uDirect. The pairing procedure controls which Bluetooth devices are permitted to communicate with each other. Make sure both devices are switched on as described in step 2. You do not need to insert uDirect into the uTV charging slot (f) during pairing. Pairing needs to be completed only once for each device you wish to use with your uDirect.
Bluetooth indicator fig. 3 Bluetooth pairing button 2 sec (g) (a) 5 sec fig. 4 If the uTV status light (g) is not flashing blue already, press the ON/OFF button ( a ) for 5 seconds until the Bluetooth indicator (g) is fast flashing blue as shown in fig 4. Wait until both Bluetooth indicator lights, ( g ) turn solid blue. This can take up to 2 minutes but typically is done within a few seconds.
Daily usage of the Unitron uTV™ First switch on devices as described in step 2. Step 4: Wearing your uDirect During operation uDirect must be worn around the neck: • To place uDirect around the neck, you may need to unplug the neckloop plug as shown in fig. 5. fig. 5 neckloop plug fig. 6 • Plug in the neckloop as shown in fig. 6. This will activate the built-in antenna and is necessary for the uDirect to communicate with your hearing instruments.
• After switching uDirect ON, it automatically recognizes your Unitron wireless hearing instruments. In cases of interference with other hearing instruments, please contact your hearing healthcare professional. Step 5: Listening to your TV You will hear the sound of your TV directly in your hearing instruments. If you cannot hear the sound of your TV through uTV please repeat steps 1 to 4. The uTV system supports Bluetooth operation up to a range of 30 m (100 ft).
If the uTV status light (g) • is green, make sure TV sound and uDirect are switched on. • blinks blue, you are in paused mode. Press the uDirect main button (b) to resume streaming. Step 6: Adjusting the volume of the TV signal First, set the volume of the TV speakers at the level to suit other viewers. • If the uTV is connected to your TV with the RCA/Cinch cable (i) or the SCART adaptor (j), adjust the volume on the uTV by pressing the +/– volume control (b) and (c).
control to adjust volume via the TV directly. Please refer to the TV user guide for more details on setting the TV volume. If your TV is connected to a satellite receiver or a cable box, make sure the volumes of these additional devices are set to a medium level for best audio quality results. Step 7: Pause and phone calls during operation Access button To pause the audio transmission from your TV, press the uDirect access button.
To resume hearing your TV, press the uDirect access button again. If you have paired uDirect with your mobile phone, you can still receive phone calls, even when watching TV via uTV. In the case of an incoming call, uDirect automatically stops transmitting the audio signal from your TV and sends the signal from your mobile phone to your hearing instruments. Access button To pick up a call, press the uDirect access button.
Step 8: Switching off uTV and uDirect To switch off the devices: • To end the transmission of the TV audio signal, switch off the uTV by pressing the ON/OFF button (a) as shown in fig. 7. (a) fig. 7 • If uDirect is not used for other purposes such as phone calls, switch it off by pressing the ON/OFF button for about two seconds as shown in fig. 8 until you see the battery indicator turn red. Battery indicator ON/OFF fig.
Step 9: Charging uDirect™ To charge uDirect, place it into the charging slot (f) of the uTV as shown in fig. 9. Battery indicator uDirect (f) fig. 9 uTV • The uDirect battery indicator will be yellow to show that uDirect is charging. • The uTV can either be ON or OFF during charging. Its status light (g) does not indicate the charging process. • Once the battery is fully charged, the uDirect battery indicator will turn green (typical time for full charge is 90 minutes).
• We recommend that the uDirect is switched off for charging. When charging the uDirect for the first time, leave it charging for at least three hours, even if the battery indicator turns green earlier. After the initial charging, you may leave uDirect in the uDirect slot on the uTV for an unlimited time. For safety reasons, recharge the battery only with chargers supplied by Unitron. If other chargers are used they must be USB certified (5.0 VDC / 500 mA).
Warnings Please carefully read the warnings section in the uDirect guide. Keep this device out of reach of children under 3 years. Interference with medical devices. These Unitron devices use low-power, digitally coded transmission to communicate to your hearing instruments. Although unlikely, interference with medical devices such as pacemakers is possible. Therefore persons using medical devices such as pacemakers are not permitted to use this device.
Information on product safety Turn off the uTV when not in use. Always plug in the uDirect neckloop and wear it around the neck when transmitting signals to your hearing instruments. Protect the device connectors, plugs, charging slot and power supply from dirt and debris. Protect all devices from excessive moisture (bathing or swimming areas) and heat sources (radiator, TV top). Protect devices from excessive shock and vibration. Clean devices using a damp cloth.
strong electromagnetic fields, it may be necessary to be at least 60 cm (24”) away from the interfering device to ensure proper operation. X-ray radiation, CT or MRI scans may destroy or adversely affect the correct functioning of the devices. Do not use these devices in areas where electronic equipment is prohibited. Keep the uTV at least 30 cm (1 ft) from the body during operation.
Troubleshooting guide Most probable cause Remedy None of the indicator lights on uDirect and uTV (g) turned solid blue • Devices are not turned on • uDirect and uTV are not paired • Switch on devices as shown in step 2 • Repeat step 3 I see a rapidly flashing blue indicator light (g) on the uTV • uTV is in Bluetooth pairing mode • Go to step 3 Only one of the blue indicator lights turned solid blue • One of the devices is connected to another Bluetooth device • Make sure to switch off all other Bluet
Most probable cause Remedy I cannot hear the sound from the TV via uDirect • The devices are switched off • Make sure all devices are switched on. See step 2 • The cables are not plugged • Repeat step 1 in correctly • There is no audio signal on • Make sure TV is not muted. Select a medium volume level on the uTV. The light indicator (g) TV set is green Make sure the audio cable uses an “OUT” port • Indicated by blue blinking status lights • uTV is in pause mode on both devices.
Most probable cause Remedy The volume during streaming is not comfortable (too low or too high) • If uTV is connected to the RCA/Cinch • The different TV audio or the SCART socket of your TV, adjust sources have different the volume by using the +/– buttons output volumes of the uTV (b), (c) If the uTV is connected to the headset output of the TV, you alternatively may adjust the volume using the TV volume control Adjust volume of your satellite receiver or cable box Adjust the volume on the hearing instr
Declaration of Conformity Hereby Unitron declares that this uTV meets the requirements of the Radio and Telecommunications Terminal Equipment Directive 1999/5/EC. The full text of the Declaration of Conformity can be obtained from the address below. Manufacturer: Unitron Hearing Ltd. 20 Beasley Drive, P.O.
This device complies with Part 15 of the FCC Rules and with RSS-210 of Industry Canada. Operation is subject to the following two conditions: 1) this device may not cause harmful interference, and 2) this device must accept any interference received, including interference that may cause undesired operation. Changes or modifications made to this device not expressly approved by Unitron may void the FCC authorization to operate this device.
Unitron Distributors Corporate Office/International 20 Beasley Drive, P.O. Box 9017, Kitchener, ON N2G 4X1 Canada Australia Level 2, Norwest Quay, 21 Solent Circuit, Baulkham Hills, NSW, NSW 2153 Belgium Baron de Vironlaan, 60 b-1700 Dilbeek Canada 20 Beasley Drive, P.O. Box 9017, Kitchener, ON N2G 4X1 China No. 78, Qi Ming Road, Export Processing Zone District B, Suzhou Industrial Park, P.R.
D i st r i b u to r www.unitron.