U4125
The lightning flash with arrowhead symbol, within an equilateral triangle, is intended to alert the user to “dangerous voltage” and to prevent from a risk of electric shock. Warning: To reduce the risk of electric shock, don’t open the cabinet. Refer servicing to qualified personnel only. The exclamation point within an equilateral triangle is intended to alert the user to important operating and maintenance (servicing). Please read the manual carefully before installing the receiver.
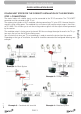
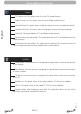
QUICK INSTALLATION GUIDE QUICK INSTALLATION GUIDE FOLLOW NEXT STEPS FOR THE CORRECT INSTALLATION OF THIS RECEIVER. STEP 1: CONNECTIONS Example 1 – Basic System rev 1.1 Example 2 – DISEqC switches Example 3 – Combined with terrestrial PAG. 3 Example 4 – Motorized system English The coaxial cable, with satellite signal, must be connected to the “IF IN” connector. The “TV SCART” connector must be connector to the TV set. The receiver also includes an UHF modulator, allowing connecting a TV set or VCR.
QUICK INSTALLATION GUIDE STEP 2: BASIC CONFIGURATION OF THE RECEIVER Language: press [ ] to select languages. The selection of languages include: English, German, French, Spanish, Italian, Portuguese, Turkish, Polish, Russian, Danish, Greek, Hungarian, Arabic, Farsi. First Audio: Some channels offer more than one audio language. This function allows you to set the preferred audio language for those channels using [ ].
QUICK INSTALLATION GUIDE recommend you to contact your installer or to refer to the user manual of this system to get the correct information. Single search: You can edit the following items (Image 2): IMAGE 3 PAG. 5 English rev 1.1 IMAGE 2 1. Satellite: Press [ ] to switch Satellites or press [OK] to enter satellite list to select directly. 2. LNB Configuration: Selecting this option and pressing [OK], the LNB Configuration menu will be displayed.
QUICK INSTALLATION GUIDE English IMAGE 4 Multi search: You can edit the following items (Image 4): 1. On “Satellite” item press [OK] to open the satellite list. Then press [ ] to move the highlight and press [OK] to mark/unmark and [EXIT] to finish the selection. You can select several satellites in this menu. At the bottom of the screen you can see the selected satellites. The system will use DiSEqC1.0/1.1, DiSEqC1.2 and USALS functions to search the marked satellites and scan channels. 2.
QUICK INSTALLATION GUIDE GMT has to be turned off. NOTE: If the current channel provides the correct time information, you will see the current time after you entered “Time” menu. If the channel doesn’t provide time information, you have to input the date and time information manually. The most channels support the time signal. 5. Show time: Use [ ] to switch on/off this option. When the option is enabled, the time will be displayed at the TV in a frame in the top right margin. 6.
QUICK INSTALLATION GUIDE TV Channel List: This option shows the list of TV stored channels. Radio Channel List: This option shows the list of Radio stored channels. Channel Setup: This option allows setting the receiver to start in a predefined channel. Delete All: This option deletes all TV and Radio stored channels. Restore channel list and settings: This option loads the user TV and Radio channel list, saved previously.
QUICK INSTALLATION GUIDE Language: This option allows choosing the language of the menus. TV System: This option allows choosing the video Standard and other parameters of the screen. Time & Timer Setting: Timer setting menu. Parental Lock: In this option, user can lock the access to the menu and change the password of the receiver. Power setting: Turns on or off the LNB power or enable / disable Low Power Consumption mode. RCU position Switch: To chose the RCU position of the remote control.
INDEX Safety Precaution Caution…..…………………...............................………………………………………………12 2. Basic Operations 2.0. Switch on STB……………………….....................................………………………………...14 2.1. Standby ……………………..............................................…………………………………...15 2.2. TTX …………..................................................……………………………………..15 2.3. Mute……………............................................………………………………………..15 2.4. Channel Number…………...........................
INDEX rev 1.1 7. Technical Specification……………………………………........................................38 8. Conformity declaration……………………………………........................................39 PAG. 11 English 3.3 Channel Setup…………..................................………………………………......22 3.3.1. Start-up Channel……………................................……………………………......22 3.3.2. Channel Play Type………........................…………………………………......22 3.4. Favourite Channel List Name……..........……………………………………......22 3.5.
The lightning flash with arrowhead symbol, within an equilateral triangle, is intended to alert the user to “dangerous voltage” and to prevent from a risk of electric shock. Warning: To reduce the risk of electric shock, don’t open the cabinet. Refer servicing to qualified personnel only. The exclamation point within an equilateral triangle is intended to alert the user to important operating and maintenance (servicing). Please read the manual carefully before installing the receiver.
PANEL & REMOTE CONTROL DESCRIPTION 1. PANEL & REMOTE CONTROL DESCRIPTION 1.1. FRONT PANEL DESCRIPTION 23 4 5 6 7 1. POWER: Switches the receiver on, or enters standby mode. To completely switch off the receiver, you have to use the switch on the back of the receiver. 2. STAND-BY-LED: Shows if the receiver is in Standby mode (when LPC mode is ON). 3. LOCK LED: Indicates a sufficient signal level at the IF IN input. 4. DISPLAY: 4 Digits to display the program numbers. 5.
PANEL & REMOTE CONTROL DESCRIPTION 1 2 3 4 5 8 6 9 English 7 10 11 12 13 15 14 16 17 1.- Power 2.- Text 3.- Mute 4.- Numbers 5.- “0” 6.- CH+/CH7.- TV/R 8.- VOL+/VOL9.- Exit 10.- Menú 11.- Back 12.- OK 13.- EPG 14.- List 15.- Fav 16.- Audio 17.- Info 18.- Fav+/Fav19.- Pup/Pdw 20.- Zoom 21.- Sub 20 21 19 18 2. BASIC OPERATIONS 2.0.
BASIC OPERATIONS 2.1. STANDBY 1. Press [Power] button to switch from TV mode to Standby mode. 2. In Standby mode press [Power] button again to switch back to TV mode. The last active channel will be showed. 3. To switch off the STB complete press the main power button (placed at the rear panel of the receiver). 2.2. TTX OSD 1 2.3. MUTE 1. Press the [Mute] button to mute the sound. On the screen an icon will be displayed to indicate the muted sound (OSD 2). 2.
BASIC OPERATIONS 2.8. VOL+/VOLIn TV mode, press [Vol+/Vol-] to adjust volume. 2.9. EXIT Press [Exit] button to exit the current menu. 2.10. MENU 2.11. RECALL Pressing the [Back] button allows you to toggle between the actual and the last selected channel. OSD 4 2.12. CHANNEL LIST OSD 5 OSD 6 In TV mode press [OK] button to open the Channel List window. Reduced Channel List (OSD 4): You can use [ ] keys to navigate this list. 1. Press [Yellow] button to open the SAT list.
BASIC OPERATIONS 2.13. EPG OSD 8 2.14. LIST In TV mode, press [List] button to access directly to the “TV Channel List” menu or to the “Radio Channel List” menu. 2.15. FAVOURITES OSD 9 1. In TV mode press the [Favourite] button to display the Favourite Group window on the screen as the picture beside shows (OSD 10). 2. In the Favourite Group window you can select the desired favourite channel with [ ] and confirm it with [OK] to switch to it. In bigger groups you can navigate with [Pup/Pdw]. 3.
BASIC OPERATIONS 2.17. INFORMATION In TV mode, press [INFO] button can open information screen (OSD 12), in the window shows the parameters of current channel. 2.18. FAV +/- English OSD 12 1. In TV mode press the [FAV+/FAV-] buttons to switch between the favourites channels in the current Favourite Group directly. 2. The sequence of the favourite channels is following the sequence in the related Favourite Group list. 2.19. ZOOM 1. Press [Zoom] button in TV mode to zoom the image.
CHANNEL 3. CHANNEL OSD 15 3.1. TV CHANNEL LIST OSD 16 OSD 17 If you enter the Channel List menu a window like the one besides will open (OSD 17). 1. You can move the highlighted channel with [ ] and press [OK] to preview the highlighted program in the preview window. 2. You can enter directly the number of the desired channel with the remote control. The selection will select that channel, but it will not be previewed until you confirm with [OK] button. 3.
CHANNEL 3.1.2. MOVE OSD 19 1. To move/change channels: Pushing the [Red] button, you will see a picture like OSD 19. You will be able to move or change the position of the channels: - Push again the [Red] button to move the channel. - Push the [Green] button to change the position of the channel. 2. Move the channel to the desired position with [ ]. Press [OK] to confirm the position. English 3.1.3. SORT OSD 20 1. Press [Green] to open the Sort window (OSD 20).
CHANNEL this menu. OSD 24 3.1.4.3 LOCK In Channel Edit menu, press [Yellow] button to place a Lock icon behind the name of the highlighted channel. Marked channels (OSD 24) will be locked and displayed only after password has been entered if you confirm to save the changes when you leave this menu. 3.1.4.4 EDIT OSD 26 OSD 27 rev 1.1 3.1.5. FIND 1. Press [Blue] button to open the “Find” window like showed besides (OSD 28).
CHANNEL 3.2. RADIO CHANNEL LIST Basically the operation of “Radio Channel List” is same as “TV Channel List” (OSD 29). 3.3. CHANNEL SETUP OSD 29 When you enter the “Channel Setup” menu you will see a screen like beside (OSD 30): English 3.3.1. START-UP CHANNEL OSD 30 Press [OK] to enter “Start-up Channel” menu to see the screen like showed beside (OSD 31): 1. If you set of “Boot on Channel” to “On” you can edit the following two items.
CHANNEL show up where you have to confirm first (OSD 35). 3. Select “Yes” to delete all channels or “No” to cancel and confirm with [OK]. 4. In step 2 and step 3, pressing [Exit] will exit the function directly without saving. OSD 34 3.6. RESTORE CHANNEL LIST AND SETTINGS OSD 35 Using this option, the receiver will load the channels saved as previously as a backup of the user channels list (see point 3.7.). For restoring the default channels, please: 1. Enter the password.
INSTALLATION 4. INSTALLATION English OSD 38 Press [Menu] in the TV mode to enter the main menu (OSD 38). ] to select the Installation item. 1. Press [ 2. Press [OK] to enter the selected item. In the Installation menu (OSD 39): 3. Press [ ] to select the wanted menu item. 4. Press [OK] to enter the selected item among. - Single Search - Multi Search - TP Scan - Satellite List - TP List - Satellite Guide OSD 39 OSD 40 After selecting Antenna Setup another window will be opened (OSD 40).
INSTALLATION OSD 42 4.2. MULTI SEARCH OSD 43 rev 1.1 OSD 44 When you enter the “Multi Search” menu a window like the one beside will open (OSD 43). 1. On “Satellite” item press [OK] to open the satellite list (OSD 44). Then press [ ] to move the highlight and press [OK] to mark/unmark and [EXIT] to finish the selection. You can select several satellites in this menu. At the bottom of the screen you can see the selected satellites (OSD 45). The system will use DiSEqC1.0/1.1, DiSEqC1.
INSTALLATION English OSD 46 OSD 47 OSD 48 OSD 49 When you enter “TP Scan” menu a window like the one beside will be displayed (OSD 46): ] to select the satellite 1. On “Satellite” item, press [ you want to scan or press [OK] to open the satellite list for selection. 2. On “TP Index” item use [ ] to select the desired transponder. If any of the TP of the list have tuned and stored channels into the receiver, the following two options “Frequency” and “Symbol Rate” will not be able to be edited.
INSTALLATION will search the selected TP. In case you select “On”, the NIT (Network Identification) will be identified and the receiver will automatically search all the TP of this network. 6. Press [OK] to start scanning. 7. On the “TP Scan” item, press [Exit] to cancel the scanning and saving the found channels. 4.4. SATELLITE LIST OSD 50 OSD 52 rev 1.1 OSD 53 OSD 54 4.5. TP LIST When you open the “TP List” menu you will see a window like the one beside (OSD 53). 1.
SYSTEM SETUP 4.6. SATELLITE GUIDE English OSD 55 When you enter “Satellite Guide” menu, you will see the screen like beside (OSD 57). Here you can enter your local longitude and latitude and the satellite’s longitude. The receiver calculates the antenna’s azimuth and elevation to point your antenna to the selected satellite. 1. Use the [Number] buttons to input the values of “Local Longitude”, “Local Latitude” and “Satellite Longitude”. 2.
SYSTEM SETUP 5. SYSTEM SETUP OSD 59 5.1. LANGUAGE OSD 60 rev 1.1 OSD 61 After selecting the “Language” menu you will see a window like beside (OSD 61): 1. Language: press [ ] to select languages. The selection of languages include: English, German, French, Spanish, Italian, Portuguese, Turkish, Polish, Russian, Danish, Greek, Hungarian, Arabic, Farsi. 2. First Audio: Some channels offer more than one audio language. This function allows you to set the preferred audio ].
SYSTEM SETUP English 1. Display Mode is used to switch the display mode. You can select from Auto / PAL / PAL-M / NTSC 3.58. Press [ ] to select the desired mode. 2. Aspect Mode is used to switch the screen aspect ratio mode. You can select from Auto / 4:3 PS / 4:3 LB / 16:9. Press [ ] to select the needed mode. 3. Video Output is use for switching the screen aspect ratio mode. Now we provide below options: RGB / CVBS. You can press [ ] key to select each mode circularly. 4.
SYSTEM SETUP OSD 65 rev 1.1 5.3.2. LOCAL TIME SETTING OSD 67 When you select “Local Time Setting” and press [OK] then you will see a window like the one beside (OSD 67): 1. GMT Usage: This item is used to set the time by using the time signal from the satellite. Press [ ] to change the setting. 2. The “GMT Offset” item is only available when “GMT Usage” is set to “On”. Press [ ] to set the “GMT Offset” value.
SYSTEM SETUP OSD 68 you have to input the date and time information manually. The most channels support the time signal. 5. Show time: Use [ ] to switch on/off this option. When the option is enabled, the time will be displayed at the TV in a frame in the top right margin.(OSD 68) 6. Press [Exit] to exit the menu. 5.3.3. SLEEP TIMER English Press [OK] button in this option to set the sleep timer.
5.6. POWER SETTING OSD 72 OSD 73 When you select this option, you will see a screen like beside (OSD 72): 1. LNB Power: If your receiver is connected to the LNB directly then you need to set the LNB Power to “On”. If your receiver is connected to a multi switch (SMATV signal distribution system) then it may be that you don’t need to provide the power to the LNB.
TOOLS 6. TOOLS English OSD 75 Press [Menu] in the TV mode to enter the main menu (OSD 75). ] to select the Tools item. 1. Press [ 2. Press [OK] to enter the selected item. In the Tools menu (OSD 76): 3. Press [ ] to select the wanted menu item. 4. Press [OK] to enter the selected item among. - Information - Quick Setup - Game - Factory Default - Software Upgrade - SatcoDX Auto Programing - Smartcard - CI 6.1. INFORMATION OSD 76 1.
TOOLS 6.3. GAME When you enter “Game” menu, you will see three Games include Tetris, Snake and Othello (OSD 79). 6.3.1. TETRIS OSD 79 6.3.2. SNAKE 1. Mark “Setup” and press [ ] to select the level (speed). 2. Mark “Start” and press [OK] to start the game. 3. Mark “Cancel” and press [OK] to leave the game. 4. Play the game: - Press [ ] to guide the snake to the red blocks. Every block you ate increases the length of the snake. If the snake runs against a wall or against itself then it dies.
TOOLS 6.5. SOFTWARE UPGRADE There are two ways of upgrading the software of the receiver as you can see at OSD 81. 6.5.1. RS232 UPGRADE OSD 82 OSD 83 6.5.2. UPGRADE BY SATELLITE This function can upgrade the software of your receiver through data sent by a satellite. At the moment we offer satellite updates only through ASTRA1 satellite. 1. Select the satellite and TP or input the TP value and download PID. 2. Then mark “Start” and press [Enter] to begin the download of the upgrade (OSD 83).
TOOLS 6.6. SATCODX AUTO PROGRAMMING OSD 85 6.7. SMART CARD In this option, you can find information about the conditional access system. If there is no card or it is placed incorrectly, information about “No card” o “Unknown” will be showed on the screen. With a FELEC-CAS card, information about the card will be showed (OSD 86). Note: Card must be inserted with chip in upper side. OSD 86 6.8. CI In this menu option you will find information in referrence with the Conditional Access.
TECHNICAL SPECIFICATION VIDEO Decoding Bit rate Output Aspect ratio Active pixel Output connector MPEG-2 & MEPG-1 compatible Max 15Mbps PAL/NTSC 4:3, 16:9, Auto 720x480 @ 30fps; 720x576 @25fps Scart / RCA AUDIO Decoding Mode Bit rate Output connector MPEG-2/MPEG-1 layer I & II Mono, Dual, Stereo, Joint stereo Max 384Kbps Scart / RCA / SPDIF RF MODULATOR Input Output Band TV Standard Output Channel IEC 169-24 Male x 1 IEC 169-24 Female x 1 UHF PAL BG/I/DK, NTSC M 21~69(PAL), 14~83(NTSC) DEMODULATOR De
CONFORMITY DECLARATION “WE , UNIVERS BY FTE, DECLARE THAT THE PRODUCTS IS IN CONFORMITY WITH FOLLOWING DIRECTIVES LVD 73/23/EEC EMC 89/336/EEC rev 1.1 AS LAST AMENDED BY 93/68/EEC” PAG.