
Installation guide


PAG.
7
English
rev 1.2
STEP 3: TIME CONFIGURATION
It is recommended to setup the clock before starting to enjoy
the receiver, because correct time maybe is required by some
applications. Please complete following options:
Press the [Menu] key of the remote control for appearing the
main menu. Select the “System Setup” option and confi rm
pressing [OK].
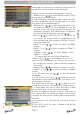
Once in the “System Setup” option, please select “Local Time
setting” option and press [OK]. Select “Time” option and press
[OK]. Image 5 is watched on the TV. For setting up the time,
please complete:
1. GMT Usage: this option will allow you to select if the date
and time will be introduced manually (GMT Usage: Off) or if
you wish to introduce the offset respect GMT manually (GMT
Usage: On).
2. GMT Offset: If GMT Usage is On, the offset respect GMT
has to be confi gured depending on your region or country. Use
the [
] keys to choose the offset. Remember that the
offset values are between -12:00 and +12:00
3. Summer: this option is only available when “USE GMT” is
enabled. Use [ ] to switch on/off the summer timetable.
4. Date / Time: In order to introduce manually the time and
date. Before these values can be modifi ed, the automatic
control of GMT has to be turned off.
NOTE: If the current channel provides the correct time
information, you will see the current time after you entered
“Time” menu. If the channel doesn’t provide time information,
you have to input the date and time information manually. The
most channels support the time signal.
5. Show time: Use [ ] to switch on/off this option. When
the option is enabled, the time will be displayed at the TV in a
frame in the top right margin.
6. Press [Exit] to exit the menu.
IMAGE 5
QUICK INSTALLATION GUIDE