
Installation guide


English
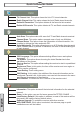
Quick Installation Guide.
Image 2
.
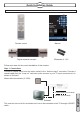
Dont make any action with the receiver until the
Auto scan has finished. For more information about
this option, please read point 4.1 of the complete
manual.
Main Menu: if all the previous steps have finished correctly, you can exit the installation menu,
by using Main Menu option and press [OK].
Step 3: Time configuration
It is recommended to setup the clock before starting to enjoy the receiver, because correct time
maybe is required by some applications. Please complete following options:
Press the [Menu] key of the remote control for appearing the main menu. Select the System
Configuration option and confirm pressing [OK].
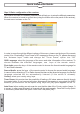
Once in the System Configuration option, please select Region and Time option and press
[OK]. Image 3 is watched on the TV. For setting up the time, please complete:
1. Country: Confirm that the correct country has been selected during the quick installation.
2. GMT Usage: this option will allow you to select if the
date and time will be introduced manually (Use GMT:
Off), if you prefer that it will be automatic by country
(Use GMT: By Region) or if you wish to introduce the
offset respect GMT manually (Use GMT: Defined by
user).
3. GMT Offset: If Use GMT defined by user has been
chose, the offset respect GMT has to be configured
depending on your region or country. Use the keys to
choose the offset. Remember that the offset values are
between -12:00 and +12:00
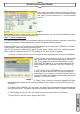
4. Date / Time: In order to introduce manually the time
and date. Before these values can be modified, the automatic control of GMT has to be
turned Off.
5. Summer Time: Selecting On this option, the time of the receiver will change automatically
during summer time. This option can only be modified when use GMT by region is selected.
6. Time Display: Selecting On this option, the time will be shown in the screen.
7. Press [Exit] to exit the menu "Region and Time".
Image 3