
User Manual

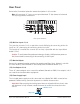


Apollo Twin MkII Hardware Manual Controls & Connectors 21
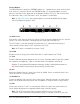
(3) Channel Selection Indicators
The currently selected input channel is indicated by the lit channel name above its input
meter (CH1 or CH2). Press the Preamp button (7) to switch between channels 1 & 2.
(4) Input Meters
These meters display the incoming signal level for input channels 1 & 2. Reduce the
channel’s preamp gain (see Setting Levels) if its red clip LED illuminates.
(5) Input Type Indicators
These indicators show which input type (MIC, LINE, or HI-Z) is active for the selected
channel. Use the Input Select button (13-a) to change the input type.
Note: Hi-Z input is available for channel 1 only.
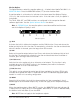
(6) Talkback Microphone
The built-in talkback mic is located beneath this hole. The talkback function is
configured in the included Console software and can be activated with the TALK button
(13-g) when MONITOR mode (12) is active.
Caution: The talkback microphone is sensitive. To avoid equipment damage, do
not insert any object into the mic hole, apply pressurized air into the mic hole, or
use a vacuum over the mic hole.
(7) PREAMP Button
Press this button to enter PREAMP mode and activate the input channel controls. Press
again to alternate between channels 1 & 2.
(8) MONITOR Selected Indicator
When MONITOR is lit, the Level knob (1) controls volume the monitor outputs (16).
Press the MONITOR button (10) to activate the monitor controls.
Note: The MONITOR indicator is RED when the monitor outputs are muted.
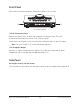
(9) Stereo Output Meters
These meters display the main stereo signal output levels.* Main output levels are
independent of monitor and headphone volume levels. Reduce levels feeding the
output(s) if a red “C” (clip) LED at the top of the Output Meters illuminates.
*Exception: If HEADPHONE is currently selected on Apollo Twin MkII and the
Headphone Source within the CUE OUTPUTS window in Console is set to HP,
these output meters indicate the level being sent to the headphone bus via
Console’s headphone sends and/or the DAW.