
Hardware manual


Apollo Twin Hardware Manual Chapter 3: Controls & Connectors 23
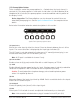
(3) Channel Selection Indicators
The currently selected input channel is indicated by the lit channel name above its input
meter (CH1 or CH2). Press the Preamp button (9) to switch between channels 1 & 2.
Tip: You can also switch between channels 1 & 2 by pressing the Level knob (1),
but only when in Preamp Mode (when the input controls are active).
(4) Input Meters
These meters display the incoming signal level for input channels 1 & 2. Reduce the
channel’s preamp gain (see Setting Levels) if its red clip LED illuminates.
(5) Input Type Indicators
These indicators show which input type (mic, line, or Hi-Z) is active for the selected
channel. Use the Input Select button (11a) to change the input type.
Note: Hi-Z input is available for channel 1 only.
(6) Monitor Selected Indicator
When lit, the Level knob (1) controls volume and muting of the monitor outputs (15).
Press the Monitor button (10) to activate the monitor controls.
(7) Stereo Output Meters
These meters display the main stereo signal output levels.* Main output levels are inde-
pendent of monitor and headphone volume levels. Reduce levels feeding the output(s) if
a red “C” (clip) LED at the top of the Output Meters illuminates.
*Exception: If HEADPHONES is currently selected on Apollo Twin and the Head-
phone Source in Console is set to HP, these output meters indicate the level being
sent to the headphone bus via Console’s headphone sends and/or the DAW.
(8) Headphone Selected Indicator
When lit, the Level knob (1) controls the volume of the headphones output (13). Press
the Monitor button (9) to activate the headphones controls (you may need to push it
twice).
(9) Preamp Button
Press PREAMP to activate the input channel controls. Press again to alternate between
channels 1 & 2.
Tip: You can also switch between channels 1 & 2 by pressing the Level knob (1),
but only when in Preamp Mode (when the input controls are active).
(10) Monitor Button
Press MONITOR to activate the control of volume levels with the Level knob (1). Press
again to alternate between control of the monitor and headphone volumes.
Tip: Indicators (6) and (8) determine which volume (monitor or headphone) is be-
ing controlled with the Level knob (1).