Helix 5 Device.
Helix 5 Device.fm Page 2 Tuesday, June 5, 2007 5:24 PM TABLE OF CONTENTS Introduction . . . . . . . . . . . . . . . . . . . . . . . . . . . . . . . . . . . . . . . . . . . . 4 Features and Functions . . . . . . . . . . . . . . . . . . . . . . . . . . . . . . . . . . . 5 Key Charts. . . . . . . . . . . . . . . . . . . . . . . . . . . . . . . . . . . . . . . . . 6 Device Table . . . . . . . . . . . . . . . . . . . . . . . . . . . . . . . . . . . . . . . 7 Installing Batteries . . . . . . . . . . . . . . . .
Helix 5 Device.fm Page 3 Tuesday, June 5, 2007 5:24 PM Transferring Node and Network Information to a Secondary remote . 26 Transferring Network Information to a Secondary remote . . . . . . . 27 Primary Controller Shift . . . . . . . . . . . . . . . . . . . . . . . . . . . . . . . . . . 28 Controller Copy Receipt . . . . . . . . . . . . . . . . . . . . . . . . . . . . . . . . . . 29 Network Reset. . . . . . . . . . . . . . . . . . . . . . . . . . . . . . . . . . . . . . . . . . 29 Network Update . . . . .
Helix 5 Device.fm Page 4 Tuesday, June 5, 2007 5:24 PM INTRODUCTION The Helix Z-wave 5-Device Remote Control with Learning by Universal Electronics is our latest generation universal remote control. Its sophisticated technology allows you to consolidate up to five of your original home entertainment remote controls into one easy-to-use product. Your remote lets you control individual Z-wave devices with one easy-to-use, compact unit. You can also set up and control different groups and scenes.
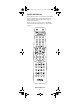
Helix 5 Device.fm Page 5 Tuesday, June 5, 2007 5:24 PM FEATURES AND FUNCTIONS Use the illustration below to locate features on the Helix Z-wave 5-Device Remote Control with Learning and then study the Key Charts (on the next three pages) to learn how they function. To find out what type of devices can be controlled by each device key after programming, see “Device Table” on page 7 . www.urcsupport.
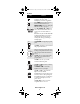
Helix 5 Device.fm Page 6 Tuesday, June 5, 2007 5:24 PM Key Charts Key Function Use SETUP for all programming sequences. Also use to turn backlighting on and off, if applicable. Press POWER once to turn on or off a home entertainment device. For MASTER POWER control, see “Using the Master Power Key” on page 21. Press TV, DVD/VCR, SAT, or AUX once to select a home entertainment device to control. Also see “Device Table” on page 7.
Helix 5 Device.fm Page 7 Tuesday, June 5, 2007 5:24 PM Key Function Press MUTE once to turn the sound off or on. Press CANCEL to Press LAST once to recall the last channel. Use to command your PVR/DVR to instantly skip forward 7 seconds in the program you are watching. Use to command your PVR/DVR cable box to instantly replay the last 7 seconds of a program you are watching. Press LIVE TV to command your PVR/ DVR cable box to return to watching live TV.
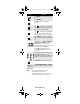
Helix 5 Device.fm Page 8 Tuesday, June 5, 2007 5:24 PM After programming, the Helix Z-wave 5-Device Remote Control with Learning will be able to control the following types of devices: Device Key Controls these types of devices Audio Amplifier, Tuner, Receiver, CD Player, Home Automation, or Miscellaneous Audio Television DVD Player, VCR, PVR Satellite Receiver, Cable Box (Converter), or Video Accessory Dedicated to Z-Wave controls INSTALLING BATTERIES 1 2 3 1. 2.
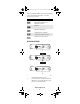
Helix 5 Device.fm Page 9 Tuesday, June 5, 2007 5:24 PM 3. 4. NOTE: Align the covers keys with the cases holes and press the cover back into place. The tab should click when the cover is locked. Test the remote control by pressing any mode key (e.g., TV). If the batteries are inserted correctly, the LED (red light) will blink once. When batteries need replacement, the remote control will cease to operate.
Helix 5 Device.fm Page 10 Tuesday, June 5, 2007 5:24 PM NOTE: 4. NOTE: 5. If the selected mode key emits a long blink, the entry is invalid. Repeat steps 2 through 3 and try entering the same code again. Aim the remote control at the device and press PWR once. The device should turn off. If it does not, repeat steps 2 through 3, trying each code for your brand until you find one that works. If it still does not respond, try searching for the code (see “Searching for Your Code” on page 12).
Helix 5 Device.fm Page 11 Tuesday, June 5, 2007 5:24 PM SETTING UP A COMBO UNIT If you own a combo unit such as a TV/VCR Combo or a TV/DVD Combo, you need to follow special steps to set it up. Perform the following instructions to control combo device: 1. For a TV/VCR Combo, turn on your TV/VCR Combo and insert a video cassette. (For a TV/ DVD Combo, insert a DVD). 2. On the remote control, press DVD/VCR once; it will blink once. Then press and hold SETUP until the DVD/VCR key blinks twice. 3.
Helix 5 Device.fm Page 12 Tuesday, June 5, 2007 5:24 PM SEARCHING FOR YOUR CODE If your home entertainment device does not respond to the Helix Z-wave 5-Device Remote Control with Learning after trying all of the codes listed for your brand, or if your brand is not listed at all, try searching for your code. For example, to search for a code for your TV: 1. Turn on your TV. 2. On the remote control, press TV once; it will blink once. Then press and hold SETUP until the TV key blinks twice. 3. Enter 9 9 1.
Helix 5 Device.fm Page 13 Tuesday, June 5, 2007 5:24 PM CHECKING THE CODES If you have set up the Helix Z-wave 5-Device Remote Control with Learning by searching for your device code (on the previous page), you may need to find out which four-digit code is operating your equipment. For example, to find out which code is operating your TV: 1. On the remote control, press TV once; it will blink once. Then press and hold SETUP until the TV key blinks twice. 2. Enter 9 9 0. The TV key will blink twice. 3.
Helix 5 Device.fm Page 14 Tuesday, June 5, 2007 5:24 PM • Learning capacity is approximately 16 to 25 keys, depending on the code being learned. • Certain device functions are not learnable including multi-frequency types, some high frequency ones, and other unusual formats. • For optimum learning, avoid high levels of ambient light such as natural sunlight or energy-efficient fluorescent lights. NOTE: Please have your original remote controls handy before programming learning.
Helix 5 Device.fm Page 15 Tuesday, June 5, 2007 5:24 PM NOTE: 6. the key on the original remote until the Helix Z-wave 5-Device Remote Control with Learning’s LED blinks twice. If the LED displays one long blink, a learning error has occurred. Try repeating this step again until a successful capture occurs. If the function is still not captured, press and hold SETUP to exit programming and review the “Learning Precautions” on the previous page. If needed, also see “Troubleshooting” on page 31.
Helix 5 Device.fm Page 16 Tuesday, June 5, 2007 5:24 PM Deleting All Learned Keys in a Specific Mode NOTE: If more than 15 seconds pass between key presses, the remote exits programming. 1. Press and hold SETUP until the last-selected mode key blinks twice, then press 9 7 6. 2. 3. Press a mode key twice (i.e., TV, DVD/VCR, SAT, or AUX) to clear all the learned keys for that mode. The LED blinks twice. Repeat step 2 for another mode or press and hold SETUP to exit programming.
Helix 5 Device.fm Page 17 Tuesday, June 5, 2007 5:24 PM Locking Channel Control to SAT 1. On the remote control, press SAT once; it will blink once. Press and hold SETUP until the SAT key blinks twice. 2. Enter 9 7 3.The SAT key will blink twice. 3. Press CH+ once. The SAT key will blink twice. Now, regardless of what mode you select (except AMP), the channel keys will only change channels on your cable converter.
Helix 5 Device.fm Page 18 Tuesday, June 5, 2007 5:24 PM 3. Press VOL- once. The last-selected device key will blink four times. 4. Repeat steps 1 through 3 for each device you want volume to be unlocked. Now, after you select a device that has volume unlocked (e.g., SAT), pressing VOL+, VOL-,or MUTE, will control only that device’s volume. Unlocking All Volume Control (Global Volume Unlock) NOTE: Performing these instructions will set independent volume control for all programmed devices. 1.
Helix 5 Device.fm Page 19 Tuesday, June 5, 2007 5:24 PM Now, when you press VOL+, VOL-,or MUTE, the volume of the selected device (e.g., TV) is controlled regardless of mode. PROGRAMMING ID LOCK The Helix Z-wave 5-Device Remote Control with Learning is locked at the factory to operate your provider’s set top box.
Helix 5 Device.fm Page 20 Tuesday, June 5, 2007 5:24 PM need to clear the key first (see “Clearing a Macro Key” on page 20). Programming a Macro Key 1. On the remote control, press and hold SETUP until it blinks twice. 2. Enter 9 9 5. The SETUP key blinks twice. 3. Select a macro key (for example, 1) and press it once. Press the key sequence you want to program into the macro. For example, to turn on your TV and raise its volume, press TV followed by VOL+. 4. NOTE: 5. 6.
Helix 5 Device.fm Page 21 Tuesday, June 5, 2007 5:24 PM USING THE MASTER POWER KEY The Helix Z-wave 5-Device Remote Control with Learning has a unique feature that allows you to sequentially turn up to five of your home entertainment devices on or off with a single key press. NOTE: MASTER POWER (PWR) only works in the SAT mode. If it is not programmed, only the cable converter will turn on or off. In any other mode, pressing MASTER POWER (PWR) once will turn the selected device on or off.
Helix 5 Device.fm Page 22 Tuesday, June 5, 2007 5:24 PM Clearing the Master Power Key 1. On the remote control, press and hold SETUP until the last-selected device key blinks twice. 2. Enter 9 9 5. The last-selected device key blinks twice. 3. Press and release PWR. 4. Press and hold SETUP until the SAT key blinks twice. RE-ASSIGNING DEVICE KEYS The Helix Z-wave 5-Device Remote Control with Learning can be set up to control a second device of an already-assigned type.
Helix 5 Device.fm Page 23 Tuesday, June 5, 2007 5:24 PM NOTE: Only one device can be assigned to an unused device key at a time. To Re-Assign Perform Key Sequence DVD/VCR as DVD/ 2nd AMP key VCRÆSETUPÆ9Æ9Æ2ÆAMPÆDVD /VCR DVD/VCR as DVD/ 2nd TV key VCRÆSETUPÆ9Æ9Æ2ÆTVÆDVD/ VCR DVD/VCR as DVD/ 2nd SAT key VCRÆSETUPÆ9Æ9Æ2ÆSATÆDVD/ VCR DVD/VCR back to VCR DVD/VCRÆSETUPÆ9Æ9Æ2ÆDVD/ VCRÆDVD/VCR To re-assign another unused device key, substitute it for the DVD/VCR key above and then perform the sequence.
Helix 5 Device.fm Page 24 Tuesday, June 5, 2007 5:24 PM node to your home network. Please make sure the remote is close to the node and try again. Deleting a Node from the Network To remove a node from your home network, you must delete it from the network. To delete the node from your network, perform the following steps: 1. 2. 3. 4. NOTE: Press HOME once. Press and release DEL twice. The red LED blinks rapidly.
Helix 5 Device.fm Page 25 Tuesday, June 5, 2007 5:24 PM Removing a Node from a Scene 1. Press HOME once. 2. Press REMOVE once. 3. Press SCENE once. 4. Press a digit (1-9) for the node location you wish to remove. The red LED blinks rapidly. 5. Press the button on the node so that it sends its information to the remote and receives information from the remote. 6. The green LED blinks twice, then the red LED blinks rapidly.
Helix 5 Device.fm Page 26 Tuesday, June 5, 2007 5:24 PM To turn all nodes either on or off, perform the following steps: 1. 2. 3. Press HOME once. Press ALL once. Press either ON to turn the nodes on, or OFF to turn the nodes off. Any ON or OFF can be pressed. The green LED blinks once. NOTE: If the red LED emits one long, steady blink, you have pressed an invalid key or the All-On/All-Off command was not successful. Repeat the steps above to try again. Adding Nodes to All Control 1. Press HOME once. 1.
Helix 5 Device.fm Page 27 Tuesday, June 5, 2007 5:24 PM 3. 4. 5. 6. 7. NOTE: 8. Press and hold SETUP until the red LED blinks twice. Enter 9 6 6 on the numeric keypad. The red LED blinks twice. Press CH+. The red LED blinks rapidly. Put the target (secondary) remote into programming mode so that it sends its information to the primary remote, as well as receives information from the remote. The remote then transfers the network and node information to the new secondary remote.
Helix 5 Device.fm Page 28 Tuesday, June 5, 2007 5:24 PM PRIMARY CONTROLLER SHIFT You can transfer all of your remote’s information to another remote, so it becomes the new primary remote. You can do this in two ways: either transferring all information, or just transferring network information. Transferring All Network and Remote Information 1. Place the two remotes near each other. 2. Press HOME. 3. Press and hold SETUP until the red LED blinks twice. 4. Enter 9 6 8 on the numeric keypad.
Helix 5 Device.fm Page 29 Tuesday, June 5, 2007 5:24 PM NOTE: 8. If the red LED emits one long, steady blink, the information has not been successfully transferred. Add nodes, groups, and scenes to the new primary remote as needed. CONTROLLER COPY RECEIPT Controller Copy Receipt allows your controller to receive information from another controller. This would then allow the unit to become a new primary or secondary controller. Copying Information from Another Controller 1.
Helix 5 Device.fm Page 30 Tuesday, June 5, 2007 5:24 PM 4. NOTE: The green LED blinks twice. The network has been successfully reset. If the red LED emits one long, steady blink, the network has not been successfully reset. NETWORK UPDATE Network Update allows your controller to update the entire Z-wave network. Updating the Network 1. Press HOME. 2. Press and hold SETUP until the red LED blinks twice. 3. Enter 9 6 3 on the numeric keypad. The red LED blinks continuously. 4. The green LED blinks twice.
Helix 5 Device.fm Page 31 Tuesday, June 5, 2007 5:24 PM Removing a Failed Node 1. Press and hold SETUP until the red LED blinks twice. 2. Press 9 7 2. The green LED blinks continuously. 3. The node has been successfully removed from the network. NOTE: If the red LED emits one long, steady blink, the network has not been successfully updated. CLEARING CUSTOM PROGRAMMING The Helix Z-wave 5-Device Remote Control with Learning contains a Custom Programming Reset program.
Helix 5 Device.fm Page 32 Tuesday, June 5, 2007 5:24 PM PROBLEM: TV/VCR Combo does not respond properly. SOLUTION: Use the VCR codes for your brand. Some combo units may require both a TV code and a VCR code for full operation (see page 11). PROBLEM: No volume on a second TV. SOLUTION: Follow instructions under “Changing Volume Lock” on page 17. PROBLEM: PLAY and STOP keys do not work on a Motorola DCT-2000 cable converter.
Helix 5 Device.fm Page 33 Tuesday, June 5, 2007 5:24 PM • Consult the dealer or an experienced radio/TV technician for help. This equipment has been verified to comply with the limits for a class B computing device, pursuant to FCC Rules. In order to maintain compliance with FCC regulations, shielded cables must be used with this equipment. Operation with non-approved equipment or unshielded cables is likely to result in interference to radio and TV reception.
Helix 5 Device.
Helix 5 Device.
Helix 5 Device.
Helix 5 Device.
Helix 5 Device.
Helix 5 Device.
Helix 5 Device.
Helix 5 Device.
Helix 5 Device.
Helix 5 Device.
Helix 5 Device.
Helix 5 Device.fm Page 45 Tuesday, June 5, 2007 5:24 PM Controlled by the DVD Go Video Humax Panasonic Pioneer RCA Sharp Sylvania Toshiba 21730 21588 20490 20631 20522 21256 20675 21503, 21588 Controlled by the VCR RCA Sylvania Toshiba 20880 20000 21008, 21996 www.urcsupport.
Helix 5 Device.
Helix 5 Device.
Helix 5 Device.fm Page 48 Tuesday, June 5, 2007 5:24 PM Star Choice Tivo Toshiba UltimateTV Ultrasat Uniden US Digital USDTV Voom Zenith 00869 01142, 01442, 01443, 01444 00749, 01749, 00790, 01285 01392, 01640 01806 00724, 00722 01535 01535 00869 01856, 00856 www.urcsupport.
Helix 5 Device.
Helix 5 Device.
Helix 5 Device.
Helix 5 Device.
Helix 5 Device.
Helix 5 Device.
Helix 5 Device.
Helix 5 Device.
Helix 5 Device.
Helix 5 Device.
Helix 5 Device.
Helix 5 Device.
Helix 5 Device.
Helix 5 Device.
Helix 5 Device.fm Page 63 Tuesday, June 5, 2007 5:24 PM Axion Broksonic Citizen Emerson ESA Funai Go Vision Hitachi Insignia Jensen Magnavox Panasonic Philips Prima RCA Samsung Sansui Sova Sylvania Toshiba 21071 20695 20695 20675, 21268 21268 21268 21071 21247 21268 21016 21268 21490 20854, 21260 21016 21022 20899 20695 21122 20675, 21268 20695 www.urcsupport.
Helix 5 Device.
Helix 5 Device.
Helix 5 Device.
Helix 5 Device.
Helix 5 Device.
Helix 5 Device.
Helix 5 Device.
Helix 5 Device.fm Page 71 Tuesday, June 5, 2007 5:24 PM Niveus Media Northgate Panasonic Pioneer Ricavision Roku Samsung Sensory Science Sharp Sony Stack 9 Sylvania Systemax Tagar Systems Toshiba Touch Viewsonic Vizio Voodoo ZT Group 01272 01272 01120 01010 01272 01486 01190, 01490 01126 01010 01272, 01324, 01364 01272 01563 01272 01272 01272 01272 01272, 01329 01126 01272 01272 www.urcsupport.
Helix 5 Device.fm Page 72 Tuesday, June 5, 2007 5:24 PM URC-5300 Revision 1.