Atlas OCAP M1056.
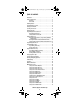
Atlas OCAP M1056.fm Page 2 Wednesday, April 30, 2008 2:52 PM TABLE OF CONTENTS Introduction . . . . . . . . . . . . . . . . . . . . . . . . . . . . . . . . . . . . . . . . . . . . 4 Features and Functions . . . . . . . . . . . . . . . . . . . . . . . . . . . . . . . . . . . 5 Key Charts. . . . . . . . . . . . . . . . . . . . . . . . . . . . . . . . . . . . . . . . . 6 Device Table . . . . . . . . . . . . . . . . . . . . . . . . . . . . . . . . . . . . . . . 8 Installing Batteries . . . . . . . . . . . . .
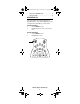
Atlas OCAP M1056.fm Page 3 Wednesday, April 30, 2008 2:52 PM Setup Codes for TV/VCR/DVD Combos . . . . . . . . . . . . . . . . . . 51 Setup Codes for VCRs . . . . . . . . . . . . . . . . . . . . . . . . . . . . . . . 52 BACKLIGHTING TIPS Some Atlas OCAP models include backlighting for keypad illumination. If you have backlighting, you will see a light bulb on the SETUP key, as shown below. To Enable Backlighting 1. Press the SETUP key twice. 2. Backlighting will now turn on after any keypress.
Atlas OCAP M1056.fm Page 4 Wednesday, April 30, 2008 2:52 PM INTRODUCTION The Atlas OCAP 5-Device Remote Control by Universal Electronics is our latest generation universal remote control. Its sophisticated technology allows you to consolidate up to five of your original home entertainment remote controls into one easy-to-use product.
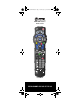
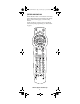
Atlas OCAP M1056.fm Page 5 Wednesday, April 30, 2008 2:52 PM FEATURES AND FUNCTIONS Use the illustration below to locate features on the Atlas OCAP 5-Device Remote Control and then study the Key Charts (on the next three pages) to learn how they function. To find out what type of devices can be controlled by each device key after programming, see “Device Table” on page 8 . www.urcsupport.
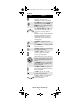
Atlas OCAP M1056.fm Page 6 Wednesday, April 30, 2008 2:52 PM Key Charts Key Function Use SETUP for all programming sequences. Also use to turn backlighting on and off, if applicable. Press PWR once to turn on or off a home entertainment device. For MASTER POWER control, see “Using the Master Power Key” on page 19. Press VCR, DVD, AUD, TV, or CBL once to select a home entertainment device to control. Also see “Device Table” on page 8.
Atlas OCAP M1056.fm Page 7 Wednesday, April 30, 2008 2:52 PM Key Function Use VOL+ (or VOL-) to raise (or lower) the audio volume. Use FAV to cycle through your favorite channels stored in your cable converter. Use CH+ (or CH-) to select the next higher (or lower) channel. For DVD players, use these keys to skip forward (or reverse) through chapters. For amplifiers/receivers, use these keys to select the next higher (or lower) preset station. Press MUTE once to turn the sound off or on.
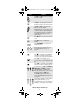
Atlas OCAP M1056.fm Page 8 Wednesday, April 30, 2008 2:52 PM Key Function Press ASPECT once to change the aspect ratio of the show you are watching. (Not available on all set-top boxes). Press SHIFT to access additional cable features (see your cable converter’s manual). Use PIP ON-OFF to switch the PictureIn-Picture feature on or off (if available on your TV or cable service). Use PIP SWAP to switch images and sound between the main and window pictures (if available on your TV or cable service).
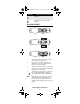
Atlas OCAP M1056.fm Page 9 Wednesday, April 30, 2008 2:52 PM Device Key Controls these types of devices Television Cable Box (Converter) or Satellite Receiver INSTALLING BATTERIES ❶ ❷ ❸ 1. 2. 3. 4. NOTE: On the back of the remote control, push the tab and lift off the battery cover. Locate the two (2) enclosed AA batteries. Match the + and - marks with those in the battery case, then insert them. Align the covers keys with the cases holes and press the cover back into place.
Atlas OCAP M1056.fm Page 10 Wednesday, April 30, 2008 2:52 PM PROGRAMMING DEVICE CONTROL The Atlas OCAP 5-Device Remote Control is preprogrammed to operate the cable box (converter) provided by your cable system, an RCA TV, a Toshiba DVD player, an RCA VCR, and a Pioneer audio receiver. To control devices other than the default brands, perform the following steps; otherwise skip this section.
Atlas OCAP M1056.fm Page 11 Wednesday, April 30, 2008 2:52 PM 5. Repeat steps 1 through 4 for each device you want the remote control to operate. For future reference, write down each working device code in the boxes on the following page.
Atlas OCAP M1056.fm Page 12 Wednesday, April 30, 2008 2:52 PM NOTE: (for example, TV/VCR). If you perform this procedure correctly, the VCR key will blink twice. If the VCR key did not blink twice after entering the codes last digit, repeat steps 2 through 3 and try entering the same code again.
Atlas OCAP M1056.fm Page 13 Wednesday, April 30, 2008 2:52 PM 4. Aim the remote control at the TV and press PWR once. 5. Press and release the CH+ key continuously, then stop when the TV turns off. NOTE: In the search mode, the remote control will send IR codes from its library to the selected device, starting with the most popular code first. Press PWR. The TV should turn on, then press SETUP to lock in the code. 6.
Atlas OCAP M1056.fm Page 14 Wednesday, April 30, 2008 2:52 PM CHECKING THE CODES If you have set up the Atlas OCAP 5-Device Remote Control by searching for your device code (on the previous page), you may need to find out which fourdigit code is operating your equipment. For example, to find out which code is operating your TV: 1. On the remote control, press TV once; it will blink once. Then press and hold SETUP until the TV key blinks twice. 2. Enter 9 9 0. The TV key will blink twice. 3.
Atlas OCAP M1056.fm Page 15 Wednesday, April 30, 2008 2:52 PM Unlocking Channel Control 1. On the remote control, press CBL once; it will blink once. Press and hold SETUP until the CBL key blinks twice. 2. Enter 9 7 3. The CBL key will blink twice. 3. Press CH- once. The CBL key will blink four times. Now the remote control will provide TV and VCR channel-control capabilities while in the TV or VCR mode. Locking Channel Control to CBL 1. On the remote control, press CBL once; it will blink once.
Atlas OCAP M1056.fm Page 16 Wednesday, April 30, 2008 2:52 PM NOTE: The audio mode’s (AUD) volume controls are active regardless of Volume Lock settings. However, if you lock the volume controls to the AUD mode, you will have control of the audio device’s volume in all other modes (i.e., VCR, DVD, TV, and CBL). This can be an advantage if, for example, you always listen to home entertainment devices through your receiver’s speakers.
Atlas OCAP M1056.fm Page 17 Wednesday, April 30, 2008 2:52 PM Locking Volume Control To One Mode (Global Volume Lock) NOTE: The audio mode’s volume controls are active regardless of Volume Lock settings. However, if you lock the volume controls to the AUD mode, you will control the audio device’s volume in all other modes (i.e., VCR, DVD, TV, or CBL). This can be an advantage if, for example, you always listen to home entertainment devices through your receiver’s speakers. 1.
Atlas OCAP M1056.fm Page 18 Wednesday, April 30, 2008 2:52 PM 4. 5. 6. Perform the instructions under “Programming Device Control” on page 10 to program device control for the desired cable converter or satellite receiver. When you are done, perform steps 5 and 6 on this page to again lock the cable ID Lock. On the remote control, press CBL once; it will blink once. Then press and hold SETUP until the CBL key blinks twice. Enter 9 8 2. The CBL key will blink twice, indicating ID Lock is again locked.
Atlas OCAP M1056.fm Page 19 Wednesday, April 30, 2008 2:52 PM NOTE: 5. 6. NOTE: You can program up to 15 key presses into one macro. Press and hold SETUP until it blinks twice. To add another macro, repeat steps 1 through 5, substituting the new key sequence to be added in step 4. Programming more than five macros on the same macro key overwrites previous settings. Clearing a Macro Key 1. On the remote control, press and hold SETUP until it blinks twice. 2. Enter 9 9 5. The SETUP key blinks twice.
Atlas OCAP M1056.fm Page 20 Wednesday, April 30, 2008 2:52 PM 2. Enter 9 9 5. The last-selected device key blinks twice. 3. Press PWR once. 4. For the first device you want in the power on sequence, press a device key (e.g., CBL) once. Then press PWR once. For the second device in the power sequence, press its key once (e.g, TV). Then press PWR. 5. Repeat step 4 up to four more times to add the second, third, fourth, and fifth device, as desired.
Atlas OCAP M1056.fm Page 21 Wednesday, April 30, 2008 2:52 PM 4. Press and hold SETUP until the CBL key blinks twice. RE-ASSIGNING DEVICE KEYS The Atlas OCAP 5-Device Remote Control can be set up to control a second device of an already-assigned type. For example, to have the unit control a TV, a Cable Converter, and two audio devices (for example, two audio receivers), re-assign the unused VCR key to operate the second audio device as follows: NOTE: VCR is preset at the factory to control an RCA VCR.
Atlas OCAP M1056.fm Page 22 Wednesday, April 30, 2008 2:52 PM To re-assign another unused device key, substitute it for the VCR key above and then perform the sequence. For example, to re-assign an unused AUD key as a second DVD key, perform AUDÆSETUPÆ9Æ9Æ2ÆDVDÆAUD. When a re-assignment is done, the selected device key (e.g., AUD) will blink twice to confirm your choice. At that time, you will need to program device control (see “Programming Device Control” on page 10).
Atlas OCAP M1056.fm Page 23 Wednesday, April 30, 2008 2:52 PM TROUBLESHOOTING PROBLEM: Device key does not blink when you press a key. SOLUTION: Replace the batteries with two (2) new AA batteries (see “Installing Batteries” on page 9). PROBLEM: Device key blinks when you press a key, but home entertainment device does not respond. SOLUTION: Make sure you are aiming the remote control at your home entertainment device and that you are within 15 feet of the device you are trying to control.
Atlas OCAP M1056.fm Page 24 Wednesday, April 30, 2008 2:52 PM FCC NOTICE This equipment has been tested and found to comply with the limits for a class B digital device, pursuant to part 15 of the FCC Rules. These limits are designed to provide reasonable protection against harmful interference in a residential installation.
Atlas OCAP M1056.
Atlas OCAP M1056.
Atlas OCAP M1056.
Atlas OCAP M1056.
Atlas OCAP M1056.
Atlas OCAP M1056.
Atlas OCAP M1056.
Atlas OCAP M1056.
Atlas OCAP M1056.
Atlas OCAP M1056.
Atlas OCAP M1056.
Atlas OCAP M1056.
Atlas OCAP M1056.
Atlas OCAP M1056.
Atlas OCAP M1056.
Atlas OCAP M1056.
Atlas OCAP M1056.
Atlas OCAP M1056.
Atlas OCAP M1056.
Atlas OCAP M1056.
Atlas OCAP M1056.
Atlas OCAP M1056.
Atlas OCAP M1056.
Atlas OCAP M1056.
Atlas OCAP M1056.
Atlas OCAP M1056.
Atlas OCAP M1056.
Atlas OCAP M1056.
Atlas OCAP M1056.
Atlas OCAP M1056.
Atlas OCAP M1056.
Atlas OCAP M1056.
Atlas OCAP M1056.
Atlas OCAP M1056.fm Page 58 Wednesday, April 30, 2008 2:52 PM NOTES www.urcsupport.
Atlas OCAP M1056.fm Page 59 Wednesday, April 30, 2008 2:52 PM NOTES www.urcsupport.
Atlas OCAP M1056.fm Page 60 Wednesday, April 30, 2008 2:52 PM M1056 Revision 2.