Kameleon C6_v10.
Kameleon C6_v10.qxd 5/14/03 9:16 AM Page 2 KAMELEON-C6 REMOTE TABLE OF CONTENTS Introduction . . . . . . . . . . . . . . . . . . . . . . . . . .3 STEP 01 Installing Batteries . . . . . . . . . . . . . . . . . . . . . . . . .4 STEP 02 Kameleon-C6 Remote Keypad Overview . . . . . . . . . . . . . . . . . . . . . . . .5-6 Keypad Functions . . . . . . . . . . . . . . . . . . . . . . .7-10 Preprogrammed Devices . . . . . . . . . . . . . . . . . . .10 STEP 03 Programming Your Kameleon-C6 Remote . . . . .
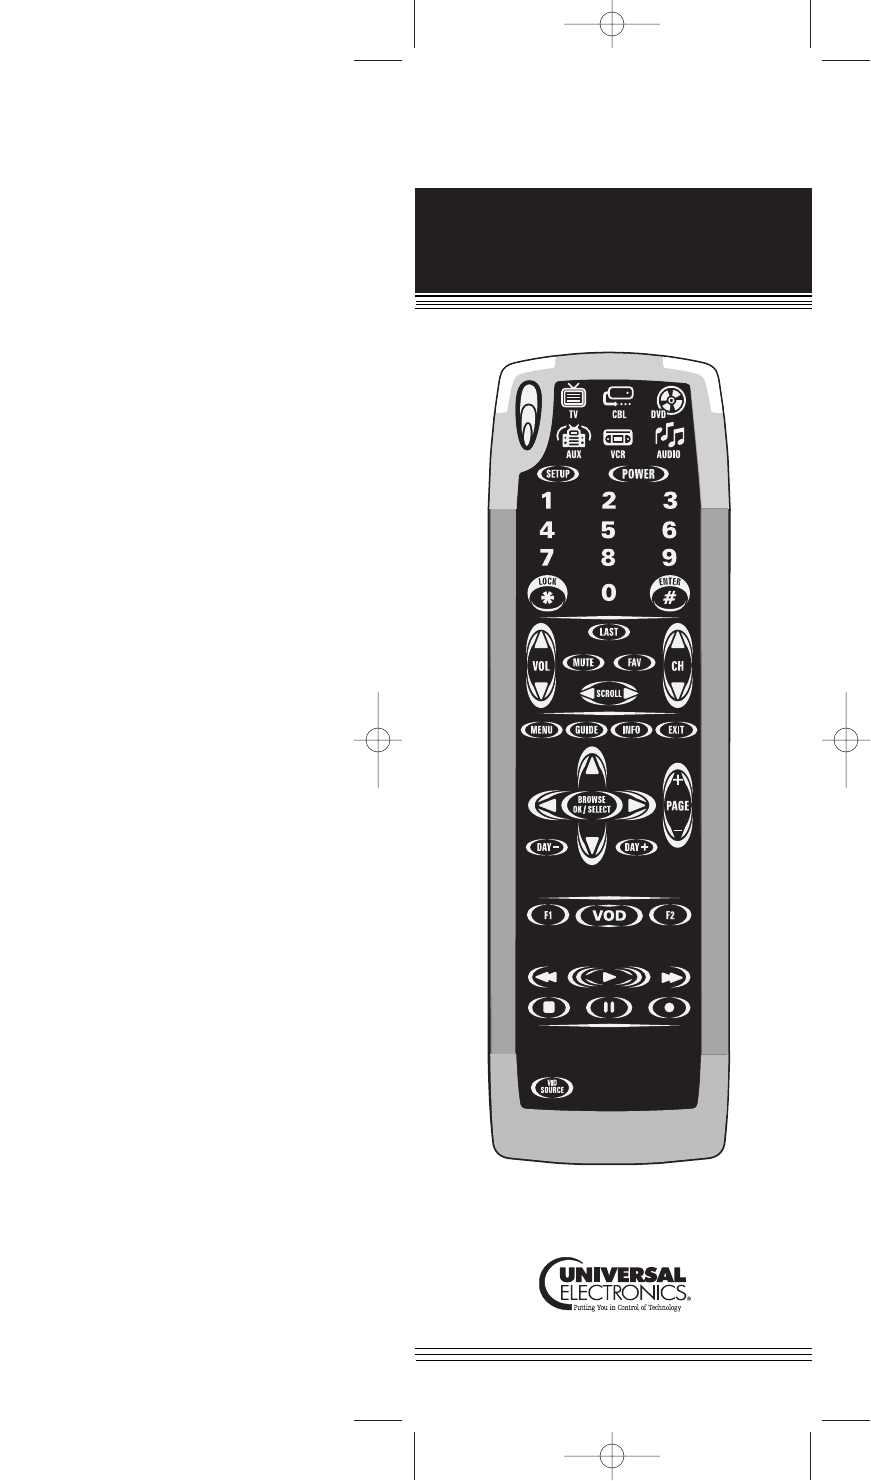
Kameleon C6_v10.qxd 5/14/03 9:16 AM Page 3 Manufacturer Codes Glossary\Trouble Shooting Advanced Options Let’s get started programming your KameleonC6 Remote! Batteries\Keypad Overview Unique screens identify the specific keys required to operate the digital cable set-top box provided by your cable system. The intuitive interface displays only the active keys for each selected device and the device icon key animates to indicate your selected device.
Kameleon C6_v10.qxd 5/14/03 9:16 AM Page 4 KAMELEON-C6 REMOTE Installing Batteries Your Kameleon-C6 Remote requires batteries. Four AAA alkaline batteries are included so you can immediately enjoy your Kameleon-C6 Remote. ABOUT REPLACING BATTERIES • Use only new batteries of the required size and recommended type. • Do not mix old and new batteries, different types of batteries (e.g. standard, alkaline or rechargeable), or rechargeable batteries of different capacities.
Kameleon C6_v10.qxd 5/14/03 9:16 AM Page 5 You can program your Kameleon-C6 Remote to control your devices using these device mode keys. Each device mode has a main and a menu screen– you can readily switch between these two screens for each device mode by hitting the scroll key.Your Kameleon-C6 intuitively displays only the active keys for each device mode. Manufacturer Codes Glossary\Trouble Shooting PRESS THE SCROLL KEY TO SWITCH TO THE MENU SCREEN FOR EACH DEVICE.
Kameleon C6_v10.
Kameleon C6_v10.qxd 5/14/03 9:16 AM Page 7 BATTERIES/KEYPAD OVERVIEW IR (INFRARED)INDICATOR The IR Indicator animates when IR is being “sent” or “received”. The IR will show “outgoing IR” whenever a functional key is pressed. Introduction Keypad Functions Digit Keys [ ] The Digit (1-9, 0) keys control the same function as on your original remote. Lock [ ] Use Lock key to parentally lock out channels from viewing. Enter [ ] Use Enter key to control the same function as on your original remote.
Kameleon C6_v10.qxd 5/14/03 9:16 AM Page 8 KAMELEON-C6 REMOTE CHANNEL & VOLUME CONTROL KEYS continued Fav [ ] Use Fav key to cycle through your favorite channels stored in your cable converter. Scroll [ ] Use the Scroll key to cycle through the available device screens for the selected mode. CH [ ] Use CH+ (or CH-) key to select the next higher (or lower) channel. For amplifiers/receivers, use these keys to select the next higher (or lower) preset station.
Kameleon C6_v10.qxd 5/14/03 9:16 AM Page 9 BATTERIES/KEYPAD OVERVIEW List [ ] Press List key once to display a list of recorded shows on your PVR. Press -->| to advance to the next Chapter while viewing a DVD Live [ ] Press Live key to return to watching live TV. Rewind Arrow [ ] In all modes except CBL, use REW, PLAY, FFWD, STOP, and PAUSE to control a VCR, DVD player, or a PVR (after selecting a desired device). To record in the VCR mode, press REC twice.
Kameleon C6_v10.qxd 5/14/03 9:16 AM Page 10 KAMELEON-C6 REMOTE TV OR SET-TOP BOX CONTROLS continued Move [ ] Use PIP MOVE key to move the window picture to different positions in the main picture. Sur Snd [ ] Use the Sur Snd + (or Sur Snd -) keys to adjust the surround sound speaker levels. PIP Ch [ ] Use PIP CH + (or PIP Ch -) keys to select the next higher (or lower) PIP channel.
Kameleon C6_v10.qxd 5/14/03 9:16 AM Page 11 •Amp/Tuner •VCR •Amplifier •DVD •CD •PVR •Home Theater in Box •Amp/Tuner •Amplifier •CD •Home Theater in Box TO PROGRAM YOUR KAMELEON-C6 REMOTE To set up other devices, perform the following steps to program your Kameleon-C6 Remote. Repeat the steps for each desired device one at a time. 1. Turn your device on. 2. Find your device code in the Manufacturer Code section (see page 28-41). The most common code for each brand is listed first. 3.
Kameleon C6_v10.qxd 5/14/03 9:16 AM Page 12 KAMELEON-C6 REMOTE REMEMBER • IF THE LISTED DEVICE’S MANUFACTURER CODES DO NOT WORK, TRY “SEARCHING FOR YOUR DEVICE’S MANUFACTURER CODE.” SEE BELOW. • IF THE ORIGINAL REMOTE CONTROL FROM YOUR VCR DOES NOT HAVE A POWER KEY, PRESS PLAY INSTEAD OF POWER ON STEP 6. • YOU CAN ALSO SET UP A SECOND TV, CBL , DVD, AUX, VCR, OR AUD. SEE “REASSIGNING DEVICE MODE KEYS” ON PAGE 21.
Kameleon C6_v10.qxd 5/14/03 9:16 AM Page 13 PROGRAMMING REMOTE • Use and store the remote only in normal temperature environments. • Keep the remote away from dust and dirt. • When necessary, wipe the remote with a damp cloth to keep it looking new. • Modifying or tampering with internal parts can cause damage. Manufacturer Codes Glossary\Trouble Shooting Congratulations! Your Kameleon-C6 is ready to operate your home entertainment components.
Kameleon C6_v10.qxd 5/14/03 9:16 AM Page 14 KAMELEON-C6 REMOTE Device Code Verification You can verify any device code that you have programmed. This will be helpful in retrieving an existing device’s Manufacturer Code programmed into your Kameleon-C6 Remote for future reference. TO VERFIY A DEVICE CODE 1. Press the desired device mode key on your Kameleon-C6 Remote. 2. Press Setup for at least 3 seconds. The bottom of the IR indicator will blink twice. 3. Press 9 9 0 on the keypad.
Kameleon C6_v10.qxd 5/14/03 9:16 AM Page 15 ADVANCED OPTIONS The volume default setting for each device mode is locked to the TV device mode. With the Volume Unlock feature, you can customize the volume setting for any device. TO UNLOCK THE VOLUME CONTROL FOR A DEVICE Batteries\Keypad Overview You can customize the volume control in your Kameleon-C6 Remote by “locking” or “unlocking” the volume control for a device (e.g. TV) while in a different device mode (e.g.VCR).
Kameleon C6_v10.qxd 5/14/03 9:16 AM Page 16 KAMELEON-C6 REMOTE Channel Control Lock The Kameleon-C6 Remote includes a programming feature that allows you to program the remote’s channel control capabilities to be locked to the cable converter using the following keys: 0~9, CH+, CH-, ENTER,and LAST*. This will guarantee that you do not inadvertently change a channel on your TV or VCR. This feature is de-activated by default and can be activated or de-activated by following the steps below.
Kameleon C6_v10.qxd 5/14/03 9:16 AM Page 17 ADVANCED OPTIONS The Learning Feature Your Kameleon-C6 Remote comes with a complete library of pre-programmed codes. After you have set up your Kameleon-C6 –for your device, you may find that there are one or more keys on the device’s original remote control that you would like to have on the KameleonC6 keypad. Your Kameleon-C6 Remote includes a Learning Feature so you can add functions that are unique to your home entertainment devices (e.g.
Kameleon C6_v10.qxd 5/14/03 9:16 AM Page 18 KAMELEON-C6 REMOTE TO PROGRAM A LEARNED FUNCTION 1. Place your Kameleon-C6 Remote and your original remote control on a flat surface. Position the remotes no more than 1 to 2 inches apart. Make sure the ends that you normally point at your device are facing each other. See image below. 1 TO 2 INCHES APART KAMELEON-C6 REMOTE ORIGINAL REMOTE 2. On your Kameleon-C6 Remote, press Setup for at least 3 seconds. The bottom of the IR indicator will blink twice. 3.
Kameleon C6_v10.qxd 5/14/03 9:16 AM Page 19 • THE KAMELEON-C6 CAN LEARN UP TO 25 FUNCTIONS. • YOU CAN OVERRIDE A LEARNED FUNCTION BY PROGRAMMING A NEW LEARNED FUNCTION ON THE SAME KEY. Introduction ADVANCED OPTIONS • THE LEARNING FEATURE IS DEVICE MODE SPECIFIC-– THEREFORE, YOU CAN PLACE ONE LEARNED FUNCTION PER DEVICE MODE ON THE SAME KEY. • LEARNING SHOULD NOT BE DONE IN DIRECT SUNLIGHT OR UNDER • WHEN CHANGING BATTERIES, YOUR LEARNED FUNCTIONS WILL BE RETAINED.
Kameleon C6_v10.qxd 5/14/03 9:16 AM Page 20 KAMELEON-C6 REMOTE Creating the Power Macro You can program the Power key on your Kameleon-C6 Remote to turn on and off multiple devices at the same time.You can command up to six devices with one press of your Power key! TO PROGRAM THE MACRO FOR THE POWER KEY 1. Press the Cable device mode key. 2. Press Setup for at least 3 seconds. The bottom of the IR indicator will blink twice. 3. Press 9 9 5 on the keypad. The bottom of the IR indicator will blink twice. 4.
Kameleon C6_v10.qxd 5/14/03 9:16 AM Page 21 ADVANCED OPTIONS 1. Press Cable device mode key. 2. Press Setup for at least 3 seconds. The bottom of the IR indicator will blink twice. Introduction TO PROGRAM A MACRO 5. Press Cable Device mode key followed by 0-0-1. 6. Lastly, to save the Macro, press Setup for at least 3 seconds. The bottom of the IR indicator will blink twice. Now, whenever you press the programmed custom VOD key, the Kameleon-C6 Remote will tune the cable converter to channel 001.
Kameleon C6_v10.qxd 5/14/03 9:16 AM Page 22 KAMELEON-C6 REMOTE Reassigning Device Mode Keys Setting up an Additional Device The six device mode key icons are designed to easily identify the most common combination of home entertainment devices. However, any device mode key can be programmed to control any home entertainment device, even though the icon may not match that particular device.
Kameleon C6_v10.qxd 5/14/03 9:16 AM Page 23 TROUBLE SHOOTING Problem: TV/VCR Combo does not respond properly. Solution: Use the VCR codes for your brand. Some combo units may require both a TV code and a VCR code for full operation. Problem: There is no volume on the second TV. Solution: Follow the instructions in “Volume Lock and Unlock” on page 15. Problem: CH+, CH- and LAST do not work on my RCA TV. Solution: Due to RCA design (1983 -1987), only the original remote control will operate these functions.
Kameleon C6_v10.qxd 5/14/03 9:16 AM Page 24 KAMELEON-C6 REMOTE Glossary Amp/Tuner- n. short for Amplifier and Tuner. It is one of the devices that can be programmed under the AUX and AUDIO device mode keys on your Kameleon-C6. See “Your Kameleon-C6 Keypad Overview” on page 11. AUD- n. short for Audio. . AUX- n. short for Auxiliary. It is one of the device modes on your Kameleon-C6 Remote. See “Your Kameleon-C6 Keypad Overview” on page 6. Blink- v. It describes an action or animation.
Kameleon C6_v10.qxd 5/14/03 9:16 AM Page 25 PIP- n. short for Picture in Picture. It is one of the TV/Set-top box controls on your Kameleon-C6 Remote. Power- n. Power is a key on the top middle of your Kameleon-C6 remote. See your “Kameleon-C6 Keypad Overview” on page 6. PVR- n. short for Personal Video Recorder. It is one of the devices that can be programmed under the DVD and VCR device mode key on your Kameleon-C6 Remote. Setup, Setup Key- n. It is a key on the top middle of your Kameleon-C6 Remote.
Kameleon C6_v10.qxd 5/14/03 9:16 AM Page 26 KAMELEON-C6 REMOTE Additional Information This product does not have any user-serviceable parts. Opening the case, except for the battery cover, may cause permanent damage to your Kameleon-C6 remote. Copyright 2003 by Universal Electronics Inc.
Kameleon C6_v10.qxd 5/14/03 9:16 AM Page 27 ADDITIONAL INFORMATION/FCC STATEMENT • Increase the separation between the equipment and receiver. • Connect the equipment into an outlet on a circuit different from that to which the receiver is connected. • Consult the dealer or an experienced radio/TV technician for help. Batteries\Keypad Overview Manufacturer Codes This equipment has been verified to comply with the limits for a class B computing device, pursuant to FCC Rules.
Kameleon C6_v10.
Kameleon C6_v10.
Kameleon C6_v10.
Kameleon C6_v10.
Kameleon C6_v10.
Kameleon C6_v10.
Kameleon C6_v10.
Kameleon C6_v10.
Kameleon C6_v10.
Kameleon C6_v10.
Kameleon C6_v10.
Kameleon C6_v10.
Kameleon C6_v10.
Kameleon C6_v10.
Kameleon C6_v10.