Pioneer Digital TV User’s Guide THE FUTURE NOW SHOWING
Welcome THE FUTURE NOW SHOWING exclusively on your TV Digital TV is TV different than anything you have seen before. It isn’t cable…it’s better. Digital TV offers more channels, more features and more choices. Watch what you want – sports, movies, news, cartoons, drama, comedies – anything you can imagine is there. Watch when you want – with features like auto tune, video on demand and digital video recording. Watch how you want – DVD quality video and sound. So sit back, relax and enjoy the future.
Table of Contents Remote Control Layout UEI S4000 Remote Control 1 1 1 Remote Control Basics Turn Your Set Top Box or TV On or Off Change Channels Adjust Volume System Buttons 3 3 3 3 4 2 How To Use This Book Layout Color-codes and Icons 5 5 5 Infobar Layout 6 3 The Infobar Introducing The Infobar Go To The Infobar Using The Infobar Exit The Infobar 7 7 7 7 9 4 The Menubar Introducing The Menubar Go To The Menubar Understand The Menubar 10 10 10 10 Guide Layout Introducing Guide Go To Guide Part
Table of Contents 6 Rentals Introducing Rentals and VOD (Video on Demand) Go To Rentals Browse Rentals Rent A VOD Rental Watch Your VOD Rental Controlling Rental Playback The Slider 24 24 24 24 25 26 27 27 7 DVR Introducing DVR Quick Recording Pause Live TV (PLT) Controlling Recorded or Live TV DVR Playback Controller The DVR Menu Go To DVR The DVR Menu Quick Reference Go To Recordings Sort Recordings Watch A Recorded Program Lock or Unlock A Recording Deleting A Recording Review Programs To Record Go To
Table of Contents Introducing PPV Events Go To PPV Events Purchasing PPV Events Introducing Reminders Go To Reminders Cancel A Reminder or Auto Tune Introducing Messages Go To Messages Read A Message Introducing Caller ID Go To Caller ID Delete A Caller ID Entry 37 37 38 38 38 38 39 39 39 39 40 40 9 Parental Controls Introducing Parental Controls Go To Parental Controls Enable/Disable Parental Controls Disable Parental Controls Enable Parental Controls 41 41 41 41 42 42 10 Settings Introducing Settings
Table of Contents 12 Search Introducing Search Go To Search Search For A Program 57 57 57 57 13 MyMedia Introducing MyMedia Go To MyMedia 59 59 59 Set Top Box Amino 110 Set Top Box Amino 130 Set Top Box Amino 530 Set Top Box Entone Amulet 60 60 61 62 63 Movie Ratings 64 TV Ratings 65
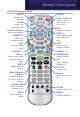
Remote Control Layout UEI S4000 Remote Control POWER MENU Displays the Menubar Device Selection Selects control of Set Top Box, TV, DVD or AUX GUIDE Displays the program guide INFO Displays the Infobar Direction Buttons Moves the highlight PAGE +/- Jumps guide listings up or down one page OK|SELECT Selects the highlighted item LAST EXIT Returns to the previous channel Close the current screen Channel +/- Volume + / - ON DEMAND DAY +/- Displays Rentals Jumps guide listings ahead or bac
Remote Control Layout This Page Intentionally Left Blank 2
1 Remote Control Basics Turn Your Set Top Box or TV On or Off The device selection buttons tell your remote whether you want to control your set top box or your television. To turn your TV on or off, press the TV button and then press the POWER button. To turn your set top box on or off, press the STB button and then the Power button on your remote control. Note: It is not necessary to turn your set top box off.
1 Remote Control Basics System Buttons There are a number of buttons on your remote that display different features of your service. MENU displays the Menubar when in set top box [STB] mode, and in [TV] mode you will see your TV’s menu. The Menubar provides quick access to every feature supported by your service. For more information about the Menubar, see section 4 Menubar.
2 How To Use This Book Layout Instructions are paired with screen shots to illustrate the process and provide confirmation of what you should see on your TV. On-screen text, such as screen titles, messages and options are shown in Deep Blue Bold Type. Buttons on the remote control are represented by a graphic of that button, or Red Bold Type when a graphic cannot be shown. Color-codes and Icons Program listings are shown in different colors based upon the type of program shown.
Infobar Layout 4 5 6 1 3 7 2 4 5 6 1 3 8 2 7 1 Channel Name and Number The name and number of the channel currently listed in the Infobar. 2 3 Current Time Program Type Indicates whether you are watching Live TV, Video on Demand, a recorded program or a Pay-Per-View program. This may also indicate if the program is Blocked because of parental controls or that the Emergency Alert System is active.
3 The Infobar Introducing The Infobar The Infobar is a quick way of finding information about the show you are watching, as well as what comes on later and what is on other channels. Go To The Infobar There are three ways to make the basic Infobar appear. Press Info on your remote control. Press the up or down direction buttons on your remote control. The basic Infobar will also appear any time you change channels. Once the Infobar is active, press Info again to display the detailed Infobar.
3 The Infobar Step 2a: See What’s On Other Channels Press the up or down direction buttons to scroll the Infobar through what is showing on other channels without actually changing channels. If you find something you would rather watch on another channel, press OK to tune to that channel. Step 2b: See What’s On Later Press the right direction button to scroll ahead to upcoming programs for the channel listed on the Infobar.
3 The Infobar Press OK to display options to set a reminder, auto tune or recording (if your set top box supports DVR). For more information on setting auto tunes, reminders, and recordings, see Setting Reminders, Autotunes and Recordings in section 5 Guide. Note: Recording options will not be available if your set top box doesn’t support those features. Exit The Infobar The Infobar will go away on its own after a few seconds of inactivity, or… Press EXIT on your remote control.
4 The Menubar Note: Parental Controls must first be set up in Settings before the Parental Controls on/off button will appear on the Menubar. Introducing The Menubar The Menubar is a quick and easy way to access any feature of your service. Go To The Menubar To display the Menubar, press Menu on your remote control. Understand The Menubar Guide will bring up the program guide. For information on Guide, please see section 5 Guide.
4 The Menubar Parental Controls allows you to temporarily disable or enable all parental controls. For information on Parental Controls, see section 9 Parental Controls. Note: Parental Controls will not appear until you have created parental control settings. Settings offers access to creating parental controls and setting blocked channels, determining how things appear on screen, and creating, editing and deleting user accounts. For information on Settings, see section 10 Settings.
Guide Layout Favorite List Indicates the favorite list currently in use. Picture-in-Picture Allows you to watch TV while you are in Guide. Info Area Provides information about the currently highlighted program. Highlight Indicates what program listing is currently in focus. Program Listings Shows channel number and abbreviation and program listings for each channel. Program listings may include icons to indicate a setting or feature for a particular program.
5 Guide Introducing Guide Guide is the place to quickly find out what’s on now and what’s playing later. You can set reminders or recordings for upcoming programs in Guide. Go To Guide There are two ways to go to Guide. Press GUIDE, or… Press MENU, highlight Guide, and press OK. Parts of Guide A diagram of the Guide screen is shown on Guide Layout. Getting Around Guide To navigate Guide… Press the direction buttons to move the highlight. Jump to a channel by entering the channel with the Number Pad (0-9).
5 Guide Recording will automatically record the program to your set top box. Note: Your set top box must support recording to use the Record event. Set A Reminder, Auto Tune or Recording Step 1: Pick A Program Find the program you want. Highlight its listing and press OK. Note: If you are setting a recording, highlight the listing and press Record instead of OK, then skip steps 2 and 3. Step 2: Set The Reminder, Auto Tune or Record Highlight or or and press OK. You will then be returned to Guide.
5 Guide Press INFO to display the reminder. Highlight the button showing the program name and press OK to tune to that program, or highlight Cancel and press OK to ignore the reminder. Step 4b: Your Auto Tune Just before the program begins, a message will display, giving you the option to tune in or cancel. You can choose either option, or just wait, the pop up will go away, and the system will tune you to the correct channel.
5 Guide Step 1: Pick A Program Find any episode of the series you want to record. Highlight the program listing and press OK. Step 2: Set The Recording Highlight Record Series and press OK. Step 3: Return To Guide Once you have set the series recording you will be returned to Guide. The program listing now shows an icon next to the program’s name. Series Recording set Every upcoming episode of the series will be recorded.
5 Guide Step 1: Pick An Upcoming Recording Locate the program to be recorded. Highlight its listing and press OK. Step 2: Edit Recording From the options shown for this program, highlight Edit Recording and press OK. Step 3: Pad Start and End Times Use the up and down arrow keys to choose Pad In or Pad Out. Once you see arrowheads to either side of the Pad In or Pad Out box, use the left and right arrow keys to adjust the Pad In time or Pad Out time.
5 Guide Edit A Series Recording Note: Recording is not available if your set top box doesn’t support it. Once you have created a series recording, you can adjust which episodes of the series are recorded and which are skipped. Step 1: Pick A Series Recording Locate any program in the series to be recorded. Highlight its listing and press OK. Step 2: Edit Series Recording From the options shown for this program, highlight Edit Series Recording and press OK.
5 Guide Preference determines whether to record the program when shown in standard definition or only when shown in high definition. Episodes determines whether to record re-runs and new episodes of the series or only new episodes. Pad In and Pad Out determines how much time to add at the start and end time of the recording so that none of the program is missed. Limit To determines how many episodes of the series are saved.
5 Guide Cancel An Auto Tune, Reminder, Recording or Series Recording You can cancel any event you have previously scheduled directly from Guide. Step 1: Pick The Program Highlight the program with the event you want to cancel and press OK. Step 2: Cancel the Event Depending on the type of event you are cancelling, your option will be or or or Highlight the option you want and press OK. Step 3: Return to Guide After you press OK, you will return to the Guide.
5 Guide Guide and Favorite Lists While in Guide, you can cycle through your Favorites lists by pressing Guide repeatedly. Each press will activate the next Favorites list. The name of the active Favorites list is shown on the green tab in the picture-in-picture area. This causes Guide to only display the channels included on that Favorites list. Pressing Guide once you have cycled through all Favorites lists will exit Guide.
5 Guide and Pay Per View Introducing Pay Per View Pay Per View allows you to watch exclusive sporting events and other content in the privacy of your home with no long lines, big crowds, expensive concessions and seats in the “nose bleed” section. Go To Pay Per View Pay Per View channels are listed in Guide in red. Pay Per View movies are listed in purple. Other Pay Per View programs are in blue. Buy Pay Per View Step 1: Pick The Program Highlight the Pay Per View program you want to buy and press OK.
5 Guide and Pay Per View Step 3: Confirm Your Purchase Highlight the box next to Enter PIN and enter your Pay Per View PIN using the Number Pad (0-9). For more information on PINs, see section 10 Settings. If you want to allow any other user accounts to be able to watch this Pay Per View, highlight the checkbox next to Share PPV and press OK. For more information on user accounts, see section 10 Settings. Finally, highlight the Buy button and press OK.
6 Rentals Introducing Rentals and VOD (Video on Demand) Rentals provides access to VOD (Video on Demand) movies and programs. It’s like renting from the local video rental store, only better. You can choose from the most recent movies and older favorites, along with favorite TV shows, music videos and local programming.
6 Rentals Step 2: Browse The Rentals When you choose a category, a list of available VOD Rentals for that category are shown to the right. Highlighting a VOD Rental will list information for that Rental in the upper left portion of the screen. Note: At any time during this process, you can press the left arrow button to return to a previous set of categories. Rent A VOD Rental Step 1: Pick A Rental Follow Steps 1-2 for “Browse Rentals” to find a VOD Rental in which you are interested. Press OK.
6 Rentals Step 2: Rent Highlight Rent and press OK. Step 3: Confirm Your Rental The confirmation screen appears. If you want other users to be able to watch this VOD Rental, highlight the Share Rental check box and press OK. Now highlight the text box next to Enter PIN and use the number pad to enter your PIN, then highlight Rent and press OK to confirm your VOD Rental. Watch Your VOD Rental You can play your VOD Rental from Rentals or from Vault. Note: For information on the Vault, see section 8 Vault.
6 Rentals Step 2: Play Your Rental Highlight Play From Start and press OK to start play at the beginning of the program. If you have already watched part of the program and want to pick up where you left off, highlight Play From Last and press OK. Controlling Rental Playback While watching a VOD Rental, you can use the Playback Control buttons to pause, rewind, fast forward or stop playback. Press Pause to halt playback at the current point.
7 DVR Introducing DVR DVR allows you to record programs digitally without the need for tapes or discs, as well as pause live TV. Note: If your set top box does not support Recording, please contact customer service for an upgrade. Quick Recording The fastest and easiest way to begin recording is to use the Record button on your remote control.
7 DVR Pause Live TV (PLT) Recording capability also allows you to pause live TV (PLT), meaning a channel that you are currently watching. This can allow you to walk away from your TV and then return without missing anything. You can fast forward from the point where you paused to the point where you catch up with live TV. While watching a channel, PLT will temporarily store what you have watched so you can rewind to when you started watching that channel.
7 DVR DVR Playback Controller Any time you press one of the Playback Control buttons while watching a previously recorded program, the DVR playback controller is displayed. The box to the left indicates the playback function in use. The bar in the middle gives a visual representation of where you are in the recording. The lighter section indicates how much of the recording has been played.
7 DVR Go To Recordings Highlight Recordings and press OK. A list of your recorded programs appears to the right. Recordings you have not yet watched are listed with white text; those you have are listed with grey text. If a program is still being recorded a red dot icon will appear to the left of the program’s name. In the lower right of the info area a percentage full item is shown. This indicates the percentage of total recording space used.
7 DVR Watch A Recorded Program Step 1: Pick A Recording Highlight the recording you want to watch and press OK. Step 2: Play The Recording Highlight OK. and press Step 3: Watch The Recording You will exit to your recording as it begins playing. The Infobar will appear for a few seconds with a green icon to the right to indicate you are playing a recording. While watching your recording, you can use any of the Playback Control buttons on your remote just as you would if watching a videotape or DVD.
7 DVR Step 2b: Unlock The Recording If you select a locked program in Step 1, the Lock option will instead be Unlock. Highlight Unlock and press OK. When the program is unlocked, the padlock icon is removed. Deleting A Recording Step 1: Pick A Recording Highlight the recording you want to delete and press OK. Step 2: Delete The Recording Highlight and press OK. Step 3: Confirm Delete Highlight Yes and press OK to confirm, or No if you change your mind.
7 DVR Cancel A Recording Event Step 1: Pick A Recording Event Highlight the recording event you want to cancel and press OK. Step 2: Cancel The Recording Event Highlight Cancel Recording and press OK. Step 3: Recording Canceled Once you have canceled the recording event, the entry for that recording event is removed from the list.
7 DVR Schedule An Event You can schedule a recording, reminder or auto tune event in exactly the same way as you would when choosing Schedule Event from Guide. Go To Schedule Event Highlight Schedule Event and press OK. Schedule An Event Once you choose Schedule Event the Schedule Event window appears. Highlight the setting you want to change and press OK. Use the up or down direction buttons to change the setting. Press OK to enter your change.
8 Vault Introducing Vault Vault stores all purchased programming, a list of your scheduled reminder and auto tune events, messages about your service, and a log of your Caller ID. The Vault Menu Video provides access to your VOD Rentals you have purchased from Rentals. PPV Events allows you to purchase and view a concert, sporting or other pay per view event. Reminders lists all reminder and auto tune events you have created. From here, you can cancel a reminder or auto tune.
8 Vault Watch A Rental Video Step 1: Pick Your Video Rental Highlight your Video Rental and press OK. Step 2: Play Your Rental Highlight Play From Start and press OK to start playing at the beginning. If you have already watched part of the program and want to pick up where you left off, highlight Play From Last and press OK. Introducing PPV Events PPV Events allows you to purchase and watch concerts, sports or other pay per view events. Go To PPV Events Highlight PPV Events and press OK.
8 Vault Purchasing PPV Events Use the arrow buttons to highlight the item you want to purchase then press OK. Once purchased you can return to the item in Vault and press OK to view or record the event at its scheduled time. Introducing Reminders Reminders lists all reminder and auto tune events you have created. From here you can cancel a reminder or auto tune. Go To Reminders Highlight Reminders and press OK. A list of your reminders and auto tunes appears to the right.
8 Vault Introducing Messages Messages allows you to view any messages about your service. Messages may inform you of promotional offers, upcoming Video on Demand events, service upgrades or billing alerts. Whenever you receive a new message an alert will appear on your screen. Press Info on your remote to display the message, or press Exit to ignore the alert and view the message later. Go To Messages Highlight Messages and press OK. A list of all available messages appears to the right.
8 Vault Go To Caller ID Highlight Caller ID and press OK. A list of received calls appears to the right. Highlighting a Caller ID log entry will display the name and number of the caller, and the date and time of the call in the upper left corner of the screen. Delete A Caller ID Entry Step 1: Pick The Entry Highlight the Caller ID listing you want to delete and press OK. Step 2: Delete Caller ID Log Entry Highlight Delete and press OK to remove the entry, or Cancel if you want to keep it.
9 Parental Controls Introducing Parental Controls Note: Parental Controls must first be set up in Settings before the Parental Controls on/off button will appear on the Menubar. Parental Controls lets you turn on and off all parental controls for your service. With Parental Controls on, the kids can watch TV without you constantly worrying they may see something inappropriate. With Parental Controls off, adults can watch their programs without repeatedly entering a password.
9 Parental Controls Disable Parental Controls Press OK. Use the Number Pad to enter your parental controls password. Then highlight OK and press OK. When you disable parental controls, they will remain that way until you turn them back on, or the Parental Controls Time Out is reached. The time out is the maximum period of time for which Parental Controls will be disabled. At the end of the time period, the system will automatically restore Parental Controls.
10 Settings Introducing Settings Settings gives you control over your video service. You can choose to share rentals, change how alerts appear on your screen, create parental controls, block channels and change the appearance of your screens using Themes. You can also create user accounts for members of your family. Go To Settings Press Menu and highlight Settings. Then enter your password, highlight OK and press OK. There are two main sections of Settings: Preferences and Users.
10 Settings Enable Caller ID Enable Caller ID turns on or off screen alerts for incoming Caller ID. To turn Enable Caller ID on or off, highlight the check box and press OK. Channel Blocking Channel Blocking enables or disables the list of channels you have blocked. Programs on blocked channels cannot be watched regardless of the rating of the program(s) being shown. To turn Channel Blocking on or off, highlight the check box and press OK.
10 Settings Program Alarm Program Alarm determines how early a reminder or auto tune will be shown once you set a program reminder or auto tune. To set Program Alarm, highlight the option box under Program Alarm and press OK. Then press the right or left direction button to display 0 seconds, 30 seconds, 2 minutes or 5 minutes, then press OK. 0 seconds will display your reminder or auto tune at the exact time the program begins.
10 Settings The Channel Blocking list will appear. To block/unblock a channel, highlight the channel entry and press OK. To go to the next screen of channels, press the up or down direction button. To save your changes and return to the Preferences screen, highlight Update and press OK. Parental Control Edit Parental Control Edit allows you to set the master parental controls that affect all users. To edit parental controls for all users, highlight the Parental Control Edit button and press OK.
10 Settings TV Rating TV Rating determines the highest rating for television that will not be blocked. To set TV Rating, highlight the option box next to TV Rating and press OK. Use the direction buttons to cycle through available ratings, then press OK. Note: For more information on TV ratings, see “TV Ratings” in the back of this book. Unlock Timeout Unlock Timeout determines how long parental controls will remain disabled when turned off from the Main Menu.
10 Settings Working With Settings/Users User accounts allows you to have separate parental controls, purchase limits and themes for different family members. Users Settings allows you to add a user account, edit an existing user account, change parental controls for a user account, or delete a user account. Separate user accounts allows different members of your family to have their own parental controls, purchasing limits and themes.
10 Settings Use the direction buttons to highlight a letter or number and press OK to add it to the login name. Once you have entered the desired name, highlight Done and press OK to return to the Create New User screen. Highlight New Password to enter the password for the new account. Use the number pad on your remote to enter the password. Highlight Confirm Password to reenter the password for the new account. Use the number pad on your remote to re-enter the password exactly.
10 Settings Highlight Enter PIN to enter the PIN used to purchase Video on Demand rentals for the new account. Use the number pad on your remote to enter the PIN. Highlight the Enable Caller ID check box and press OK to enable or disable Caller ID alerts to appear on screen for this user account. Once you have entered the settings for the new account, highlight Submit and press OK.
10 Settings Use the direction buttons to highlight a letter or number and press OK to add it to the login name. Once you have entered the desired name, highlight Done and press OK to return to the Edit User screen. Highlight New Password to change the password. Use the number pad on your remote to enter a numeric password. Highlight Confirm Password to reenter the password. Use the number pad on your remote to exactly re-enter the password.
10 Settings Highlight Enter PIN to enter the PIN used to purchase Video on Demand rentals. Use the number pad on your remote to enter the PIN. Highlight the Enable Caller ID check box and press OK to enable or disable Caller ID for this user. Once you have made all changes to this account, highlight Submit and press OK. Edit Master User Account Editing the Master Account is slightly different. You can only change the password and PIN.
10 Settings Movie Rating Movie Rating determines the highest rating for movies that will not be blocked. To set Movie Rating, highlight the option box next to Movie Rating and press OK. Use the direction buttons to cycle through available ratings, then press OK. Note: For more information on movie ratings, see “Movie Ratings” in the back of this book. TV Rating TV Rating determines the highest rating for television that will not be blocked.
10 Settings To turn Show Info For Blocked Programs on or off, highlight the check box and press OK. Content Rating Content Rating determines the type of content that will be blocked: S - Sexual Situations, D - Suggestive Dialogue, V - Violence, L - Language and F - Fantasy Violence. To block a particular type of content, highlight the check box to the right of that content item and press OK.
11 Favorites Introducing Favorites Favorites allows you to create, edit, choose or delete a list of your favorite channels. You can even have multiple favorites lists. Go To Favorites Press Menu and highlight Favorites, then press OK. You will be presented with a screen with options to choose, edit, create or delete a favorites list, or cancel.
11 Favorites Step 3: Choose Your Favorite Channels Highlight a channel to add to or remove from your favorites list and press OK. A channel included in the favorites list shows a heart icon right of the channel info. to the To go to the next screen of channels, press the down direction button. To save your favorites list, highlight Update at the bottom right of your screen and press OK.
12 Search Introducing Search Search allows you to enter the name or partial name of a program or video you are looking for and have your service find any program matching the text you enter. Go To Search Press Menu and highlight Search, then press OK. Search For A Program Step 1: Enter The Program Title The highlight will be on the Search text box when the Search screen appears. Press OK and a keyboard will appear to the right of the screen.
12 Search Note: It is best to enter as little as possible when searching. Usually the first 3 or 4 letters in the name will be enough to find what you want. Step 2: Search Highlight Search Guide and press OK. Then choose Quick Search to only search program titles. Choose Extended Search to search program titles, program info and descriptions. The system starts searching for all programs that match your search criteria.
13 MyMedia Introducing MyMedia MyMedia is a new feature of Pioneer DTV that gives you access to news, sports, local weather, entertainment including local movie show times and synopses, community information and customer care. Go To MyMedia Press Menu, then highlight MyMedia and press OK|Select. You can also access MyMedia by pressing the Media button on your remote. Once MyMedia is shown, use the direction buttons to highlight any item, then press OK to select that item.
Set Top Box Amino 110 Set Top Box 1 2 3 4 5 6 7 1. 5V DC Provides power to the set top box. 2. Network Connects the set top box to the video service using a CAT5 Ethernet cable. 3. USB (Universal Serial Bus) Connects the set top box to technician’s equipment and other devices. 4. SPDIF Digital Out Connects the set top box to a home theater system to provide surround sound audio - provides audio only. 5.
Set Top Box Amino 130 Set Top Box MADE IN CHINA A/V OUT SPDIF 5V DC Macrovision Corp. US patent no’s apply AmiNET130 602106D000140 2 3 4 5 IN ® © 2002-6 Amino Communications Ltd 1 OUT 6 C 7 US 8 9 1. 5V DC Provides power to the set top box. 2. Network Connects the set top box to the video service using a CAT5 Ethernet cable. 3. USB (Universal Serial Bus) Connects the set top box to technician’s equipment and other devices. 4.
Set Top Box Amino 530 Set Top Box 1 2 3 4 5 6 7 8 9 10 11 1. Network Connects the set top box to the video service using a CAT5 Ethernet cable. 2. USB (Universal Serial Bus) Connects the set top box to technician’s equipment and other devices. 3. HDMI (High Definition Media Interface) Connects the set top box to an HDTV to provide best quality HDTV - provides video and audio. 4. S-Video Connects the set top box to your TV to provide high-quality video - provides video only. 5.
Set Top Box Entone Amulet 1 2 3 4 5 6 7 8 9 10 1. RF TV Connects the set top box to your TV using a standard coax cable - provides audio and video. 2. CH3 / CH4 Determines the channel the set top box uses to output video service to the TV over the RF TV connection - adjust if a local over-the-air channel is interfering with reception. 3. ANT IN Connects the set top box to a wall jack using coax cable to provide video service. 4.
Movie Ratings MPAA (Motion Picture Association of America) Ratings System G – General Audience This is a film which contains nothing which would, in the view of the MPAA Rating Board, be offensive to parents whose younger children view the film. PG – Parental Guidance Suggested The theme of a PG-rated film may itself call for parental guidance. There may be some profanity in these films. There may be some violence or brief nudity.
TV Ratings TV Parental Guidelines Ratings System The TV Parental Guidelines ratings provides program ratings, and content ratings to provide a clearer idea of the reason for a program’s rating Program Ratings TV-Y – All Children This program is designed to be appropriate for all children. TV-Y7 – Directed to Older Children This program is designed for children age 7 and above. It may include mild fantasy violence or comedic violence.
www.ptci.