
- Universal printer MAINTENANCE OWNER'S MANUAL


29
MAINTENANCE
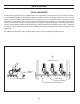
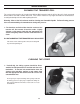
3 - Blot the surface of the die with a clean paper towel to dry
as shown in and reinstall the clean dies on the coder.
CLEANING THE PRINTING DIES
All inks which are formulated for printing on non-porous surfaces contain a resin binder which bonds the dye or
pigment in the ink to the surface of the material being printed. As the ink begins to dry, this binder becomes
“tacky” or “sticky”. While in this stage of the drying process, the tack on the printing dies will tend to pick up both
airborne dust and any dust or dirt on the surface of the material being printed. After some period of use, the
accumulation of contaminates on the printing dies will cause degradation of the print quality. When this happens,
the dies should be cleaned or replaced. Cleaning the printing dies is a very easy process and, excluding exces-
sive wear to the die face, will restore the print quality of the coder.
The easiest method of cleaning Printing Dies requires the appropriate solvent for the ink being used, a pair of
rubber gloves, safety glasses, an apron to protect your clothing is recommended, a toothbrush, some clean
paper towels and a plastic bag to protect your workbench from staining. (Naturally, the toothbrush will never be
suitable for oral hygiene use after this process.)
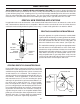
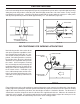
1 - Place the contaminated Printing Die on top of several lay-
ers of paper towels to absorb the excess solvent. Pour
just enough solvent on the face of the die to cover the die
face.
2 - Using the toothbrush, carefully scrub the face of the die
to remove the contamination and old ink as shown in. Add
more solvent as necessary and repeat the process until
the die is clean.
FIGURE 51
FIGURE 52
FIGURE 53
Do not submerge or soak the dies in solvent as this may cause
swelling of the rubber compound.