Computerized Controls Printer Driver and Graphics Software Installation, Setup, and Operation Instructions Using Microsoft Windows 95/98/ME/2000/XP Universal Laser Systems, Inc. 16008 North 81st Street Scottsdale, AZ 85260 USA Technical Support Department Phone: 480-609-0297 Fax: 480-609-1203 Web Based Email Support: www.ulsinc.
Notice This publication and its contents are proprietary to Universal Laser Systems, Inc. (ULS), and are intended solely for the contractual use of ULS, Inc. customers. While reasonable efforts have been made to assure the accuracy of this manual, ULS shall not be liable for errors contained herein or for incidental or consequential damage in connection with the furnishing, performance, or use of this material.
Table of Contents Section 1 – Printer Driver Installation Installation ........................................................................................................................ 1-1 Windows 95/98/ME .......................................................................................................... 1-1 Windows 2000/XP ............................................................................................................
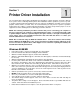
Section 1 Printer Driver Installation The ULS printer driver allows Microsoft Windows based graphics software programs to interface with the laser system. Before continuing with the printer driver installation and the operation of your laser system, a complete and thorough understanding of how your computer, the Windows operating system, and your graphics software work is essential. Also, we recommend that you read your laser system’s operations manual before proceeding.
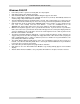
PRINTER DRIVER INSTALLATION Windows 2000/XP • • • • • • • • • • • • Power ON your PC. If your PC is already ON, close all programs. Click Start, and then click Printers and Faxes. Click Add Printer. When the Add Printer Wizard dialog box appears click Next. Choose Local Printer attached to this computer and deselect (uncheck) Automatically detect and install my Plug & Play Printer and then click Next. Use the following Port (LPT1) should already be selected. We recommend the use of this port.
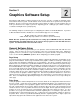
Section 2 Graphics Software Setup Choosing the right graphics software program to run the laser system is essential for maximum usage and control of the laser system. Not all software can be used to run the laser system because many have limitations. Because you may be using word processing software to output to your laser printer does not mean you should use it to output to your laser engraving system. Setting up you software correctly is essential to running the laser system properly.
PRINTER DRIVER CONTROLS Power Control through Color Selection The laser system allows the use of 8 different colors to access 8 different power settings when cutting and engraving. The printer driver controls this feature. When using this power change feature with driver, the colors that are used MUST exactly match the colors listed in the driver. The colors are black, red, green, yellow, blue, magenta, cyan, and orange.
PRINTER DRIVER CONTROLS Image Processing Order When cutting or engraving a graphic image, the laser system will perform all engraving first, and then proceed to vector cutting. Raster engraving will proceed in the exact order of the colors listed in the driver. For example, all black filled objects will engrave first, then all red filled objects, then all green filled objects and so on.
PRINTER DRIVER CONTROLS The laser system can print all three types of bitmaps providing that either the driver or the bitmap imageprocessing program converts the grayscale and/or color bitmaps into a monochrome bitmap. Essentially, the laser system is a monochromatic printer, either it fires the beam to burn a dot or it does not fire the beam to leave an empty dot on the material. There are several different bitmap storage formats available: TIF, JPG, BMP, PCX, and others.
PRINTER DRIVER CONTROLS Encapsulated Postscript (EPS) Images Bitmap images cannot be cut by the laser system only engraved. The only way to have the laser system cut out or vector a bitmap is to first convert it to a vector file format such as an EPS. Raster to vector conversion programs are available that trace the bitmap (this only works well with monochrome bitmaps) and creates a separate EPS vector file. These EPS files can then be imported into the graphics program and printed out from there.
PRINTER DRIVER CONTROLS CorelDRAW 8 NOTE: CorelDRAW 8 is NOT compatible with Windows 2000 or Windows XP. ONLY run it in the Windows 95/98 or Windows ME environment. 1. 2. 3. 4. 5. 6. 7. 8. 9. 10. 11. 12. 13. 14. Make sure CorelDraw 8 is installed on your computer and functioning properly. Make sure that you have downloaded and installed all service releases and patches from the CorelDRAW website www.corel.com. At the time this document was released, the latest patch file names were DR8HLP.
PRINTER DRIVER CONTROLS CorelDRAW 9 NOTE: There are different software setup instructions depending on whether you are using Windows 95/98/ME or Windows 2000/XP. It is extremely important that you follow the correct instructions based on your operating system otherwise you will have problems using CorelDraw with your laser system. We highly recommend upgrading to Corel 11 or 12 for the best results in the Windows 2000 or XP environment. Windows 95/98/ME and CorelDRAW 9 1. 2. 3. 4. 5. 6. 7. 8. 9.
PRINTER DRIVER CONTROLS Windows 2000 or Windows XP and CorelDRAW 9 1. 2. 3. 4. 5. 6. 7. 8. 9. 10. 11. 12. 13. 14. Make sure that you have installed all Service Releases and software patches from Microsoft. For Windows 2000, this includes Service Pack 1, Service Pack 2, and Service Pack 3. If you are reading this document from the ULS Windows Printer Driver CD, as a service to you, you can find these files on this CD. For the latest releases, check Microsoft’s website, www.microsoft.com.
PRINTER DRIVER CONTROLS CORELDRAW 10 NOTE: There are different software setup instructions depending on whether you are using Windows 95/98/ME or Windows 2000/XP. It is extremely important that you follow the correct instructions based on your operating system otherwise you will have problems using CorelDraw with your laser system. We highly recommend upgrading to Corel 11 or 12 for the best results in the Windows 2000 or XP environment. Windows 95/98/ME and CorelDRAW 10 1. 2. 3. 4. 5. 6. 7. 8. 9.
PRINTER DRIVER CONTROLS Windows 2000 or Windows XP and CorelDRAW 10 1. 2. 3. 4. 5. 6. 7. 8. 9. 10. 11. 12. 13. 14. 15. Make sure that you have installed all Service Releases and software patches from Microsoft. For Windows 2000, install Service Pack 3. If you are reading this document from the ULS Windows Printer Driver CD, as a service to you, you can find the file on this CD. For the latest releases, check Microsoft’s website, www.microsoft.com.
PRINTER DRIVER CONTROLS CorelDRAW 11 NOTE: There are different software setup instructions depending on whether you are using Windows 95/98/ME or Windows 2000/XP. It is extremely important that you follow the correct instructions based on your operating system otherwise you will have problems using CorelDraw with your laser system. Windows 95/98/ME and CorelDRAW 11 1. 2. 3. 4. 5. 6. 7. 8. 9. 10. 11. 12. 13. 14. 15.
PRINTER DRIVER CONTROLS Windows 2000 or Windows XP and CorelDRAW 11 1. 2. 3. 4. 5. 6. 7. 8. 9. 10. 11. 12. 13. 14. 15. Make sure that you have installed all Service Releases and software patches from Microsoft. For Windows 2000, install Service Pack 3. If you are reading this document from the ULS Windows Printer Driver CD, as a service to you, you can find the file on this CD.
PRINTER DRIVER CONTROLS CorelDRAW 12 Windows 2000 or Windows XP and CorelDRAW 12 Note: CorelDRAW 12 was optimized for Windows 2000/XP. We suggest not running it under Windows 95/98. Therefore, we have only included setup instructions for Windows 2000/XP 1. 2. 3. 4. 5. 6. 7. 8. 9. 10. 11. 12. 13. 14. 15. Make sure that you have installed all Service Releases and software patches from Microsoft. For Windows 2000, install Service Pack 3.
PRINTER DRIVER CONTROLS AutoCAD 14/15 and AutoCAD LT 97/98 for Windows Printer Setup • • • Open AutoCAD or AutoCAD LT. Click CANCEL if the Start Up window appears. Click File, then Printer Setup, then New, and then System Printer ADI 4.3. Type in a printer name in the Add a description box (M-360 for example) and click OK.
PRINTER DRIVER CONTROLS AutoCAD 2000i, 2002 and 2004 for Windows 2000/XP NOTE: AutoCAD version 2000 is not compatible with ULS laser systems. You must upgrade to version 2000i or higher. Also, we recommend installing ULS printer driver version 1.07F or higher. 1. 2. 3. 4. 5. 6. 7. 8. 9. 10. 11. 12. 13. 14. 15. Make sure the ULS Printer driver is installed prior to setting up AutoCAD. If AutoCAD is already installed and you are just upgrading ULS printer drivers: • Close all open programs.
PRINTER DRIVER CONTROLS Adobe Illustrator CS for Windows 2000/XP Adobe Illustrator CS, in combination with the new ULS printer driver version 1.07F or later, is now capable of both raster and vector output as well as full-field engraving capability. The following procedure assumes that you are familiar with the use and operation of Windows 200 or XP, and Adobe Illustrator CS. Procedure 1. Close all Windows programs. 2. Upgrade to Adobe Illustrator CS but do not launch it yet. 3.
Section 3 Printer Driver Controls This section describes the use of each of the features of the printer driver. The printer driver controls are similar between the Windows 95/98/ME and the Windows 2000/XP operating systems. THE WINDOWS 2000/XP PRINTER DRIVER HAS MORE CONTROLS AND FEATURE THAN THE WINDOWS 95/98/ME DRIVER AND WE HIGHLY RECOMMEND ITS USE.
GRAPHICS SOFTWARE SETUP Laser Settings Tab Pen Mode The driver uses the word “PEN” because the laser system works similar to the operation of a pen plotter output device. A pen plotter physically selects a colored pen that matches the same colored objects in your graphic, called “color mapping”, and draws the graphic, on paper, in that color.
GRAPHICS SOFTWARE SETUP PPI Available settings are 1 to 1000. The laser beam is always pulsed and never “on” continuously even though it may appear that way. The PPI setting indicates how many laser pulses, per linear inch, the laser cartridge will emit. The pulsing of the laser beam is electronically linked to the motion system. These pulses will always fire, equally spaced, from one to the next, regardless of changes in speed.
GRAPHICS SOFTWARE SETUP DPI (Windows 95/98/ME) or Image Density (Windows 2000/XP) This setting determines how many raster strokes per vertical inch of travel the motion system steps down to produce the engraving. It can also be referred to as the vertical lines per inch or fill spacing. There are six DPI settings to choose from 1000, 500, 333, 250, 200 and DRAFT (Win 95/95/ME).
GRAPHICS SOFTWARE SETUP Save By clicking Save, the “Save Engraving Setup” dialog box will appear and will allow you to enter in a file name. All settings will be stored in this file that has a “.LAS” extension. DO NOT rename the extension; the driver will not recognize the file as a laser settings file if it does not have the “.LAS” extension name. These files can be stored in any directory on your hard drive or floppy disks and you can have as many setting files as your disks can hold.
GRAPHICS SOFTWARE SETUP Choose Your Material The best material to use is one that has the highest contrast such as black anodized aluminum, black marble, or black cored engravers plastic with a white micro surfaced coating. While other materials may work ok, they might not produce the highest quality. Establishing Nominal Power Choose your %Speed and you Image Density settings. Set the PPI to 1000 but don’t set the %Power setting just yet.
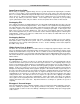
GRAPHICS SOFTWARE SETUP Engrave the calibration scale, onto your material, using the nominal power setting you established earlier. Compare it to the actual calibration scale that you see on screen or in this manual. If the response of your material to the laser beam was perfectly linear, then the result should look exactly like the calibration scale. Most likely you will find that several rectangles appear to have the same appearance of shading.
GRAPHICS SOFTWARE SETUP To obtain a “chiseled” or “sunken” engraving, create a “positive” graphic so that the background is white and the text or objects are black. This way, the text or graphic engraves and the background remains untouched, producing a “chiseled” effect. Configure Button Selecting it brings up a pop-up window so you can choose from the following settings: Taper Selection Choose from various types of shoulder angles. Experiment with each setting and note the result.
GRAPHICS SOFTWARE SETUP Engraving Field Tab Language Select from many different languages in this drop down list. Some language changes will not take effect until the printer control panel is closed and then re-opened. Version Clicking Version will display a pop-up dialog box containing information on the current driver version number as well as the driver’s copyright notice. If contacting technical support, it is important to have the version number of your driver available.
GRAPHICS SOFTWARE SETUP Rotary Fixture This option is available for most models. Please refer to operations manual on how to install and use the Rotary Fixture. Advanced Tab (Windows 2000/XP) Dithering Dithering settings are used when printing grayscale or color bitmapped images such as TIF, JPG, and BMP formatted images.
GRAPHICS SOFTWARE SETUP Print Direction Your choices are Down or Up. The default direction is Down which begins engraving at the top of the field and finishes at the bottom. On some materials you may get better results by starting at the bottom and engraving towards the top of the field (Up). This is because the engraving smoke is being drawn towards the top of the field.
GRAPHICS SOFTWARE SETUP DENSITY: Adjusts the difference between the entire unengraved and engraved areas. If the parameter is too high, then the entire engraved image may appear thick, bold or over powered. Too low of a setting may cause the image to appear thin and pixels or parts of characters may disappear altogether. The opposite effect would occur on inverted images such as white text on a black background.
GRAPHICS SOFTWARE SETUP Engrave it with the settings determined in step one but this time ENABLE Image Enhancement and set CONTRAST to 0, DEFINITION to 0, DENSITY to 100 and the TUNING value to +4. You should expect the results to appear fuzzy, having parts of the characters missing, and overall engraving quality to be not as good as expected. This is normal.
GRAPHICS SOFTWARE SETUP NOTE: Image Enhancement will cause files to take longer to print. Since most materials do not require the use of Image Enhancement, use this feature only as needed. Also, Image Enhancement and 3D Effects cannot be selected at the same time. The printer driver will automatically notify you if you attempt to do so. Use 1 Laser (SuperSpeed – 600 and SuperSpeed – 660 models only) Enables only the top laser and disables the bottom laser from emitting a beam during raster engraving.
GRAPHICS SOFTWARE SETUP Vector Scaling This feature allows you to calibrate vector cutting or vector engraving to your particular application. To calibrate the system, as an example, draw a precise, 5” x 5” square in your graphics software. In the printer driver, set the laser power and speed setting to vector mark (do not cut through) this square onto some scrap material.
GRAPHICS SOFTWARE SETUP Force Old Corel 4.0 Bitmap Mode Use this option ONLY if you are printing grayscale bitmaps directly from CorelDRAW 4. CorelDRAW 4 has a unique way of converting grayscale bitmaps into a halftone pattern, which is not available in any other version of CorelDRAW. This halftone pattern is based on your Resolution choice in the printer driver (see the chart below). If you are using CorelDRAW 4 but are not printing any grayscale bitmaps, then leave this selection OFF.
GRAPHICS SOFTWARE SETUP Error Diffusion Unlike halftoning, error diffusion scatters the black pixels in a random pattern to represent shading. Error diffusion, as opposed to halftoning, represents the grayscale bitmapped image by adjusting the quantity of black dots as instead of the size of the black dots. The pattern created will be dependent on the quality setting that you choose in the driver with the exception that there is no chart to reference.
GRAPHICS SOFTWARE SETUP Print as a Mirror Image Mirrors the ENTIRE PAGE from left to right (horizontally). It will not mirror individual objects or selections. This is very useful for engraving full sheets rubber stamps because the graphics on screen are non-mirrored and can be proof read easily. Shoulder Choose from one of the preset options by clicking the down arrow in the shoulder type dropdown list and selecting the type of shoulder you desire.
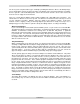
GRAPHICS SOFTWARE SETUP The wizard will ask you to focus the laser system to the material using the Focus A B C D E F GH I J K L MNOP QR S T U Tool and to place the left side of the material at the 4-inch mark, up against In the above example, “K” would be the best choice the top ruler. It will then ask you to enter the Power and Speed settings that you would normally use to engrave this particular material at 100% speed.
GRAPHICS SOFTWARE SETUP 5% 10% 15% 20% 25% Engrave these different power settings and note the LOWEST setting that cleanly engraves the material. To narrow down the precise setting further, take this setting, apply it to the middle rectangle, and subtract 2% going up and 2% going down for each rectangle. For example, let’s say that we think the best setting was 20%. Take the 20% setting, apply it to the middle, and the other settings should appear as shown.
GRAPHICS SOFTWARE SETUP Rotary Rotation If you have purchased the optional Rotary fixture, you may feel the need to calibrate your fixture if your application requires you to engrave or cut completely around the cylinder at least 360 degrees. Only use this option if you completely understand and have used the Rotary Fixture in the past.