Installation, se & Care Guide 30" and 36" FreeoStandin 9 Range Hood
i_i!_!_i!i_iii_!i!_!_i!i_iii_!i!_!_i!i_iii_!i!_!_i!i_iii_!i!_!_i!i_iii_!i!_!_i!i_iii_!i!_!_i!i_iii_!i!_!_i!i_iii_!i!_!_i!i_iii_!i!_!_i!i_iii_!i!_!_i!i_i__i @2007 ElectrduxHome Products, Inc. All rights reserved.
important mmpo ant Safe Safety instructions mnstructions Read all instructions before using this appliance. Save these instructions for future reference. Approved for residential appliances For residential use only Do not attempt to installor operate your appliance until you have read the safety precautions in this manual. Safety items throughout this manual are labeled with a WARNING or CAUTION based on the risk type.
_i_!_i_i!_i_!!!_ii!_i_!!_i_!!_!i_!_!_i_i!_!_i!_!_i!_!_i!_!_i!_!_i!_i_!_!_i_ii_!_!_ii_!_iiiii_!J_i_!_i_i_i_i_i_i_i!!_!i!i_!_!i!_!_ii_ ; Important safety Instructions READ AND SAVE THESE INSTRUCTIONS mmpoAant safety mnstructions dFDOeVIATiNG USE ONLY DO NOT USE RA_tko_fa:,jcua._ly OcPoe_na:ect [O_X_g_ZARDOUS OR EXPLOS,VE MATER,, • .... WA TO REDUCE A. B. C. _ Servicing.
and o_inances. Qualified Installer, check if they perfectly fit with your cabinet/wall. If codes permit and a separate ground wire is used, it is recommended that a qualified electrician determine that the ground path is adequate. 4, Do not use flex ducting. , Do not ground to a gas pipe. Check with a qualified electrician if you are not sure range hood is properly grounded. Do not have a fuse in the neutral or ground circuit.
_!_!_!;;i!_!_i_!_!_i_!_!_i_!_!_i_!_!_i!:;_ii!!_ii!!_i_!i_!i_!i!ii_!i_i_;_i_i!_!!_i_!_ii_!i_i_:i_:i_:i_!_:i_i_i_i_i!_!ii_!i List of Materials List of Materials • • • • Hoodcanopyassemb]ywithb]ower, transition. Lampalreadyinsta]led. Grease filter. GlassCanopy Duct cover. mardwarebagwith: • PlasticGasket. - Template. • Uuctcoversupportbracket (1 piece) • Use, careand installationguide • • Glassbracket(2 Woodscrews(6 pieces) pieces-3/16 .... x 1 3/4) • Hoo,dattachmentanchorsscrews(6pieces- .
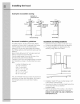
installing the hood mnstaHing the hood For the most efficient air flow exhaust, use a straight run or as few elbows as possible. Vent unit to outside of building, only. On avarage 2 to 3 hours are necessary to complete installation (without considering cut to be done on wall and or on cabinet, installation of ducts, conduit and electrical connections to the mains).
Keepductrunsasshortandstraightaspossible. Ductfittings(elbows andtransitions) reduceairflow efficiency. • Theheightinstallation isdetermined bythe following image.Markthelocation.
installing the hood Mounting the duct cover bracket The duct bracket should be installedagainst the back wall and flush with the ceiling. This bracket will hold the telescopic duct cover in place at the top (this a extra accessory available not included with the hood). Secure the bracket to the wall: • Align the marked centerline on the bracket with the centerline on the wall. Mark 2 screw hole locations in the wall. Drill 5/16" pilot holes in the marked locations. Install wall fastener anchors.
i_i!_!_i!i_ii_!i!_!_i!i_ii_!i!_!_i!i_ii_!i!_!_i!i_ii_!i!_!_i!i_ii_!i!_!_i!i_ii_!i!_!_i!i_ii_!i!_!_i!i_ii_!i!_!_i!i_ii_!i!_!_i!i_ii_!i!_!
installing the hood • Removethe hood. Drive "lower" wood screws, by hand. Remove screws. Mount the hood onto the "upper" screws. Drive and tighten the "upper" wood screws, by hand. Drive and tighten the "lower" wood screws, by hand. J Install the plastic gasket to the front hood flange.
i_i!_!_i!i_ii_!i!_!_i!i_ii_!i!_!_i!i_ii_!i!_!_i!i_ii_!i!_!_i!i_ii_!i!_!_i!i_ii_!i!_!_i!i_ii_!i!_!_i!i_ii_!i!_!_i!i_ii_!i!_!_i!i_ii_!i!_!_i!i_i
installing the hood Making the electrical connections electrical conduit Electrical Shock Hazard House Warning: Turn off power at the service panel before wiring this unit. 120 VAC, 15 or 20 Amp circuit required. wiring ELECTRICAL GROUNDING INSTRUCTIONS THIS APPLIANCE IS Flqq-EDWITH AN ELECTRICAL JUNCTION BOX WITH 3 WIRES, ONE OF WHICH (GREEN/YELLOW) SERVES TO GROUND THE APPLIANCE.
_!_!ii:i_iiii_i_ii_!_!i_i;;_i!_ii_;!_;!_i_i_!_!;i;i;i_!_i_i_i_i_i!;!i;i_ii;_i_ii;_ii_!_ii_ii!_!_;_i_i_i_i_i!!_;ii_;:iii_i_ lo ta,iog .ood Mo,,,,t_,,Qt_,_,J,.,_,_o,,,,_ • • • Position the duct cover over the mounted hood. Slide the bottom of the duct onto the glass area. Position the top of the duct over the duct mountingbracket. Ifatelescopicductcoveris used, grab the upper part of the telescopic duct cover, pull itand place it intheductcover mountingbracket.
®
;!_!!i_!i_!:!_ii_:_i_:_iJ_i!i_%_!_i_i_!_!_i_i:_i_!_!_i_i!_!_;_ control buttons control bu ons Th_s hood_s_qu_pped w_th ane_ectron_e motor and amp centre . .' /he control ......... IS alole ]:o se[/4 alTrerent Tan speeas * fthefansatseeond speed andthe"V' turn ON/OFF ght and has a t met funct on ::::: ::: • Inthefollowingdrawingaredescribedthemainkey functions • • ::: 1\ 2 3 \ / ," @@ f f / / • button is " Button. Seed p Increase / ON ortum ON thefan.
i Specia functions Clock program.,ing The clock can be reprogrammed • • The clock can be displayed in a twelve hour format and valid clock times are from 1:00 to 12:59. The clock can be reprogrammed pressing the "Timer' button for 5 seconds, and after, the clock can be adjusted with the "A"and • • • "V'_butt°ns' Colon ":'" will flash indicating clock programming mode.
For Best resuks iiiiiiiiiiiiiiiii{ii{ii{ii{ii{ii{!i_iii!!i_!!ii_iii_iii_!iiii_!iiii_!_!i_!!i!_ii{!_!_ii_!_ii_i_i • Continuous use of the fan system while cooking helps keep the kitchen comfortable and less humid. _i_ii!i!i__iJ_iii!iii!ii{!!i!!i!!i!!i!!!_i!!iii_ii_ii_!_i_i!!i__iii_!_!___iii___iii___ii__i!i_i!i{i_iii!_!_! • Italsoreducescookingodorsandsoiling moisturethatcreateafrequent needforcleaning.
Care and cleaning Care and cleaning The efficiency of the range hood system depends on the cleanliness of the intake and filters. The frequency of cleaning depends on the amount and type of cooking. • Do not use the ventilating system without the filters in place or with grease-laden filters or surfaces. To avoid risk of fire and explosion do not use flammable liquids or solvents. Always unplug or disconnect the appliance from the power supply before servicing.
i_i!_!_i!i_ii_!i!_!_i!i_ii_!i!_!_i!i_ii_!i!_!_i!i_ii_!i!_!_i!i_ii_!i!_!_i!i_ii_!i!_!_i!i_ii_!i!_!_i!i_ii_!i!_!_i!i_ii_!i!_!_i!i_ii_!i!_!_i!i_i
Warranty information RANGE WARRANTY Your range is protected by this warranty In the U.S.A., your appliance is warranted by Electrolux Home Products North America, a division of White Consolidated Industries, Inc. We authorize no person to change or add to any of our obligations under this warranty. Our obligations for service and parts under this warranty must be performed by us or authorized Electrolux Home Products North America servicer. In Canada, our appliance is warranted by Electrolux Canada Corp.