
Instructions / Assembly

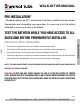
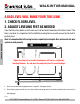

Table Of Contents
- THANK YOU FOR CHOOSING Spa World Corp ®
- CONTACT INFORMATION
- Product Registration*
- UNPACKING THE UNIT
- PRE-INSTALLATION*
- INSTALLATION PREPARATION
- electrical PREPARATION
- INSTALLATION PROCEDURES
- DRAIN CONNECTION
- Connecting the Autodrain
- Installation and extension panels
- Faucet installation
- operating safety instructions
- operating instructions
- CLEANING AND MAINTENANCE
- warranty
- RETURN POLICY

Page 10
WALK-IN TUB MANUAL
OPERATING INSTRUCTIONS
5701 NW 35 Avenue Miami, FL 33142 • Phone 877-360-4454 • Fax 866-560-1060
INSTALLATION PROCEDURES
INSTALLATION PROCEDURES
INSTALLATION PROCEDURES
WARNING! WHEN INSTALLING A JETTED WALK-IN BATHTUB, THE FOLLOWING BASIC
PRECAUTIONS SHOULD BE FOLLOWED.
DANGER! RISK OF ELECTRIC SHOCK. CONNECT ONLY TO SEPARATE CIRCUIT PROTECTED BY A
GROUND FAULT CIRCUIT INTERRUPTER (GFCI) ON PLUG IN UNITS.
NOTE: INSTALLATION MUST PROVIDE ACCESS FOR SERVICING PUMP/MOTOR (ALL TUBS COME WITH AN ACCESS PANEL
FOR THE PUMP/MOTOR).
GENERAL GUIDE-THROUGH
• Install tub waste/overflow according to instructions (see page 11).
• After framing is a complete (see attached diagrams), set product in place to make certain the tub can be
properly leveled. (Caution: If a walk-in bathtub is not resting on all leveling feet, water will not drain properly
and may cause the door to leak) (see page 8).
• Verify the product’s level by checking tub’s deck surface and ensure all leveling feet are touching the
ground (see page 8).
• Electrical connection is made pre-instruction on specified models.
• After plumbing and electrical connections have been made, the tub should be cleaned of dirt and debris.
• Installation is not complete until the tub has been tested in place.