
User's Manual


Wiring instruction (set power wire as an example, the rest can be done in the same manner)
Take off the protection circle
on the pre-stripping wire of
socket cable
1
2
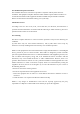
Paste hole papers, and keep the horizontal line parallel with the ground and the red line 1.4m
distance to the ground. Drill 3 screw holes on the wall according to the reminder of hole paper,
drill 1-2 outlet holes according to wiring needs, and use expansion pipe in the parts to knock
into the hole.
3
Please punch out the tail lines from the outlet hole before installing the support.
Attention: If the polarity of the power cable is connected in opposite direction, then the device will not be booted; if connected in
right direction, then the device will be normally booted; power adapter requires DC12-16V, 2A
Steps
5 / 6
Use tool like scissor to strip
(power) cable, and expose the
metal wire
Twist the positive pole of the power cable with
corresponding metal wire, and use black tape to
cover the metal part
Pre-stripping
1.4m
Wall-mount stickers
1.4m calibration tail
Please follow the calibration tail, and
paste this sticker horizontally on the wall
Drill here
Drill here
Drill here
Steps (on the wall):
1. Please follow the calibration tail, and paste
this sticker horizontally on the wall
2. Please follow the marker, and drill the holes
3. Remove the sticker, and install the device
Trapezoidal
screw hole
Countersunk screw
Trapezoidal
screw hole
Screw hole
Screw hole
5
Install the trapezoidal screws on the host, insert the tails into wiring socket, then align the
trapezoidal screws installed on the host with holes on top of the support, to hang the host on
the support. Meanwhile, use hexagon tool or hexagonal screwdriver to tighten the counter-
sunk screw follow the direction indicated, to complete the installation.
4
Move the support to align the 3 holes on it with holes on the wall, and use the screws to fix the
support on the wall.
Ground
Outlet hole
Expansion pipe screw
Wall-mount stickers
1.4m calibration tail
Please follow the calibration tail, and
paste this sticker horizontally on the wall
Drill here
Drill here
Drill here
Steps (on the wall):
1. Please follow the calibration tail, and paste
this sticker horizontally on the wall
2. Please follow the marker, and drill the holes
3. Remove the sticker, and install the device
If the wall has hard foundation, self-tapping screws shall be used together with expansion pipe; if the wall has soft
foundation, use self-tapping screws directly.
Wall