OWNER'S MANUAL PREASSEMBLED AUTOMATIC SECURITY FLOODLIGHTS MOTION SENSOR SECURITY LIGHTING SYSTEMS LiteAide ® HE-100B HE-100BW HE-112 HE-112W HE-117 HE-117W HE-117-2B
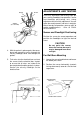
OWNER'S MANUAL FLOOD LAMPS (BULBS) Your security floodlight uses two 150 watt (maximum) incandescent, quartz or halogen flood lamps. if you are replacing an old floodlight installation, save the flood lamps. If you are making a new installation, obtain two flood lamps from your local hardware store or home center. ELECTRICAL POWER CIRCUIT AND WALL SWITCH INSTALLATION If you are not replacing an existing floodlight (or another outdoor light at least 8 feet [2.
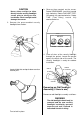
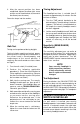
CAUTION Never allow sunlight to shine directly into the security floodlight sensor prior to, during or after installation. Direct sunlight could damage the sensor. 3. Observe three controls on the sensor. Rotate SENS/RANGE (sensitivity) control fully clockwise. Rotate DAYLIGHT/TESTON control fully counterclockwise. Rotate TIME (Time Delay) control fully counterclockwise. 2. Remove the preassembled security floodlight from the box. ADJUST SENS DAYLIGHT TIME RANGE TEST-ON TIME 4.
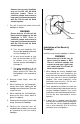
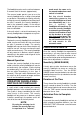
Connect the security floodlight only to 110-120 volt, 60 Hertz electrical power. There is sufficient voltage and current to harm you if you come into contact with the 110-120 volt, 60 Hertz electrical power. BLACK 1. Turn off all electrical power to the old floodlight as follows: WARNING Ensure that the 110-120 volt, 60 Hertz electrical power to the old floodlight is OFF. There is sufficient voltage and current to harm you if you come into contact with the 110-120 volt, 60 Hertz electrical power. A.
WHITE BLACK BARE GREEN (IF SUPPLIED) ADJUSTMENTS AND TESTING Four easy adjustment and testing steps put your security floodlight into operation: sensor and floodlight positioning, test, timing adjustment and sensitivity adjustment. You can make these adjustments and tests in daylight. After a few days of operation, you may want to make readjustments - refer to FINAL ADJUSTMENTS.
3. After the correct position has been established, tighten the elbow joint screw and the sensor head locknut at the end of the elbow (near the cover). Screw the lamps into the sockets. Timing Adjustment The floodlight on-time is variable from 5 seconds to approximately 18 minutes. Set the on-time as follows: 1. Turn the TIME control clockwise to the desired setting. The mid-setting is 9 minutes (approx.). The further it is turned clockwise, the longer the security floodlight remains on when triggered. 2.
The floodlight remains on the set time between 5 seconds and 18 minutes (approximate). The manual mode permits you to turn the security floodlight on for as long a time period as you desire. You end the on-time by manually turning the security floodlight off and then back on after 5 seconds (the security floodlight is now in the automatic mode). In the manual mode, the light sensor, infrared sensor and the timer are disabled.
LIMITED 5 YEAR WARRANTY Universal Security Instruments, Inc. ("Universal") warrants your Universal product to be free from defects in material and workmanship for a period of five (5) years from the date of purchase. This warranty applies only to the original consumer purchaser and only to products used in normal residential use and service.